Good apple pruning is less about cutting a lot and more about choosing the right branches to keep. Understanding how to prune apple trees comes down to timing, structure, and restraint: the goal is a tree that carries fruit on sturdy wood, gets enough light into the canopy, and stays easy to harvest. In this guide, I focus on the cuts that matter, the shape worth aiming for, and the mistakes that usually cost more fruit than they save.
The essentials before you make a cut
- Prune in late winter to very early spring, after the harshest cold has passed and before buds swell.
- Build around one central leader with 3 to 5 well-spaced scaffold branches.
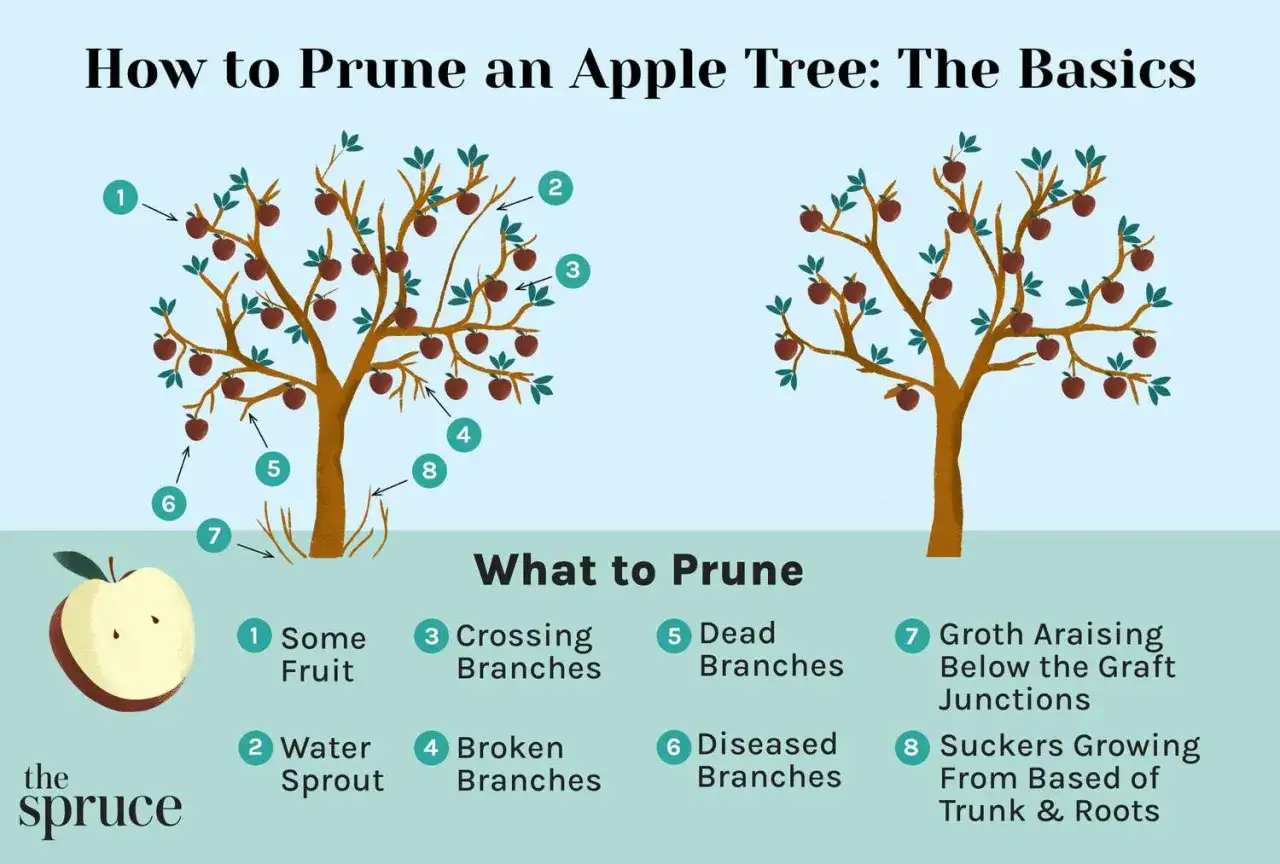
- Remove dead, damaged, crossing, inward-growing, downward-growing, and upright water-sprout growth first.
- Use thinning cuts more often than heading cuts, and cut at the branch collar rather than leaving stubs.
- Keep renovation gentle on older trees. Major corrections usually need 2 to 3 winters, not one hard session.
Prune when the tree can respond well
For most US home orchards, the safest and most useful window is late winter to very early spring. The tree is still dormant, the structure is easy to read, and fresh cuts are less exposed to severe cold than they would be in the middle of winter. If you live in a colder region, I would wait until the worst freezes are behind you; if you are in a milder state, the same rule still applies, just a little earlier on the calendar.
| Timing | Best use | My take |
|---|---|---|
| Late winter to very early spring | Structural pruning, canopy cleanup, size control | The default choice for most backyard apple trees |
| Mid to late summer | Light thinning, controlling vigor, improving light penetration | Useful, but keep it light so you do not stress the tree |
| Deep winter cold spells | Avoid pruning | Fresh cuts and hard freezes are a poor combination |
I use summer pruning only as a control tool, not as the main event. It can calm a vigorous tree and help the fruit color up, but it should not replace the main dormant-season pruning that sets the tree's structure. Once the timing is right, the next decision is the shape you want to protect.
The shape I aim for in a backyard apple tree
The form I usually aim for is a narrow cone or pyramid built around a single central leader. That leader is the main upright stem, and the scaffold branches are the primary side limbs that carry most of the crop. This structure matters because apples need light, and light needs a clear path into the middle of the canopy.
- Keep 3 to 5 main scaffold branches.
- Space those scaffolds about 8 to 12 inches apart vertically.
- Choose branches with wide crotch angles instead of tight V-shaped forks.
- Start the first scaffold roughly 18 to 30 inches above the ground on a young tree.
- Remove branches that compete directly with the leader or create heavy shade in the center.
I do not try to force an apple into a vase shape the way I might with some other fruit trees. Apples fruit best when the structure is open but still anchored around one strong leader. Once that framework is set, pruning becomes maintenance instead of reconstruction.
Make the main cuts in the right order
I start at the top of the tree and work downward, because an open canopy is easier to judge once the upper clutter is gone. The order matters more than most people think: if you remove the wrong branches first, you often end up making bigger cuts than necessary.
- Remove dead, diseased, and broken wood first.
- Cut out suckers from the rootstock, the shoots that rise from the base, and water sprouts on the trunk or scaffold limbs.
- Take out branches that cross, rub, point inward, or hang downward.
- Thin crowded sections so light can reach the center of the tree.
- Shorten an overly long leader or scaffold by cutting back to a strong lateral branch when the tree is getting too tall.
- Stop when the canopy is open but still well furnished with healthy fruiting wood.
| Cut type | What it does | When I use it |
|---|---|---|
| Thinning cut | Removes a branch at the branch collar, the swollen base where the branch joins the limb | Most of the time, because it opens the canopy without pushing a lot of new shoot growth |
| Heading cut | Shortens a shoot and pushes new growth below the cut | Only when I need to redirect growth on a young tree or control length |
Read Also: Grow Asparagus - The Permanent Crop for Decades of Harvests
Use the three-cut method on larger limbs
For bigger branches, I make an undercut first, then a second cut from the top a little farther out, and only then do I make the final cut at the collar. That prevents bark from tearing down the trunk, which is a small detail that saves a lot of damage on older trees.
These cuts set the foundation, but the right amount of pruning changes with the age and condition of the tree, so the next step is to adjust your approach rather than repeat the same pattern everywhere.
Adjust the cut to the tree's age and condition
The biggest mistake I see is pruning every tree as if it were a neglected adult. A young tree needs structure, a productive tree needs light, and an old tree often needs patience.
| Tree type | Main goal | What I do | What I avoid |
|---|---|---|---|
| Young tree | Build the framework | Select the leader, keep 3 to 5 scaffolds, and correct awkward angles early | Heavy cutting that delays growth and fruiting |
| Mature productive tree | Keep light and airflow moving through the canopy | Thin crowded wood, remove vertical shoots, and keep the height reachable | Topping or stripping out too many spur-bearing branches |
| Neglected tree | Recover gradually | Remove one or two major problem limbs per year and lower height in stages | A single brutal renovation cut that triggers a wall of water sprouts |
On established trees, I try not to remove more than about 25 to 30 percent of the canopy in one dormant season, and I spread serious renovation over 2 to 3 winters when needed. If a tree is so overgrown that every scaffold needs a major correction, I start asking whether renewal is smarter than heroic pruning. A neglected tree often answers hard cuts with a wall of water sprouts, the fast upright shoots that follow heavy pruning, so patience usually pays off better than force.
Once you know how hard to go, the remaining job is avoiding the habits that quietly reduce fruiting.
The mistakes that usually make the tree worse
Most bad pruning is either too much, too late, or aimed at the wrong wood. If I strip a tree of fruiting spurs, cut flush into the trunk, or top the canopy, I usually buy myself extra shoot growth instead of a better harvest.
- Overpruning - heavy cuts push the tree into vegetative growth and can reduce fruiting.
- Leaving stubs - stubs heal poorly and often die back before the tree can close the wound.
- Flush cuts - cutting into the collar weakens the branch union and slows recovery.
- Ignoring the center - a shaded middle becomes crowded, humid, and less productive.
- Chasing height in one session - a tall tree is safer and easier to manage when height is lowered gradually.
Apple trees fruit on spurs, the short stubby shoots that hold flower buds from year to year, so I do not treat every short piece of wood as disposable. I remove some spur wood when it is crowded, but I never try to make the tree look bare just for the sake of order.
When the cuts are sensible, the last layer of quality comes from the tools and cleanup, which is where a lot of home gardeners save time without realizing it.
Use sharp tools and keep the cuts clean
I prefer bypass pruners for small shoots, loppers for medium wood, and a pruning saw for anything too thick for hand tools. Sharp blades make a cleaner cut, and a cleaner cut is much easier for the tree to seal off.
- Wipe blades clean before you start and after you remove diseased wood.
- Use a stable ladder only when you cannot reach a cut safely from the ground.
- Wear eye protection when working overhead, especially in dense trees with brittle dead wood.
- Remove or dispose of diseased branches instead of leaving them piled under the canopy.
- Check the tree again a few weeks later, because hard cuts often trigger new upright shoots that need a summer pinch.
I usually treat cleanup as part of pruning, not as an optional extra. The tree heals better when the wounds are clean and the surrounding area stays free of broken debris.
The yearly routine that keeps pruning simple
My annual rule is straightforward: make the structural cuts in late winter, make only light corrective cuts in summer, and never let the tree reach a point where one weekend of work has to solve years of neglect. That rhythm keeps the tree productive without turning it into a constant project.
- Late winter: remove dead, damaged, crossing, inward-growing, and upright crowding wood.
- Spring and early summer: watch for water sprouts and pinch or remove the most vigorous ones while they are still soft.
- During the growing season: keep an eye on light. If the center starts shading out, it is already time to thin next winter.
- Every year: keep the leader dominant and the scaffolds evenly spaced so the tree stays reachable.
If I had to reduce the whole process to one habit, it would be this: prune a little every year, keep the center bright, and stop before the tree answers with a thicket of new shoots. That is usually the difference between an apple tree that looks managed and one that actually produces well.