The essentials to get right before the system goes in
- Most private wells use a submersible pump, a pressure tank, a pressure switch, and a pitless adapter.
- The pump should match the well’s depth and recovery rate, not just the home’s appetite for pressure.
- A pressure tank works best when its air pre-charge is set about 2 psi below the switch cut-in pressure.
- The first startup should include leak checks, pressure checks, flushing, and usually disinfection after the system is opened.
- Local permits, electrical requirements, and well rules can change the parts list and the order of work.
How the system fits together
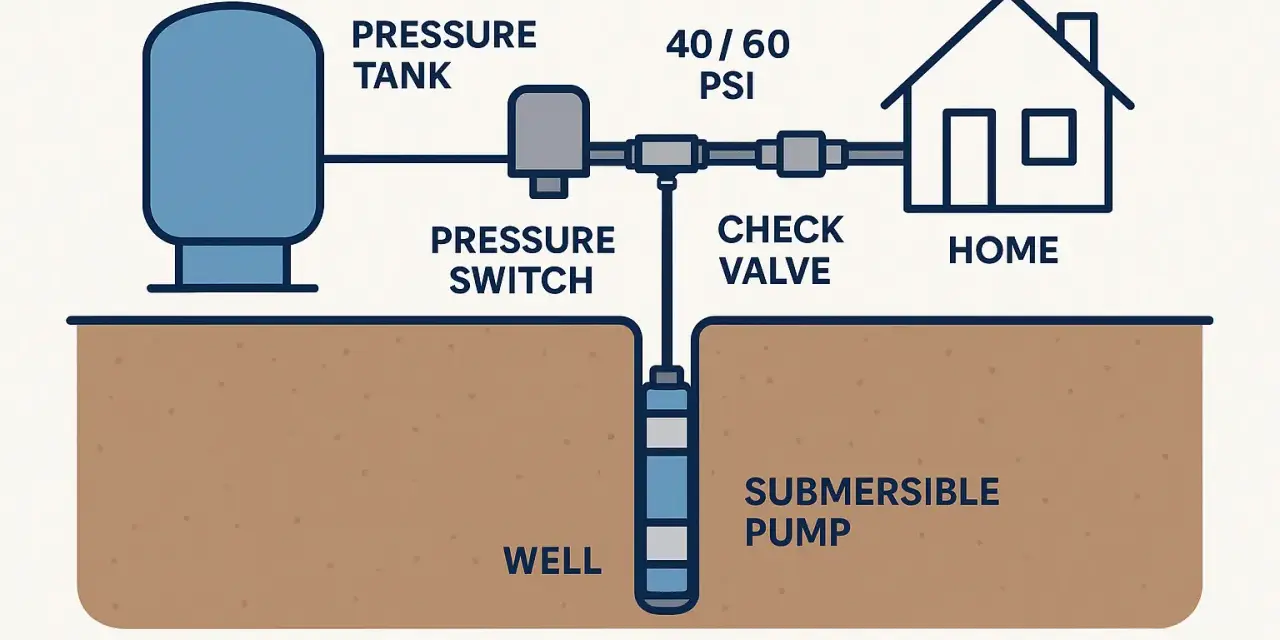
When I look at a private well, I think in terms of a system, not a single pump. Water has to move from the aquifer into the house without freezing, losing prime, cycling too often, or dragging sediment into the plumbing. That is why the pump, tank, switch, and wellhead details all matter together.
| Component | What it does | Why it matters |
|---|---|---|
| Submersible or jet pump | Moves water from the well into the plumbing system | It has to match the well depth and yield, or the system becomes inefficient or unreliable |
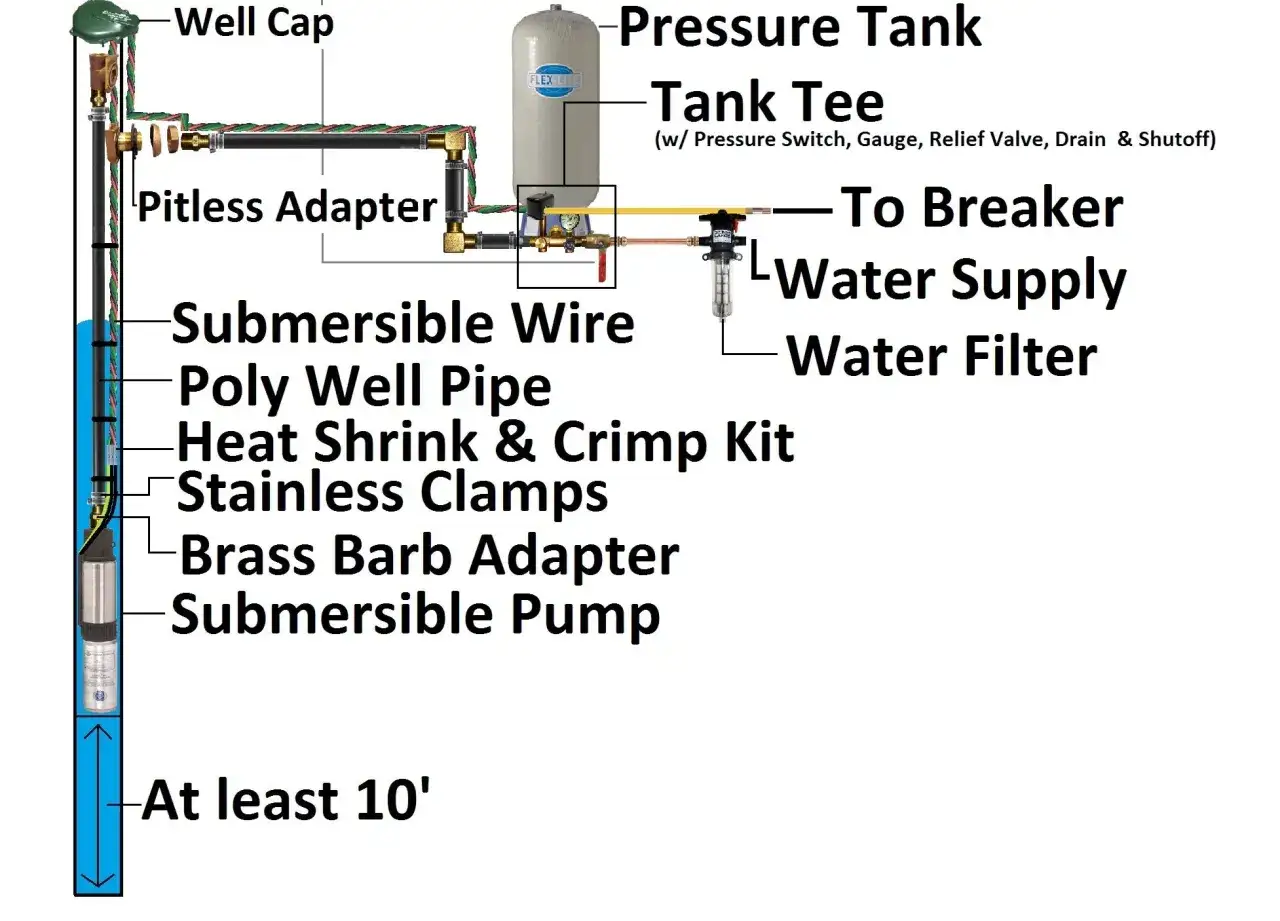
| Pitless adapter | Transfers water from the well casing to the underground service line below frost depth | It helps prevent freezing and keeps the well sealed at the casing wall |
| Pressure tank | Stores water under pressure between pump cycles | It reduces short cycling, which is hard on pump motors and controls |
| Pressure switch | Tells the pump when to start and stop | Common settings are 30/50 psi or 40/60 psi, depending on the system |
| Check valve | Prevents backflow | It helps the system hold pressure and protects the water column in the line |
| Control box and wiring | Supplies and manages power for the pump | Bad wiring, poor grounding, or the wrong conductor size can create expensive failures |
One term I use often is drawdown, which is the amount of usable water stored in the tank between pump cycles. A tank’s advertised size is not the same as the water you can actually draw before the pump kicks back on. Once that basic layout is clear, the next job is choosing the right pump and tank combination for the well itself.
Choosing the right pump and tank
The biggest mistake I see is treating the pump like a standalone appliance. In a private well, pump size, well depth, static water level, and recovery rate all have to line up. A pump that is too aggressive for the well can pull the casing down too fast, shorten equipment life, and make the water carry sand or sediment.
| Option | Best use | Main advantage | Main limitation |
|---|---|---|---|
| Submersible pump | Most drilled private wells, especially deeper ones | Quiet, efficient, and good at pushing water up from depth | Harder to service because it sits in the well |
| Shallow-well jet pump | Shallow wells with limited lift | Accessible above ground and easier to inspect | Not suitable for deep suction lifts |
| Deep-well jet pump | Some deeper wells where the pump stays above ground | Useful in a few older setups | Less efficient and more finicky than a submersible setup |
| Constant-pressure system | Homes that want steadier pressure | Smoother shower and fixture performance | Costs more and adds electronics that need proper setup |
For pressure tanks, I start with the switch setting and work backward. If the system is set to 30/50 psi, the tank pre-charge is usually about 28 psi when the tank is empty. If it is a 40/60 psi system, I want the tank closer to 38 psi. That small adjustment matters because it helps the tank store water correctly and prevents rapid cycling. Once the hardware is matched, the next step is the actual sequence of installing it.
The installation sequence I would follow
For an existing private well, the process is usually a replacement or retrofit, not a brand-new water source. If a new well is being drilled, the drilling, casing, and well development come first; the pump work starts only after the well is complete and the system is ready for equipment.
- Confirm the well details. I want the depth, casing diameter, static water level, recovery rate, and local permit requirements before anyone starts.
- Shut off power and depressurize the system. Safety comes first. The well circuit needs to be isolated before the pump or pressure switch is touched.
- Remove the old assembly if one is already in place. On a replacement job, that means pulling the pump, pipe, wiring, and any worn parts that are being reused.
- Assemble the new pump drop. The drop pipe, pump cable, safety rope if used, and fittings need to be secured so they can survive the trip down the casing.
- Set the pump at the right depth. I usually want it high enough to avoid stirring up sediment, but low enough to stay submerged during normal drawdown.
- Connect the pitless adapter and service line. This is the underground transfer point to the house plumbing, and it has to be sealed properly.
- Install or verify the pressure tank and switch. The tank needs to be accessible, properly supported, and set to the correct pre-charge before the system is pressurized.
- Restore power and test the cycle. I check cut-in and cut-out pressure, inspect for leaks, and make sure the pump is not short cycling.
I prefer to test the system before I consider the job closed out. If something is off, it is much easier to fix it before the well cap is final, the trench is closed, or the wall repairs are finished. From there, the plumbing and electrical details become the part that separates a clean install from a future headache.
Plumbing and electrical details that matter
Most private well problems that show up later are not dramatic. They are small mistakes that were easy to miss on the day of the job. A loose fitting, a poor seal at the wellhead, a mis-set switch, or the wrong conductor size can turn into pressure loss, pump wear, or water quality trouble.
- Use the right wire and breaker. Submersible pumps need proper electrical sizing, secure splices, and a dedicated circuit that matches the motor load.
- Keep the wellhead sanitary. The cap or seal should be watertight and tamper-resistant so surface water cannot enter the casing.
- Respect frost depth. The underground line and any exposed plumbing in colder climates need protection from freezing.
- Check the tank location. Pressure tanks and related controls should be in a protected, accessible space where service work is realistic.
- Do not ignore backflow risk. Hose hookups, treatment equipment, and any added plumbing should be arranged so contaminated water cannot siphon backward into the system.
I also treat local rules as part of the design, not paperwork at the end. Permit expectations, plumbing codes, and electrical requirements vary across the U.S., so I would confirm them before buying parts. If the system is in a cold region, or if the well house is tight and poorly ventilated, those details matter even more. Once the code and hardware questions are settled, the next concern is money.
What the project costs in the U.S.
Cost depends mostly on depth, access, and how much of the old system can be reused. A straightforward pump replacement is not the same job as pulling a stuck pump from a deep casing, repairing damaged wiring, and replacing a pressure tank at the same time.
| Project | Typical U.S. range | What pushes it higher |
|---|---|---|
| Pump replacement or installation | $977 to $2,824 | Deep wells, hard access, narrow casing, extra labor, and electrical repairs |
| Pressure tank replacement | $800 to $1,500 | Larger tanks, cramped mechanical rooms, or added plumbing work |
| Full drilled-well system on a new property | $6,000 to $16,000 for a typical 200-foot system | Soil conditions, drilling depth, casing, wiring, and permit requirements |
| Extra pipe or electrical repair | $250 to $1,000 | Damaged drop pipe, corroded fittings, or old wiring that has to be replaced |
The number I keep in mind is not just the invoice total but the hidden extras that appear once the old equipment is pulled. A cheap-looking quote can become expensive if it assumes the tank is fine, the wire is reusable, and the piping will come out clean. Once the budget is realistic, the final stretch is testing and cleaning the system properly.
Testing, disinfection, and first startup
The first startup tells me more than the installation itself. If the pump comes up to pressure cleanly, the tank behaves correctly, and the plumbing stays dry, the system is probably on track. If not, the problem usually shows up quickly.
Here is the sequence I would use:
- Open a few faucets and watch the pressure switch cycle the pump.
- Verify that the cut-in and cut-out points match the intended setting.
- Look for leaks at the pitless adapter, tank fittings, pressure switch, and any new plumbing joints.
- Flush sediment until the water runs clear if the well was disturbed.
- Disinfect the well and plumbing after the system has been opened, especially after pump work or a major repair.
Shock chlorination is the common term for a one-time disinfection step that helps clear bacteria from the well and plumbing after service. It is not a cure for every water problem, but it is a standard cleanup step after work that opened the system. After that, I want the water to clear before anyone treats it as normal household supply again. Once the startup checks are done, the last thing I look at is how the setup will age.
Mistakes that shorten pump life
Most failed wells do not fail all at once. They wear out because one or two setup decisions were off from the beginning. These are the mistakes I would avoid every time:
- Oversizing the pump. More capacity is not automatically better if the well cannot recharge fast enough.
- Ignoring the tank pre-charge. A tank set too high or too low will cycle badly and reduce pump life.
- Skipping well yield checks. The pump has to fit the water supply, not just the household demand.
- Leaving the wellhead vulnerable. A poor seal invites surface contamination and freeze problems.
- Reusing questionable wiring or fittings. Old electrical parts and corroded plumbing are cheap to replace during the job and expensive to chase later.
- Forcing the system back into service too quickly. Sediment and chlorine need time to clear before the water is considered ready.
I also see homeowners assume a pressure switch can solve low-yield problems. It cannot. The switch controls cycling; it does not create water. If the well itself cannot keep up, the real fix is usually equipment sizing, storage, or a different system design. That is why the final inspection matters so much.
The checks I would make before calling it finished
Before I would call the job complete, I want three things: stable pressure, clean water, and no hidden stress on the equipment. The house should get steady flow without rapid on-off cycling, the tank should hold the correct charge, and the well cap and plumbing should stay dry after the system runs for a while.
My practical aftercare list is simple. Test the water on a regular schedule, especially if the well is shallow or if the area has flooding or agricultural runoff. Check the pressure tank once in a while so a slow air-charge loss does not turn into pump wear. After heavy rain, freezing weather, or any service work, I would inspect the cap, visible piping, and electrical connections before assuming everything is still fine.
That is the real value of a well-built system: it disappears into the background and delivers water without drama. When the pump, tank, plumbing, and controls are matched correctly, the setup runs quietly for years instead of announcing every mistake the first time someone opens a faucet.