Knowing how to hang shelves safely starts with the wall, not the shelf. The shelf type, the wall material, and the fasteners you choose all affect whether the result feels sturdy or flimsy. In this guide, I focus on the parts that actually matter in a typical U.S. home: finding structure, matching hardware, leveling accurately, and avoiding the small mistakes that turn a simple repair into a patch job.
Key takeaways before you drill
- Studs are the best anchor point whenever the shelf will carry real weight.
- The shelf style matters: floating shelves, bracketed shelves, and rail systems all mount differently.
- Drywall anchors are a fallback, not the first choice for heavy loads.
- Most U.S. walls use studs spaced 16 inches on center, but 24-inch spacing also appears in some homes.
- Leveling and layout matter as much as the hardware, especially for floating shelves.
- Load the shelf with weight close to the supports, not all the way at the front edge.
Choose the shelf style that fits the load
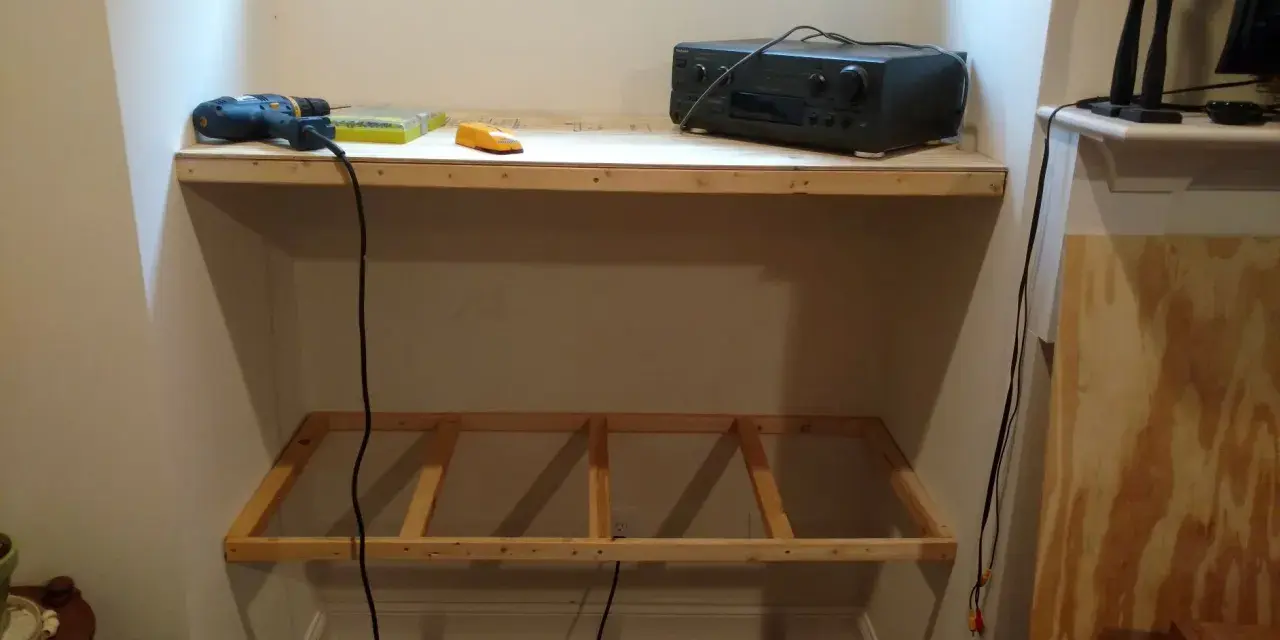
The right mounting method depends on the kind of shelf you are installing. A floating shelf gives you the cleanest look, but it is also the least forgiving because the hidden cleat or backplate has to be level and firmly fastened. Bracketed shelves are more visible, but they are easier to align and often better for books, pantry items, or utility spaces. Rail or standard systems are the most adjustable, which makes them practical when you want several shelves or expect the layout to change later.
| Shelf style | Best use | Strengths | Watchouts |
|---|---|---|---|
| Floating shelf | Decor, medium-duty storage, clean interiors | Minimal look, hidden support | Needs accurate leveling and strong backing |
| Bracketed shelf | Books, kitchen storage, garage, laundry room | Simple installation, easy to inspect later | Hardware is visible |
| Rail or standard system | Closets, offices, flexible storage | Adjustable shelf heights, good for multi-shelf runs | More parts, more layout to get right |
When I am deciding between those options, I ask one question first: is this shelf supposed to look decorative, or is it supposed to work hard every day? That answer usually tells me whether I can prioritize appearance or need to prioritize access and load capacity. Once that choice is clear, the next step is finding the strongest part of the wall.
Find the wall structure first
For most shelf installations, studs are the gold standard because they give you direct fastening into the framing behind the drywall or plaster. In many U.S. homes, studs are spaced 16 inches on center, though 24-inch spacing is also common in some walls. A stud finder helps, but I never trust one pass alone. I mark the first hit, check again nearby, and confirm the stud line before I drill. If you are working over drywall, the usual clues are simple: a solid reading from the stud finder, a pattern that repeats every 16 or 24 inches, or the presence of outlets and switches nearby, since those boxes are often attached to studs. With plaster walls, the surface is harder and less predictable, so patience matters more. In masonry, the wall itself becomes the structure, but the fasteners and bit have to match brick, block, or concrete instead of wood framing.I also slow down near plumbing, outlets, and switch boxes. Those areas often hide wires, pipes, or blocking, and a guess is not worth the damage. If I cannot confirm the framing cleanly, I change the layout or choose a different attachment method rather than forcing the shelf into a bad location. That is the point where hardware choice becomes the deciding factor.
Match the hardware to the wall and the weight
The shelf will only be as strong as the weakest part of the fastening system. A good screw in a weak anchor is still weak, and a strong anchor in damaged drywall is not much better. I think about hardware in terms of wall type, load, and how much margin I want between the shelf and failure.
| Wall situation | Best fastening approach | Typical use | Practical caution |
|---|---|---|---|
| Stud-backed drywall | Wood screws or lag-style fasteners into the stud | Most shelves with meaningful weight | Use screws long enough to bite deeply into framing |
| Drywall with no stud at the mounting point | Heavy-duty drywall anchors or toggle bolts | Light to medium loads | Follow the package rating and do not treat it as a target |
| Plaster and lath | Stud fastening when possible, otherwise rated toggle-style hardware | Older homes and retrofit projects | Plaster can crack if you rush the drill or over-tighten |
| Brick, block, or concrete | Masonry screws or masonry anchors with the correct bit | Basements, garages, exterior walls | Use the right drill bit and clear the dust before setting the fastener |
For floating shelves, I often see people underestimating the hidden cleat or backplate. That part carries the load, so it needs to be fastened as seriously as any visible bracket. For many kits, 2 1/2-inch screws are common for the wall side, but the shelf instructions should always win over guesswork. The next job is getting the layout right so the hardware lands exactly where it should.
Measure and mark without rushing
A shelf that is even slightly off at the layout stage is harder to fix later than most people expect. I start by deciding the final height, then I mark that height from a reference point such as the floor, countertop, or the top of another shelf. If I am installing more than one shelf, I mark all the positions before drilling anything so the spacing stays consistent.
- Mark the shelf height with a pencil, then check it from both sides of the wall section.
- Use a level to draw a straight line where the top edge, bracket line, or cleat will land.
- Transfer the hole locations from the bracket or backplate to the wall with a sharp pencil.
- Confirm the marks against the stud locations before drilling pilot holes.
- Drill slowly, especially near plaster, tile, or masonry.
Small pilot holes matter because they let the screw start cleanly and reduce the chance of splitting or wandering. They also give you a second chance to verify the wall before you commit to the full fastener. Once the marks are right, the actual installation becomes much more manageable.
Install the hardware cleanly
At this stage, the goal is simple: put the load-bearing parts of the shelf where they belong, and do not force anything. For a floating shelf, that means fastening the cleat or backplate to the wall first, checking level again, and only then sliding the shelf body into place. For bracketed shelves, I usually attach the first bracket, verify the level, and then set the remaining brackets or supports from that fixed reference point.
Over-tightening is a common mistake. It can strip a screw, distort a bracket, crush drywall, or make a floating shelf sit crooked even when the marks were correct. Tighten until the hardware feels firm, then stop. If the shelf kit includes set screws or locking points, use them exactly as directed so the shelf cannot shift after installation.I also clean the dust before final assembly. It sounds minor, but a few grains of drywall dust under a bracket or cleat can throw off a level reading or keep a shelf from seating fully. A quick wipe or vacuum takes less time than redoing the whole mount. After that, the last step is about how the shelf will actually be used.
Load the shelf the smart way
The shelf may be mounted correctly and still sag if the load is poorly distributed. Heavy items belong closest to the wall and near the supports, not at the front edge where they create a longer lever arm. That matters a lot for books, cookware, tools, and anything dense enough to bend a shelf over time.
I like to think of shelf weight in two layers: the planned load and the accidental load. The planned load is the decor, storage bins, or books you expect to keep there. The accidental load is the hand that leans on it, the bag someone drops, or the object that gets added later because the shelf seemed to have room. A good install leaves room for both.
- Put the heaviest items directly above brackets, studs, or cleat supports.
- Spread weight across the shelf instead of stacking everything in one spot.
- Do not use a drywall anchor rating as if it were a working target.
- For longer shelves, add more support points instead of trusting the ends alone.
This is also where shelf purpose changes the recommendation. A display shelf can tolerate less weight than a pantry shelf, and a shelf for office supplies should be treated differently from a shelf for books. The hardware may be identical, but the way you load it should not be. That leads straight into the mistakes that quietly undermine an otherwise decent install.
Avoid the failures I see most often
The failures I see most often are not dramatic. They are small, avoidable errors that add up: a shelf mounted off level, a fastener that never reached framing, an anchor that was used beyond its rating, or a bracket placed where the wall is weak or damaged. Those problems usually show up later as sagging, wobble, or a shelf that slowly pulls away from the wall.
- Skipping stud verification and relying on drywall alone for a heavy shelf.
- Using screws that are too short to bite properly into the stud or anchor.
- Drilling without double-checking level and spacing.
- Over-tightening hardware until the wall surface starts to deform.
- Ignoring hidden wires, pipes, or old patchwork in the wall.
- Loading the shelf too quickly before testing the mount.
If I am unsure about one part of the wall, I stop and reassess rather than hoping the shelf will make up for the mistake. That is especially true in older homes, rental units, or any wall that has already been patched more than once. A little caution at this stage is cheaper than repairing torn drywall later.
The last checks I make before calling it done
Before I consider a shelf finished, I check three things: level, firmness, and load placement. The shelf should not rock when I press lightly on the front edge, the visible line should read straight to the eye, and the supports should feel like they belong in the wall rather than attached to it. If any of those feel off, I fix them immediately instead of living with the compromise.
I also like to recheck the hardware after the shelf has carried weight for a day or two. Materials settle, anchors seat, and screw tension can change slightly after the first load. That final inspection takes almost no time, but it tells you whether the installation was truly solid or only looked finished. If you get the structure, hardware, and load distribution right, the shelf should feel unremarkable in the best possible way.