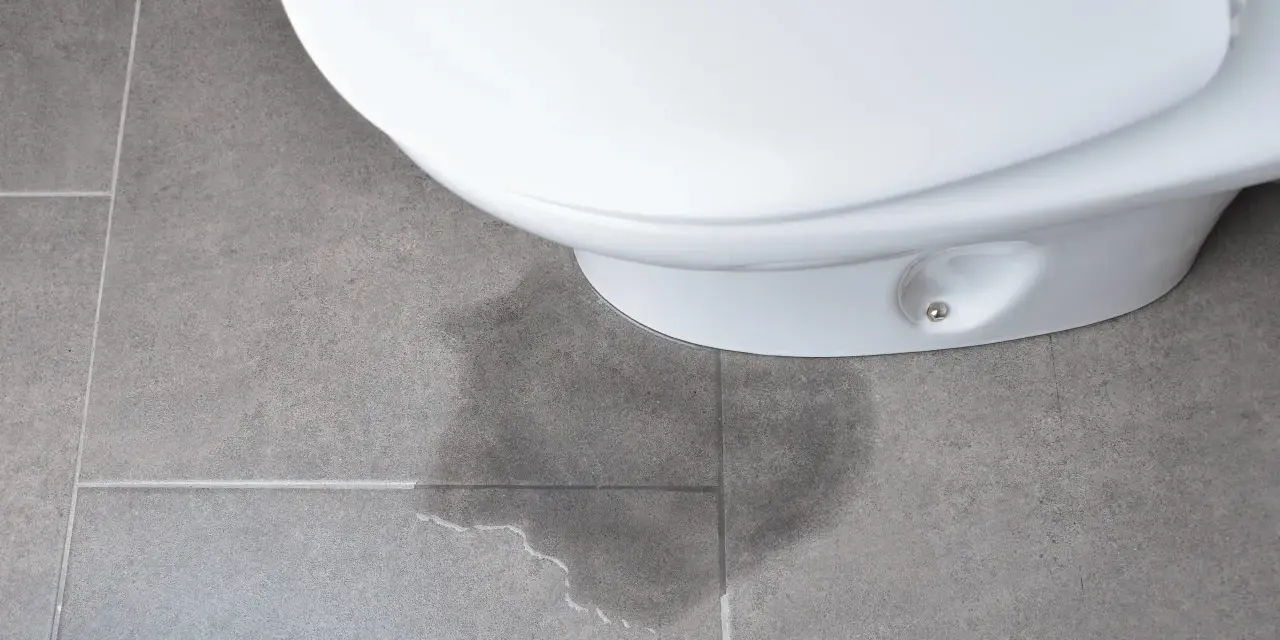
A damp patch around the toilet is rarely random. In most American bathrooms, water where the toilet meets the floor points to a failed seal, loose closet bolts, a flange that is out of level, or a crack that is easy to miss until the floor starts showing damage. I use a simple troubleshooting order: confirm the source, decide whether a reset is enough, and stop early if the floor or porcelain is compromised.
What I would check first when water shows up around the toilet base
- Leak after flushing usually points to the wax ring, a wax-free seal, or a flange fit problem.
- A toilet that rocks will keep breaking the seal until it is shimmed or reset.
- Water behind the bowl often comes from the supply line or tank hardware, not the floor seal.
- A soft floor or sewer odor means the damage may already be beyond a quick cosmetic fix.
- Caulk is not a repair; it can hide the symptom while the real leak keeps spreading.
What a leak at the base usually means
When water collects where the toilet meets the floor, I assume the seal between the bowl and the floor flange has been compromised until I prove otherwise. That seal is supposed to keep flush water, waste, and sewer gas inside the drain path, so when it fails, the problem often shows up right after a flush or when someone sits on a toilet that shifts even slightly.
The important distinction is this: not every wet floor around a toilet means the same thing. A leak that starts behind the bowl points me higher, toward the supply line, tank bolts, or fill hardware. A leak that appears only after flushing makes the base seal the first suspect. The EPA’s WaterSense program also notes that household leaks add up fast in the US, so even a small bathroom leak deserves prompt attention rather than a wait-and-see approach.
Once I know the water is really coming from the base, I move to source checks instead of guessing at parts. That next step saves both time and the floor below the toilet.
How I narrow down the source before removing the toilet
I do not pull the toilet immediately unless the leak is obvious and active. A few quick checks usually tell me whether I am dealing with the floor seal, the tank, or a supply connection that is simply running down the porcelain.
The checks I trust first
- Dry the floor, the back of the bowl, and the supply line completely with paper towels.
- Flush once and watch where the first moisture appears.
- Sit on the bowl and feel for movement. Even a few millimeters of rock can break the seal.
- Look for water at the back of the toilet, where the supply line and tank bolts sit.
- If the tank keeps losing water, use a food coloring test in the tank and check the bowl after about 10 minutes. That test helps rule out a hidden tank-to-bowl leak.
My rule of thumb is simple: if the floor stays dry until the toilet is flushed, the outlet seal or flange is probably the problem. If the back of the toilet is wet before any flush, I look higher first. That distinction keeps a base leak from being confused with a tank leak or a bad supply connection.
Once the leak pattern is clear, the next step is matching the symptom to the real cause rather than replacing parts blindly.
The common causes and the signs I trust
Most base leaks come from a short list of problems. The trick is reading the symptoms correctly, because the fix for a worn wax ring is not the same as the fix for a cracked flange or a toilet that keeps shifting on the floor.
| Likely cause | What I usually see | Why it leaks | What usually fixes it |
|---|---|---|---|
| Worn wax ring or failed wax-free seal | Water appears after flushing, often with a damp ring around the toilet base | The seal no longer compresses evenly between the toilet and the flange | Remove the toilet, clean the surfaces, and install a new seal |
| Loose closet bolts | The bowl shifts when someone sits down or leans on it | Movement opens the seal and lets water escape under load | Snug the bolts, add shims if needed, and inspect the seal |
| Flange too low, crooked, or damaged | The problem started after flooring work or a recent toilet install | The seal cannot compress correctly against the drain connection | Repair, extend, or replace the flange before resetting the toilet |
| Cracked toilet base or bowl | A hairline crack is visible after drying the porcelain | Water is escaping through the fixture itself, not just the seal | Replace the toilet |
| Supply line or tank hardware leak | The back of the toilet is wet, or water runs down the outside of the bowl | Water is tracking from above and collecting at the floor | Replace the supply line, tank bolts, or gasket as needed |
One pattern I see often is a new or recently reset toilet that leaks because the flange is not level at the floor. That is why I never treat a base leak as “just replace the wax ring” until I have checked the fit and stability first. From there, the repair becomes much more predictable.
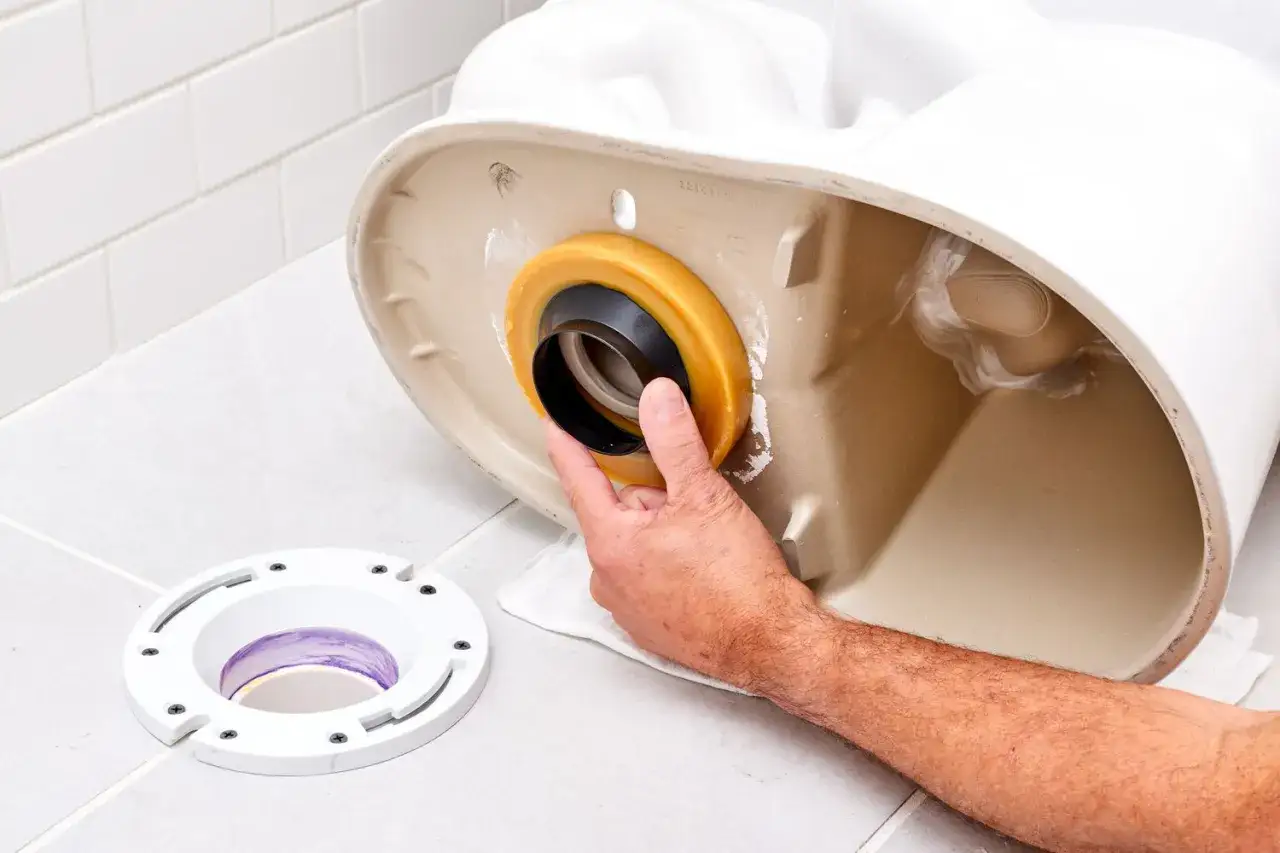
How I replace the seal without creating a second problem
When the flange is intact and the toilet is otherwise sound, a proper reset is usually the right fix. I do not rush the reinstall, because most repeat leaks come from setting the bowl crooked, leaving debris behind, or over-tightening the bolts.
What I gather first
- New wax ring or wax-free seal
- Replacement closet bolts and washers
- Adjustable wrench
- Putty knife or scraper
- Plastic shims
- Bucket, sponge, towels, and gloves
- A rag to block the drain opening while the toilet is off
The reset in order
- Turn off the water, flush, and sponge out the tank and bowl.
- Disconnect the supply line and remove the closet bolt caps and nuts.
- Lift the toilet straight up and set it on cardboard or towels.
- Scrape away every trace of old wax from the horn and flange.
- Inspect the flange for cracks, corrosion, or height problems, and fix those before moving on.
- Set the new seal, lower the toilet carefully, and press it down evenly without rocking it.
- Shim if needed, then tighten the nuts a little at a time until the bowl is stable but not stressed.
- Reconnect the supply line and test several flushes, then watch the base for 10 to 15 minutes.
Read Also: How to Snake a Drain - The Complete DIY Guide
How I know the repair is holding
A solid reset should feel solid immediately. If the toilet still rocks after shimming, the flange or floor needs more attention. If the floor stays dry through several flushes and the bowl remains stable after a few hours of use, the repair is probably sound. That is the point where I start thinking about which seal type or repair part makes the most sense if the job needs to be done again.
Wax ring, wax-free seal, or flange repair
There is no single best product for every bathroom. The right choice depends on whether the floor is level, the flange sits at the right height, and whether you want the easiest reset or the most forgiving one. In 2026, these are the rough US ranges I would budget for a straightforward repair.
| Option | Typical parts cost | Best for | Tradeoffs |
|---|---|---|---|
| Wax ring | $5 to $20 | A standard toilet with a sound flange and a stable floor | Cheap and proven, but it is less forgiving if the toilet shifts after installation |
| Wax-free seal | $15 to $35 | A toilet that may need repositioning or a cleaner reset | More forgiving and less messy, but it still depends on a good flange and correct fit |
| Flange extender or repair ring | $15 to $60 | A flange that sits too low, is slightly damaged, or needs to be brought back to the right height | Solves the geometry problem, but usually adds labor and inspection time |
| Plumber reset and repair | $150 to $400+ | Hidden flange damage, stubborn rocking, or jobs that are awkward to access | Higher cost, but safer when the floor or drain needs real troubleshooting |
| Full toilet replacement | $300 to $900+ | Cracked porcelain, repeated failures, or an old toilet that no longer sits properly | Most expensive path when the toilet itself is the problem |
I tend to recommend a wax-free seal when the toilet may need to be lifted and reset more than once, or when a clean reposition matters. I still use wax when the flange is correct and the bowl can be set cleanly the first time. The seal type matters, but the floor geometry matters more.
Mistakes that make the leak come back
The biggest repeat leaks usually come from trying to force a bad installation into working order. A seal is not meant to compensate for a loose bowl, a crooked flange, or flooring that has already moved.
- Reusing a flattened wax ring.
- Stacking two rings instead of fixing the flange height.
- Over-tightening the closet bolts until the porcelain flexes.
- Skipping shims on a toilet that rocks even slightly.
- Leaving debris under the bowl or on the flange lip.
- Caulking before you have confirmed the leak is gone.
- Ignoring a worn supply line while the toilet is already off.
The pattern behind all of those mistakes is the same: the installer is trying to make the seal do work that belongs to the flange, the floor, or the mounting hardware. Once I see that, I slow down and fix the structure first. That matters even more when the flooring itself has started to suffer.
When the floor is already damaged
If the leak has been active for a while, I inspect the floor before I reset anything. A spongy subfloor, stained vinyl, lifted tile, or mildew smell tells me water has been moving under the toilet long enough to weaken more than the seal.
- On wood subfloors, check for softness around both closet bolts and the front edge of the toilet.
- On tile, look for cracked grout, loose tile, or moisture tracking under adjacent flooring.
- On slab homes, water can still run under tile and show up at baseboards or into the next room.
- If the flange moves when you touch it, stop and repair the support before reinstalling the toilet.
- If the porcelain is cracked, replace the toilet instead of resealing it.
When the structure is sound, the repair is usually straightforward. When the floor is compromised, the job stops being a simple plumbing fix and becomes a plumbing-and-flooring problem, which is a much better time to call for help.
The checks I make before I call the job finished
Before I leave a toilet repair alone, I want proof that it will stay dry under normal use. One clean flush is not enough for me; I want repeated flushes, a stable bowl, and no sign that the floor is re-wetting as the toilet settles.
- Flush the toilet three or four times and watch the base closely.
- Press gently on the bowl to confirm it does not rock.
- Recheck the closet bolts after the first day of use and stop at snug, not crushed.
- Inspect the supply line and tank bolts one more time so a higher leak does not get mistaken for a base leak.
- If you plan to caulk, wait until the toilet has stayed dry through several flushes and a full day of use.
I also keep track of the seal type, the toilet model, and whether the flange needed shims or an extender. That makes the next repair faster and keeps me from repeating the same mistake twice, which is usually the difference between a one-time fix and a recurring bathroom problem.