What matters most before you start
- Measure from the finished deck surface, not the framing, because every railing height check starts there.
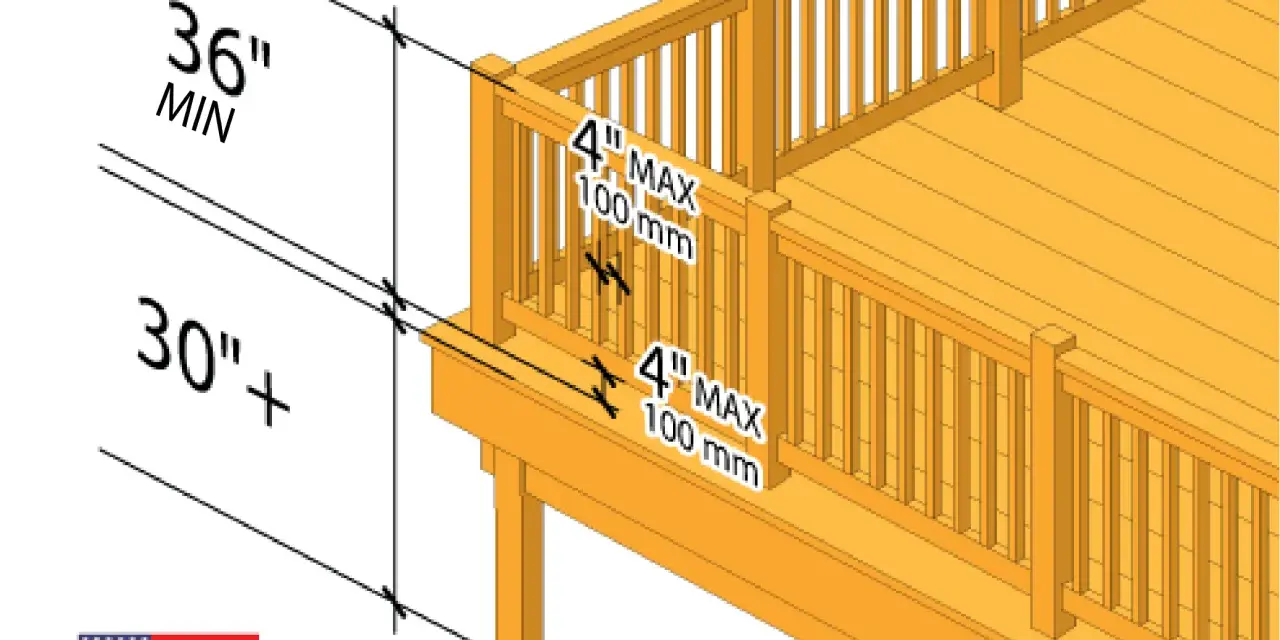
- In many U.S. residential code rules, an open side more than 30 inches above grade needs a guard, and the common target height is 36 inches.
- Stair runs are different: the handrail usually lands between 34 and 38 inches above the tread nosing.
- Post anchoring is the weak point to design around; a nice top rail cannot compensate for a loose connection.
- Wood is the lowest-cost path, while cable and glass push the project into higher-budget, higher-detail territory.
What the project really involves
I usually split the job into two parts: the structural guard that protects the edge of the deck and the handrail detail that follows the stairs. Those are related, but they are not the same assembly, and mixing them up is where many DIY projects drift off track.
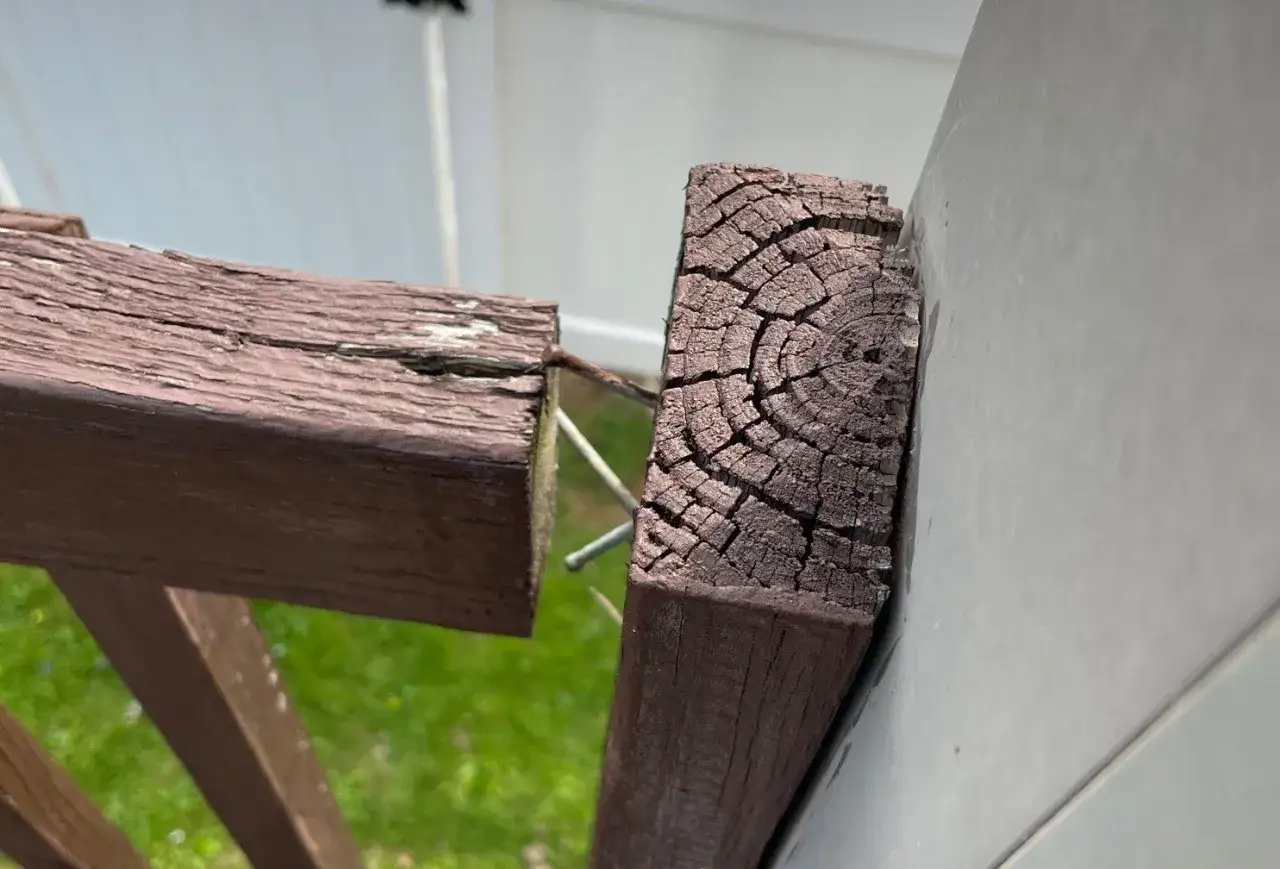
If I am replacing an old railing, I look at the deck frame first. Rotten rim boards, undersized posts, or soft blocking will make the new system fail long before the finish wears out. On a new deck, I want the post locations planned early, because railing support affects the framing layout, not just the trim package.
The other thing I watch closely is whether the railing is level, stair-stepped, or both. A clean level run can be straightforward, but one flight of stairs adds a second set of measurements and a second chance to get the height wrong. That is why I never treat rail work as pure finish carpentry, and why I start with the rulebook before I touch the saw.
The code checks that shape the layout
I do not start drilling until I know the height rules, opening limits, and load expectations for the jurisdiction. In most U.S. residential settings, guards are required when the walking surface is more than 30 inches above grade, the guard height is typically 36 inches, stair handrails usually need to land between 34 and 38 inches, and openings must not allow a 4-inch sphere to pass through.| Code check | Typical residential baseline | Why I care |
|---|---|---|
| Need for a guard | Open side more than 30 inches above the floor or grade below | Determines whether the railing is optional or required |
| Guard height | 36 inches on many homes | Controls fall protection and inspection approval |
| Stair handrail height | 34 to 38 inches above the tread nosing | Gives the hand a comfortable, usable grip |
| Opening size | 4-inch sphere limit | Prevents dangerous gaps between balusters or infill parts |
| Structural load | 200-pound concentrated load at the top, with many guard systems also designed around 50 pounds per linear foot | This is why post anchoring and blocking matter more than the decorative profile |
| Commercial or multifamily work | Often 42-inch guards | Changes the product choice and sometimes the permit review |
The practical takeaway is simple: measure from the finished surface and confirm the local rule set before you buy parts. Local amendments can be stricter, and coastal, high-wind, or multifamily projects often demand more than a basic single-family deck. If the deck edge sits close to grade, I still look at sightlines, traffic flow, and child safety before I decide to skip the guard entirely. Once those numbers are set, the material choice becomes much easier.
Choosing the right railing system for the deck
The best system depends on budget, maintenance tolerance, and how much view you want to preserve. I think of it less as a style choice and more as a compromise between cost, stiffness, upkeep, and how much on-site cutting the system demands.
| System | Best for | Trade-offs | Typical installed cost per linear foot |
|---|---|---|---|
| Pressure-treated wood | Lower budgets and traditional looks | Needs sealing, can warp, and will weather faster | $15 to $30 |
| Composite or PVC | Low-maintenance residential decks | Costs more than wood and can feel bulkier | $40 to $80 |
| Aluminum | Clean lines and stable, low-upkeep installs | Less privacy and usually a more modern look | $50 to $100 |
| Cable | Unobstructed views | Higher labor, tensioning matters, and detailing is less forgiving | $80 to $150+ |
| Glass | Wind protection and premium finishes | Highest cost, more cleaning, and more scrutiny on structure | $120 to $200+ |
For planning, I treat those as installed ranges, not quote promises. A simple 20-foot run with standard corners is a different job from a stair-heavy deck with multiple returns, and permits can add a few hundred dollars to a few thousand depending on the town. If you want the shortest path to a durable result, wood and aluminum are usually the least complicated; if you want the cleanest view, cable or glass is where the cost and precision climb fastest. From there, the installation sequence matters just as much as the material.
The installation sequence I trust on most residential decks
I get the best results when I build the posts first, then the rail sections, then the infill, and only after that do I lock in the finish details. That order keeps errors from compounding and makes it easier to correct a small measurement issue before it becomes a crooked top rail.
1. Mark the finished height and post locations
I mark everything from the finished deck surface, not from the framing. If the decking is not installed yet, I wait or account for its thickness before I commit to post cuts and bracket positions. This is also the moment to decide where stairs, door swings, and furniture traffic might interfere with the railing.
2. Reinforce the framing before the first fastener goes in
The post should transfer load into the structural frame, not just into a fascia board or decorative trim. On wood decks, that usually means blocking, through-bolts, or a manufacturer-approved connector package. I want the post to feel like part of the structure, because that is exactly what the code expects when someone leans hard on the top rail.
3. Dry-fit the rails before final assembly
I always dry-fit the section before I commit to cutting balusters or drilling final holes. A dry fit reveals whether the posts are truly plumb and whether the span is square enough to accept the panel without forcing it. If the fit is off, I fix the posts first. Forcing a rail section into a bad layout is how you end up with visible gaps, twisted caps, and stripped screws.
4. Assemble the field sections with the right hardware
Most modern systems are built around bracketed rails, balusters or infill panels, and a top cap. I use the hardware that belongs to that system and keep the holes aligned before tightening. Overdriving screws into composite or PVC parts can crush the material, while under-tightening metal connections leaves a rail that rattles the first time somebody uses it.
Read Also: Above Ground Pool Installation Guide - Avoid Costly Mistakes
5. Handle stairs as a separate detail
Stair rails need their own measurement pass because the handrail height is taken from the tread nosing, not the deck surface. I check every tread line before I lock the brackets in place, and I pay extra attention to the triangular opening near the bottom of the rail, because that small gap is easy to overlook. Once the stair run is right, the whole project looks more intentional.
The biggest habit I rely on here is simple: measure, dry-fit, then tighten. That sequence saves more rework than any fancy tool I own, and it usually tells me whether the deck is ready for a clean install or needs structural repair first. It also makes the usual failure points easier to spot before they turn into callbacks.
The mistakes that turn a clean rail into a headache
- Measuring from the wrong surface. If the deck boards are not accounted for, the finished guard height will be off.
- Fastening into weak trim. Posts need structural anchoring, not cosmetic support.
- Using the same detail for stairs and level runs. They share parts, but not the same geometry or height rules.
- Skipping plumb and level checks. A small lean at one post becomes obvious across a long run.
- Ignoring load path. The top rail may feel solid in your hands, yet still fail if the post connection is undersized.
- Mixing hardware systems. Random screws and brackets can void warranties and create uneven performance.
- Forgetting maintenance access. Cable and glass look great until you have to clean or retension them in a tight corner.
I also see a lot of projects get rushed at the end. The builder installs the main section, steps back, and assumes the job is done, but that last 10 percent is where the inspection details live. I recheck fasteners, caps, and height at the end of the day, then again after the first weather swing if the deck is new or recently repaired. After that, the only big question left is whether the project still makes sense as a DIY job or should be handed off.
What the project usually costs and when I would hire a pro
For a straightforward residential run, I think in terms of linear feet. Recent U.S. cost guides put wood railing around $15 to $30 per linear foot installed, composite around $40 to $80, metal around $50 to $100, and specialty cable or glass systems around $80 to $150 or more. On top of that, permit and inspection fees can add another $300 to $2,000 on some projects, especially when the deck is elevated or the local office wants engineering details.
| Project type | DIY fit | Typical time | Why it fits or does not fit |
|---|---|---|---|
| Simple wood level rail | Good for experienced DIYers | 1 to 2 days | Fewer custom parts and easier field adjustments |
| Composite or aluminum kit | Moderate DIY | 1 to 2 days | Factory parts help, but fit and fastening still matter |
| Cable or glass system | Usually pro territory | 2 to 5 days | Higher precision, tensioning, or engineering sensitivity |
| Old deck with unknown framing condition | Pro recommended | Varies | Structural repairs can change the entire scope |
I usually recommend hiring help when the deck is tall, the frame is old, the run includes multiple stair turns, or the railing system depends on exact tension or engineered glass. Those are the jobs where mistakes become expensive quickly. If you are opening the deck surface anyway to add blocking or repair the rim, the labor bill often makes more sense than trying to squeeze a complex rail into a weak structure. When the framing is suspect, stopping for structural repairs is usually the smarter call.
What I check before I call the railing finished
- The guard height is measured from the finished surface, not the framing.
- Every post is plumb, rigid, and tied into structure.
- No opening is large enough to let a 4-inch sphere through.
- Stair handrails sit comfortably between 34 and 38 inches above the nosing.
- Fasteners are fully seated, but not crushed or stripped.
- The top rail looks straight from every approach, not just from one angle.
When those checks pass, I am comfortable calling the railing ready for real use. The smartest last step is to keep a small maintenance habit: wash the system, inspect the fasteners, and recheck any exposed connection after the first season of sun, rain, and temperature swings. That is how a good install stays good.