Harvesting arugula at the right stage makes a bigger difference than most gardeners expect. I want the leaves young enough to stay tender, but not so young that I’m stripping the plant bare and losing the next flush of growth. This guide covers the timing, the two harvesting styles that work best, what I do immediately after picking, and the mistakes that make a bed turn bitter too quickly.
Harvest arugula young, keep the crown intact, and the plant will keep producing
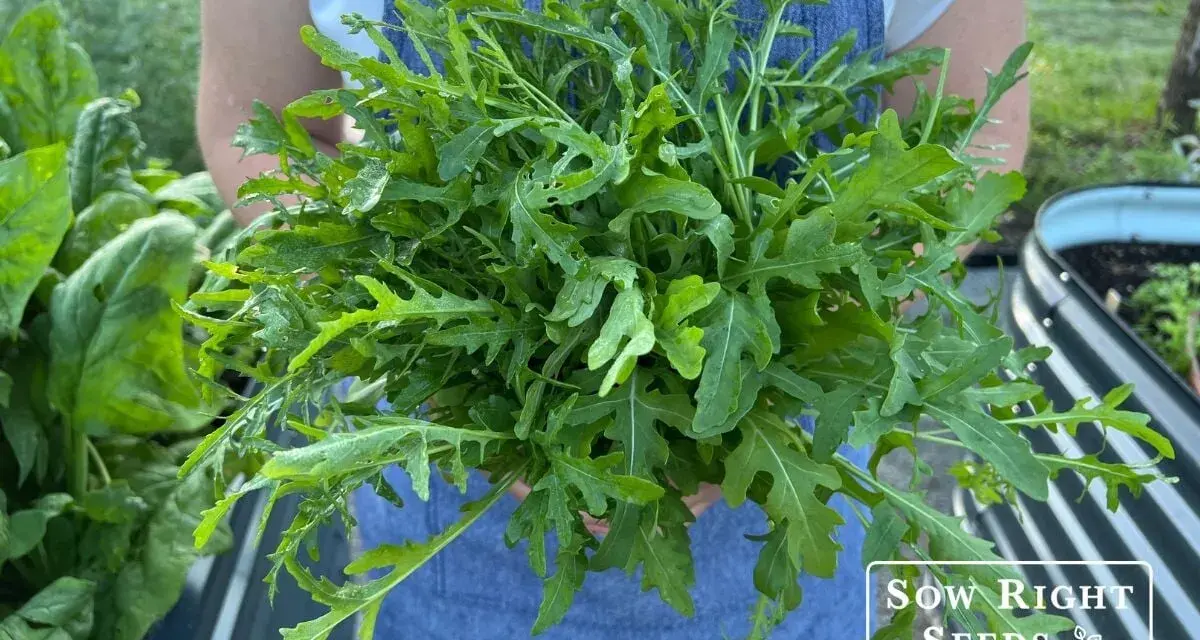
- Pick leaves when they are about 2 to 3 inches long for the mildest flavor.
- Use outer-leaf picking or a cut-and-come-again cut, depending on how much you need.
- Harvest in the morning, when the leaves are cool, crisp, and less stressed.
- Leave the center of the plant alone so it can push out new leaves.
- Store dry arugula in the refrigerator and use it within about a week.
- Once plants bolt, the flavor turns sharper, but the flowers and seed pods are still usable.
Pick arugula before the leaves get tough
Arugula is at its best when the leaves are still small and actively growing. I usually start checking plants when the outer leaves reach roughly 2 to 3 inches long, because that is the stage where the texture stays tender and the flavor is pleasantly peppery instead of harsh. In many home gardens, that means the first usable harvest arrives in about 4 to 6 weeks, depending on variety, temperature, and how quickly the plant grows.
The real signal is not just size, though. I watch for the plant to stay low and leafy. Once stems start stretching upward or flower buds appear, the taste gets sharper and the leaves can turn rougher. In warmer U.S. climates, that shift can happen quickly, so I do not wait for a “perfect” big leaf if the weather is already leaning hot. Once you know that window, the harvesting method becomes much easier to choose.
The two harvesting styles I rely on
For arugula, I think in terms of two practical approaches: take a few outer leaves for a steady salad supply, or cut a larger section for a fuller batch. University of Wisconsin Extension treats arugula like a classic cut-and-come-again green, and that is still the simplest way to keep a planting useful for longer.
| Method | Best for | How much to take | What it gives you | Main tradeoff |
|---|---|---|---|---|
| Outer-leaf picking | Small daily harvests | A few of the oldest leaves from each plant | Continuous regrowth and a longer picking season | Slower to fill a basket |
| Cut-and-come-again | Baby leaf harvests and mixed greens | Cut the top section a couple of inches above the soil | A larger harvest from a dense patch | Needs a healthy crown left behind |
| Whole-plant harvest | When plants are bolting or you need everything at once | Remove the entire plant | Fastest way to clear the bed | No regrowth from that plant |
I use outer-leaf picking when I want a few leaves for lunch, and I switch to a fuller cut when a patch gets dense enough to justify it. If you are growing arugula for a steady family supply, that distinction matters more than any fancy tool ever will. The next step is handling the cut correctly so the plant rebounds instead of stalling.
My step-by-step harvesting routine
I keep the process simple, because arugula does not need a complicated harvest to stay productive. Clean hands, sharp scissors, and a light touch are usually enough.
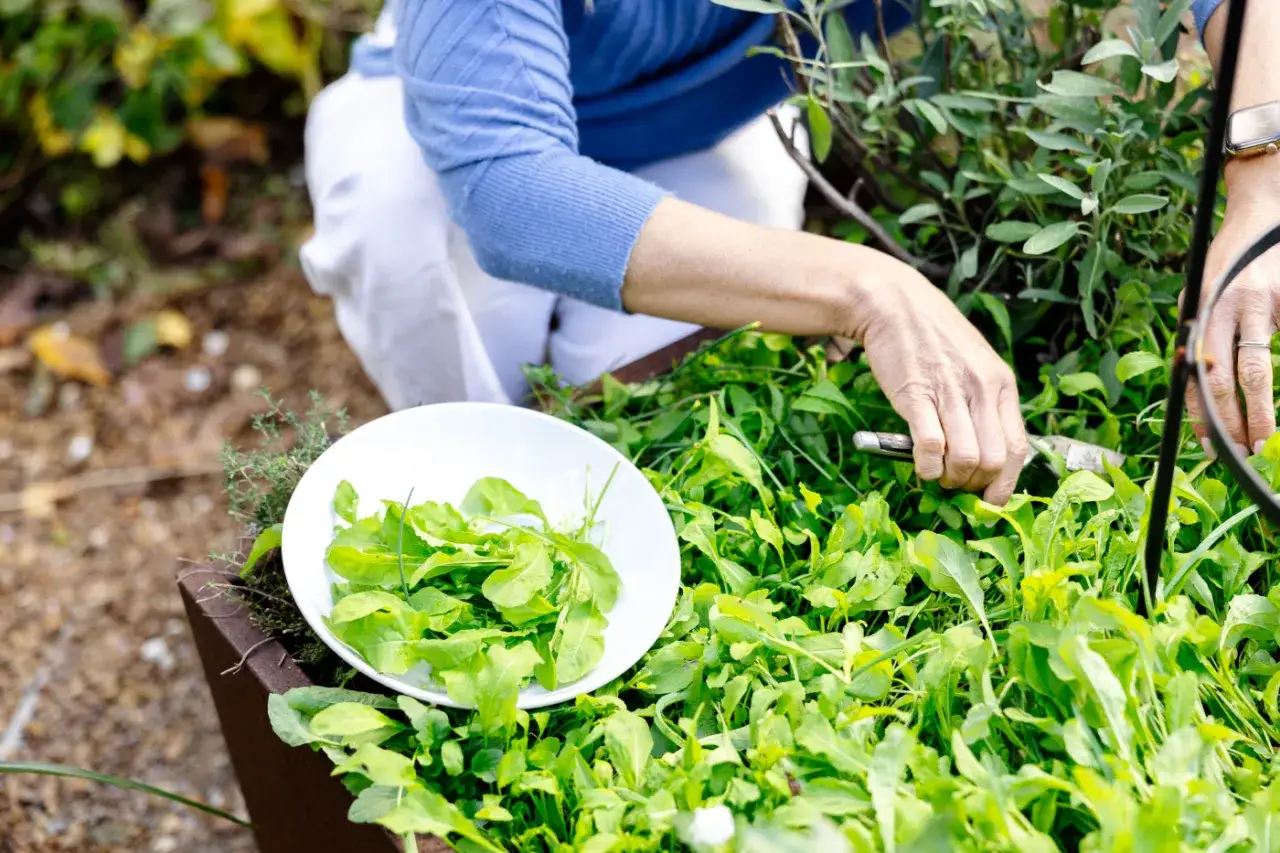
- Harvest in the morning or in a cool part of the day. The leaves are firmer and less likely to wilt while you work.
- Check the plant from the outside in. I start with the oldest outer leaves because they are usually the biggest and the most ready to pick.
- Snip or pinch the leaf stems cleanly. I prefer scissors for a neater cut, especially if the leaves are small and delicate.
- Leave the center crown untouched. That growing point is what keeps new leaves coming.
- On a dense patch, cut a section a couple of inches above the soil line instead of yanking the whole plant.
- Take only what the plant can spare. My rule of thumb is to avoid stripping any one plant too aggressively if I want it to keep producing.
- Set the leaves loosely in a basket or bowl. Crushing them now means limp greens later.
For baby-leaf harvests, I often treat a row almost like a salad bed and take a quick pass across the top. For larger individual plants, I harvest more selectively and leave the younger interior leaves to expand. That difference in technique is what makes arugula feel generous instead of one-and-done.
What to do right after you pick the leaves
Fresh arugula is at its best when it is cool, dry, and handled quickly. I rinse the leaves in cold water if they are dusty or gritty, then dry them thoroughly with a spinner or a clean towel. Wet leaves packed into a bag are a fast path to slimy greens. Clemson notes that greens are best used within about a week of harvest, and that matches what I see in real kitchens: the sooner arugula is eaten, the better it tastes.
If the plant still looks healthy after picking, I water it well so it can recover. A bed that has been cropped hard will also appreciate soil that stays evenly moist, especially in raised beds or containers where the surface dries fast. If the soil is poor, a light feed can help, but I would rather rely on good moisture and rich planting soil than over-fertilize a salad green. The leaves are quick to regrow when conditions stay steady, which is why the next section matters so much.
Common mistakes that shorten the harvest window
Most arugula problems come from pushing the plant too far or too late. The crop is forgiving, but it is still a cool-season green with a fairly short prime window.
- Waiting too long to pick - Large leaves can turn tougher, and the flavor becomes sharper very quickly.
- Cutting too low - If you remove the crown, the plant cannot regrow the way a healthy rosette can.
- Ignoring heat stress - Warm weather speeds bolting, especially in full sun.
- Letting the soil dry out - Stressed plants get more bitter and recover more slowly after harvest.
- Harvesting wet and storing wet - Moist leaves bruise and spoil much faster in the refrigerator.
- Assuming every leaf should be the same size - The best harvest is often a mix of outer leaves and smaller inner ones, not a perfectly uniform cut.
I also see gardeners wait for the plant to get “bigger” when the better move is actually to pick sooner and more often. That habit keeps the leaves tender and buys you more harvests from the same planting. Once that rhythm is working, the last job is making the crop last as long as the season allows.
The small adjustments that keep arugula producing longer
In much of the United States, arugula behaves like a spring-and-fall crop first and a summer crop only if the weather is kind. Light shade helps slow bolting, especially in hotter regions, and succession planting every 2 to 3 weeks keeps a fresh patch coming on as older plants fade. I like that approach because it spreads the risk: if one sowing gets tired, the next one is already on deck.
Regular cropping also helps. When I keep taking the outer leaves and leave the center alone, the plant keeps trying to replace what I removed. If the weather turns hot and the plant starts to shoot up, I switch from “keep it going” mode to “pick it now” mode. At that stage, the leaves are still edible, just sharper, and the flowers can be used as a peppery garnish. That is the part most people forget: a bolting arugula plant is not useless, it is simply changing character.
If you want one simple rule to remember, it is this: harvest early, harvest lightly, and keep the plant comfortable enough to make more leaves. That is the routine that turns a short-lived salad green into a steady part of the kitchen for as long as the season allows.