The space around a water heater looks simple until something leaks, vents poorly, or starts making noise. This guide breaks down water heater plumbing in practical terms: how the lines are arranged, which safety parts matter, what changes between tank, tankless, electric, and heat pump setups, and where homeowners usually run into trouble. I’m focusing on the details that actually affect reliability, cost, and safety in a U.S. home.
The essentials at a glance
- A proper installation is more than two pipes on a tank; the shutoff valve, relief valve, and expansion control all matter.
- Gas heaters add venting and combustion-air concerns, while electric and heat pump units shift attention to electrical supply and condensate drainage.
- Closed systems often need an expansion tank. If a check valve, PRV, or backflow preventer is in place, thermal expansion has to go somewhere.
- Simple tank replacements are usually cheaper than retrofits that change fuel type, venting, or service access.
- Annual flushing, leak checks, and a sensible 120°F setpoint help the system last longer and run more safely.
How the piping layout around a water heater works
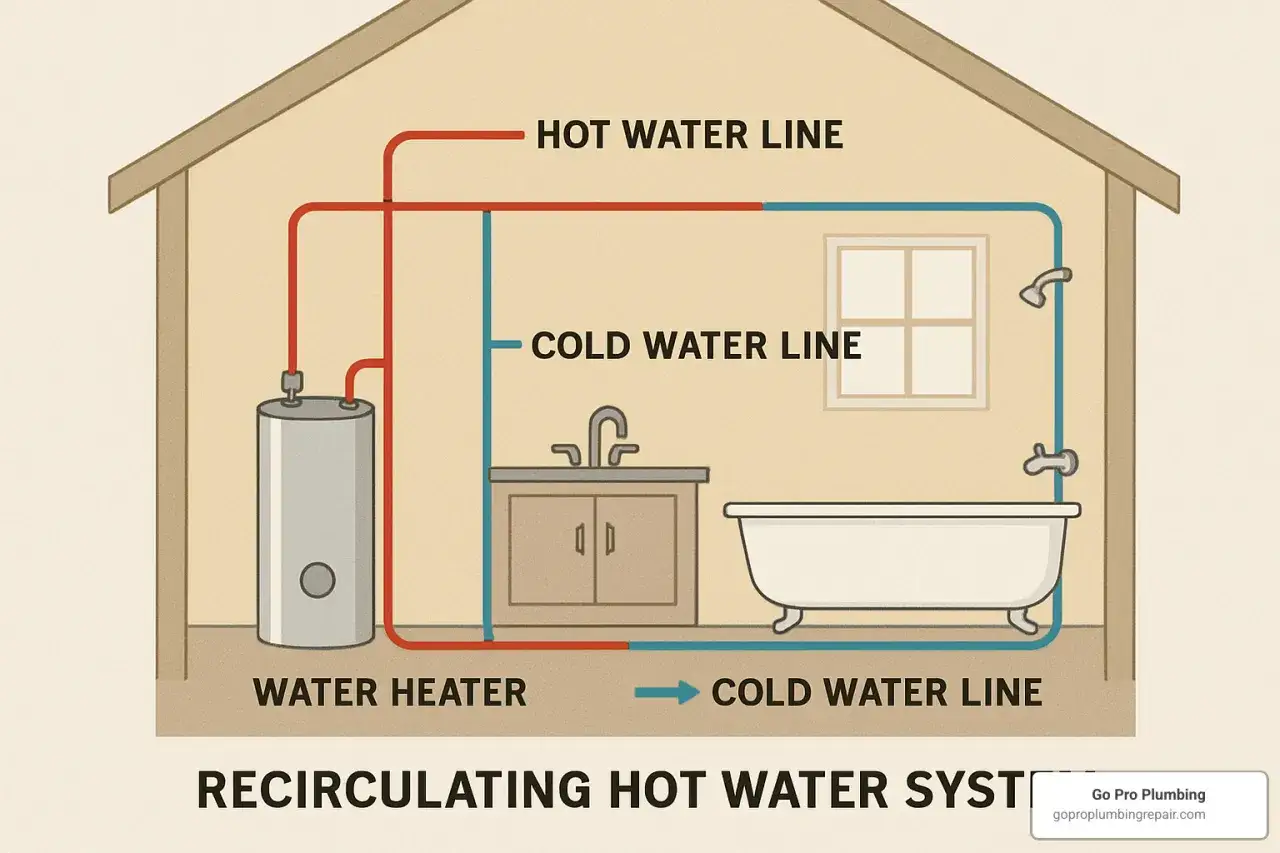
I start with the basics: cold water enters the tank, heated water leaves it, and a set of safety parts keeps pressure and temperature from getting out of hand. That sounds obvious, but the difference between a clean setup and a problem job is usually found in the details around those connections, not in the tank itself.
The hot and cold lines should be easy to identify, easy to isolate, and easy to service. I want a shutoff valve on the cold supply, a clear route for the temperature and pressure relief discharge, and enough room around the unit to replace parts without tearing apart nearby plumbing. If the home has a pressure-reducing valve, check valve, or backflow preventer, I also expect an expansion tank on the cold side to absorb the water that expands when the heater runs.
| Component | What it does | Why I care |
|---|---|---|
| Cold-water shutoff valve | Isolates the heater from the home supply | Makes service and emergency shutdown fast |
| Hot-water outlet | Sends heated water to the fixtures | Wrong routing or poor fittings can cause heat loss and leaks |
| Expansion tank | Absorbs pressure created when water expands | Protects the system in homes with closed plumbing |
| T&P relief valve and discharge pipe | Releases excess temperature or pressure | It is a core safety device, not an optional accessory |
| Drain pan | Catches minor leaks or condensate | Helps protect floors, ceilings, and finished space |
| Drain valve | Lets the tank be flushed or drained | Useful for maintenance and sediment removal |
I also pay attention to the fittings themselves. Dielectric connectors help reduce corrosion when dissimilar metals meet, and heat traps can limit unwanted circulation so the tank does not bleed heat back into the pipes. Once the layout is clear, the next step is learning which symptoms usually point to a small fix and which ones point to a failing tank.
The parts I check first when a system is acting up
When a water heater starts misbehaving, I do not begin with the thermostat. I begin with the signs around the tank, because the symptoms usually tell the story faster than the controls do. A drip at the top, rust near the base, or moisture around the relief line usually means the problem has been developing for a while.
- Drips at the top connections often point to loose fittings, failed seals, or tired flex connectors.
- Rust at the base of the tank usually means the tank itself is corroding, which is a replacement conversation, not a patch.
- Popping or rumbling usually comes from sediment, especially in harder-water areas.
- Water hammer suggests pressure spikes or unsecured piping.
- Repeated T&P discharge means pressure, temperature, or expansion is not being controlled correctly.
- Lukewarm water can be a thermostat issue, a burner or element failure, or a tank that is simply too small for the household.
What a clean replacement or new installation looks like
A good replacement is orderly. The water, gas, or electrical supply is shut down first, the old tank is drained safely, and the new unit is set level with enough access around it to service the connections later. I like installs that look almost boring when they are finished, because boring usually means the owner will not hear from the plumber again for the wrong reasons.
- Shut off the water, and disconnect gas or power.
- Drain the tank and remove the old unit.
- Set the new heater on a stable base and level it.
- Reconnect the cold inlet, hot outlet, and any required expansion tank or service fittings.
- Reconnect venting, condensate drainage, or electrical supply if the model needs them.
- Refill, purge air, test every joint, and verify that the relief path works properly.
In many U.S. markets, a straightforward tank replacement often lands around $1,600 to $2,400 installed, while tankless or heat pump retrofits usually cost more because they may require venting changes, condensate work, electrical upgrades, or gas-line adjustments. A same-footprint swap can often be handled in half a day, but a conversion job can take a full day or more, especially when code upgrades are part of the scope. Once the install steps make sense, the differences between heater types become much easier to judge.
How the setup changes by heater type
The plumbing layout is not identical across every water heater. The tank may look familiar from one model to the next, but the support system around it changes enough that I always ask what type of heater I’m dealing with before I talk about cost or labor.
| Type | What changes around the unit | What usually drives the extra work |
|---|---|---|
| Standard tank, gas | Needs hot and cold connections plus venting and combustion air | Flue condition, draft, and safe exhaust routing |
| Standard tank, electric | Usually the simplest plumbing layout, with no venting | Electrical capacity and access to the elements or thermostat |
| Tankless | Often needs service valves, stronger flow management, and careful inlet filtering | Vent sizing, gas-line capacity, and descaling access |
| Heat pump | Needs condensate drainage and enough surrounding air space | Drain routing, airflow, and sometimes a pan or stand |
For a gas unit, the venting and combustion-air path can matter as much as the water lines. For a heat pump model, the condensate drain is the detail that gets missed most often, and that mistake shows up later as a leak or overflow. Tankless systems are a different kind of headache: they can be efficient and compact, but they are less forgiving if the gas supply is undersized or the service valves were installed carelessly. The common failure points make more sense once you see how install errors show up in real homes.
The mistakes that create leaks, noise, and callbacks
Most water heater failures are not mysterious. They are the predictable result of skipping one of the boring details that should have been handled on day one. If I had to name the mistakes I see most often, they would be these:
- Skipping the expansion tank on a closed system.
- Routing the relief discharge into a hidden drain where nobody can see a problem.
- Reusing corroded connectors because they “look fine.”
- Mixing metals without the right protection and creating long-term corrosion.
- Leaving sediment in the tank until the heater starts rumbling and losing efficiency.
- Ignoring a blocked condensate line on a heat pump unit.
- Setting the temperature too high and increasing scald risk and standby loss.
I also see a lot of noise complaints that are really pressure complaints. A banging pipe, a vibrating supply line, or a relief valve that dribbles occasionally is usually telling you the system is under stress. That is why I prefer to inspect the heater after the first full heat cycle, not just the moment the last fitting is tightened. Those checks matter because even a good-looking installation can still age badly if the basics are ignored.
The details I never skip before signing off on the system
The last pass is usually the most valuable. I check for leaks again, confirm that the discharge path is clear, and make sure the area around the heater gives someone room to service the unit later. I also like to set the temperature around 120°F for most homes unless there is a specific reason to go higher, because that keeps the water hot enough for normal use without pushing scald risk or energy waste any higher than needed.
For maintenance, I prefer a simple routine: look for drips monthly, flush sediment at least once a year, and service tankless units on a descaling schedule that matches the water quality in the home. Hard-water homes need more attention, and heat pump systems need a clean condensate path just as much as they need open airflow. If a gas unit is involved, I want the venting sound, the exhaust path, and the combustion-air setup checked by someone who understands that appliance, not just someone who can tighten a fitting. If the work involves gas, venting, electrical changes, or a relief-valve discharge that will not behave, I would not treat it as a DIY project. That is the point where the connection layout stops being a convenience issue and becomes a safety issue.