A shower floor has one job, but it has to do it flawlessly: collect water, move it to the drain, and keep the structure underneath dry. A proper shower pan installation is where that system either comes together cleanly or starts leaking by design. In this guide I break down the pan types, the prep work, the actual installation sequence, and the details that matter most in U.S. bathrooms.
The decisions that matter before the first tile goes down
- Choose the pan system first: prefab base, mortar bed, or bonded foam tray.
- Match the drain to the system; the wrong drain is a common failure point.
- Keep the floor slope at about 1/4 inch per foot toward the drain.
- Waterproofing has to cover the pan, curb, seams, and drain transition as one system.
- Most leaks come from poor prep, blocked weep holes, or mixing incompatible parts.
What the shower base is actually doing
I think of the base as the hidden manager of the whole shower. It supports your weight, directs runoff, and protects the framing, subfloor, and ceiling below from repeated moisture exposure. If any one of those jobs is handled poorly, the rest of the assembly starts working harder than it should.
For homeowners, the biggest mistake is treating every shower floor the same. A fiberglass receptor, a mortar bed, and a bonded waterproof tray all solve the same problem in different ways, but they do not use the same drain details or waterproofing layers. That is why the right system matters before the first tool comes out.
| System | Best for | What I like about it | Tradeoffs | Typical budget |
|---|---|---|---|---|
| Prefabricated acrylic or fiberglass base | Standard alcoves and quick replacements | Lightweight, simpler install, fewer leak paths | Limited sizing and needs a flat, stiff subfloor | Usually about $900 to $2,300 installed |
| Traditional mortar bed with liner | Custom tile showers and odd dimensions | Flexible layout and strong when built correctly | More labor and more chances to miss a detail | Often around $900 to $3,500 for the pan portion |
| Pre-sloped foam tray with bonded membrane | Tile showers where speed and consistency matter | Factory slope, lighter weight, cleaner workflow | Requires matched drain parts and accessories | Tray materials often run roughly $250 to $600 |
Once you know which build you are dealing with, the prep work becomes much easier to judge. The next section is where I look before I set anything permanently.
What I check before I touch the drain
The shower opening has to be sound before a pan will stay sound. I look for a stiff subfloor, a flat enough footprint, and a drain line that is actually where the pan expects it to be. If the framing is springy, the floor is rotten, or the pipe height is wrong, the pan is already fighting a losing battle.
For a typical job, I want a level, tape measure, utility knife, drill, mixing paddle, bucket, straightedge, the correct drain kit, and the waterproofing materials the system calls for. If any product sheet specifies a proprietary drain or membrane corner, I treat that as mandatory, not optional.
- Verify that the subfloor is dry, solid, and properly fastened.
- Measure the drain location against the finished pan dimensions, not just the rough opening.
- Check the pipe material, usually PVC or ABS in U.S. homes, before choosing primer, cement, or a no-caulk drain.
- Decide whether the shower will be curbed, curbless, or standard threshold height, because that changes the base detail.
- For tile systems, confirm whether the drain is a clamping drain or a bonding-flange drain.
If the floor is out of plane, I correct that before the pan goes in. A foam tray wants a reasonably true substrate; a mortar bed can compensate more easily, but it is not a substitute for rotten wood or structural movement. That distinction saves time and avoids the false confidence that a layer of mortar can fix everything.
Once the base structure is ready, the actual installation steps are straightforward. The trick is doing them in the right order, and not combining parts from different systems.
How I would install the pan from dry fit to flood test
There are two common paths here: a prefabricated receptor or tray, and a traditional tile-ready pan built with mortar and waterproofing. The first is faster and more standardized. The second gives you more flexibility, but it punishes sloppy work.
For a prefabricated base or foam tray
- Dry-fit the tray and verify the drain centerline before any adhesive goes down.
- Set the drain body at the finished height the system calls for.
- Check the subfloor for dips and high spots, then flatten them as needed.
- Bond the tray with the approved thinset or setting material, not a random adhesive.
- Seal seams, curb transitions, and fastener locations according to the product instructions.
- Let the assembly cure fully, then perform a flood test before tiling or closing the walls.
Read Also: Toilet Seat Replacement - Easy DIY Guide & Troubleshooting
For a traditional mortar bed with liner
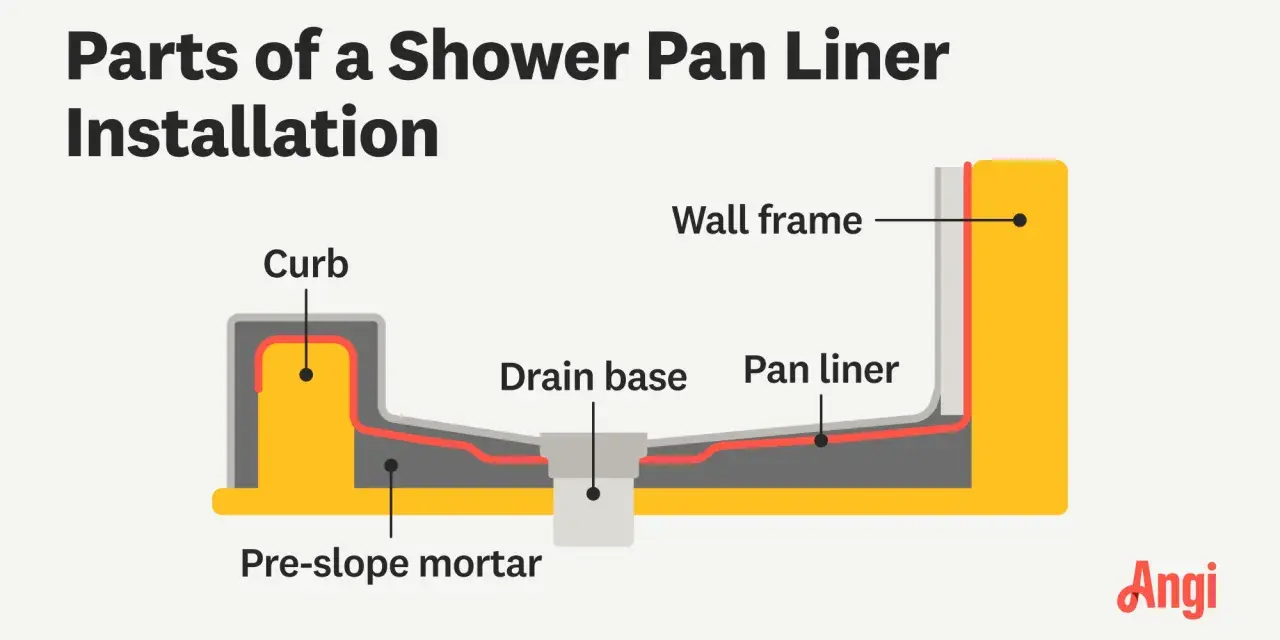
- Install the drain flange first and make sure the pipe height is right.
- Build a pre-slope under the liner so water can move toward the drain instead of sitting under the mortar.
- Run the liner up the walls and over the curb, often about 5 inches above the curb line into the wall framing.
- Fold corners cleanly and use dam corners where the curb meets the jamb.
- Protect the drain weep holes with a weep-hole protector or small spacers when packing the final mortar bed.
- Allow the bed to cure, then flood test before tile goes in.
For either system, I like a flood test before the shower gets closed up. It is the cheapest leak test you will ever do, and it catches a bad seam or drain seal before tile hides the mistake.
The difference between a shower that lasts and one that fails usually shows up in the waterproofing details, so that is where I spend the most attention next.
Why the drain, slope, and waterproofing need to work as one system
Water rarely fails in the middle of a shower floor. It fails at transitions: the drain, the curb, the corners, and the seam where different materials meet. That is why I treat slope and waterproofing as a single design problem instead of two separate steps.
- Slope should consistently move toward the drain, usually about 1/4 inch per foot.
- Drain choice has to match the base. A preformed base wants a no-caulk or solvent-weld drain, while a tile floor usually needs a clamping drain or a bonding-flange drain.
- Weep holes in traditional drains must stay open so trapped water can escape from under the tile bed.
- Liner height matters because the waterproof layer has to protect the framing above the curb line, not just the floor.
- Curbless showers need extra planning because the floor itself has to carry the containment, which often means a recess or ramped transition.
I also pay attention to what the product system expects. Some membrane systems are built around a factory tray and a matching drain flange, while others are designed for a site-built mortar bed. When the parts are matched, the installation is cleaner and the warranty risk drops. When they are mixed, the problems show up later, usually as slow leaks or a soft floor.
Once those details are handled correctly, the job is less about luck and more about avoiding the handful of mistakes that cause most callbacks.
The mistakes that cause leaks, odors, and soft spots
Most bad shower pans do not fail dramatically on day one. They fail slowly: grout cracks, the curb softens, the drain smells damp, or the bathroom ceiling below shows a stain months later. Those symptoms usually point to one of a few predictable errors.
- Skipping the pre-slope under a traditional liner, which leaves water trapped under the mortar bed.
- Blocking weep holes with too much sealant or packed mortar.
- Cutting liner corners instead of folding them or using proper dam corners.
- Using the wrong drain type for the base system.
- Installing a foam tray over an uneven or weak subfloor.
- Trusting the pan to compensate for rotten framing or loose subfloor panels.
- Skipping the flood test and discovering the leak after tile, grout, and glass are already installed.
The simplest way I keep a project honest is by checking whether each layer can do its own job without rescuing the next layer. The drain handles drainage, the membrane handles waterproofing, and the structure handles support. If one part is expected to do two jobs, something usually gives.
That reality is why some homeowners can handle a straightforward replacement while others are better off bringing in a plumber or tile setter early.
What this usually costs in the U.S. and when a plumber is worth it
For a straightforward replacement in the U.S., a basic prefab base often lands around $900 to $2,300 installed, while a custom tile-ready pan can move higher, especially once drain relocation, waterproofing, tile, and glass work are included. Material-only prices are much lower, but labor is where the spread gets wide.
| Project type | Typical time | What usually drives the price |
|---|---|---|
| Prefab acrylic or fiberglass base | About 1 day to 2 days | Drain alignment, demo, and subfloor correction |
| Pre-sloped foam tray with bonded membrane | About 1 to 3 days | Matched drain parts, membrane accessories, and tile labor |
| Traditional mortar bed with liner | About 2 to 4 days, plus cure time | Extra labor for pre-slope, liner, curb, and flood test |
I would call a plumber or tile pro sooner if the drain has to move, the subfloor feels soft, the shower is being converted to curbless, or the pan has to tie into a steam or bonded waterproofing system. Those jobs are still doable, but they stop being simple once the pipe routing or floor structure changes.
If you are keeping the drain in place and swapping in a like-for-like receptor, the project is more approachable. Once you start moving plumbing or building a fully custom tile shower, the margin for error gets thin fast.
The details that make a shower floor stay quiet for years
When a shower base performs well, nobody thinks about it again. That is the goal. I want the floor to drain cleanly, the curb to stay dry, and the framing below to remain boring in the best possible way.
If I had to reduce the whole job to three rules, they would be these: choose one system and stay with it, keep the slope consistent, and never leave water with a hidden place to sit. Those three decisions do more for durability than any flashy finish or expensive tile choice.
For most bathrooms, the best result comes from matching the pan type to the room, not forcing the room to fit a bad system. That is the real lesson behind a well-built shower floor, and it is the one that saves the most money over time.