This guide shows how to install a bathtub in a way that keeps the plumbing accessible, the tub level, and the finished room watertight. I’m focusing on the parts that actually matter in a real bathroom: choosing the right tub style, preparing the rough-in, connecting the drain and overflow correctly, and closing the walls without creating a future leak problem.
The job is won or lost in the rough-in and the leak test
- The tub type decides how much floor space, framing, and support you need.
- Most problems come from a bad drain alignment, an uneven subfloor, or weak support under the base.
- Dry-fitting before final installation saves more time than any tool purchase.
- A watertight drain, a level set, and a proper silicone seal do most of the long-term protection.
- If the project involves subfloor rot, drain relocation, cast iron, or electrical work, a plumber is often the smarter call.
Choose the tub that fits the room and the rough-in
Before I touch a wrench, I decide what kind of tub is going in. That choice shapes everything else, from the drain location to the amount of framing and wall finish work. In a typical U.S. bathroom, an alcove tub is the easiest replacement because it sits between three walls, while a freestanding tub needs more open floor space and a different finish detail around the plumbing.
| Tub type | Typical fit | Installation notes | Difficulty |
|---|---|---|---|
| Alcove | Standard three-wall bathroom layouts | Works well when the drain and supply lines already line up with the existing rough-in | Moderate |
| Drop-in | Custom deck or surround | Needs framing for the deck, plus careful finish work around the rim | Moderate to high |
| Freestanding | More open floor area | Often simpler to set, but the exposed drain and floor finish must be planned neatly | Moderate |
| Cast iron | Any layout with reinforced support | Heavy enough that floor loading and handling matter as much as plumbing | High |
| Acrylic or fiberglass | Most remodels | Lighter and easier to maneuver, but they usually need the support bed or feet arrangement the manufacturer specifies | Moderate |
Measurements matter more than brand names. I check the opening length and width, the finished wall thickness, the drain centerline, the door swing, and the floor structure below. Standard alcove tubs are commonly around 60 to 72 inches long and 30 to 36 inches wide, but the product sheet is the only number I trust. Once the tub style is chosen, the next step is gathering the parts that make the install actually hold water.
Gather the parts that make or break the job
A bathtub install looks simple until one small missing part stalls the project. I like to have the drain and overflow assembly, the trap, the trap adapter, sealant, shims, a level, and the fastening hardware on site before the old tub comes out. If the tub model calls for a mortar bed or adhesive support, I plan for that too instead of improvising halfway through.
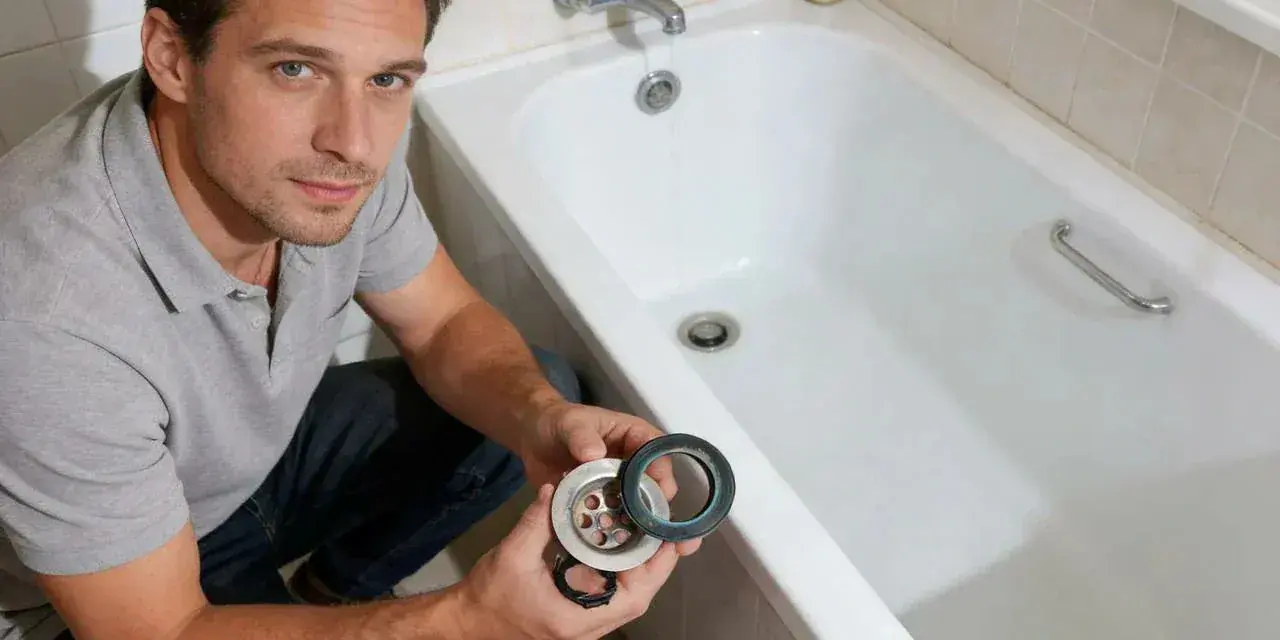
- Drain and overflow kit - connects the tub to the waste line and handles the overflow opening.
- P-trap - the U-shaped drain trap that keeps sewer gas from coming back into the room.
- Shims - thin leveling pieces used when the floor is slightly out of plane.
- Level - essential for checking the tub across the rim and along the drain side.
- 100% silicone - the sealant I use at finished joints and around the rim where the manufacturer calls for it.
- Mortar or support bed - used on some tubs to eliminate flex and keep the base fully supported.
- Blocking and ledger support - wood added between studs or along the wall to help support the flange and wall finish.
- Access panel - a service opening that makes future drain repairs far easier.
In manufacturer instructions, the same themes repeat: level subfloor, proper drain access, solid support, and a final leak check before the walls are closed. That is not accidental. Tub plumbing failures usually come from one of those four areas, so I treat them as non-negotiable. With the parts ready, I can move on to the dry-fit, which is where most hidden problems show up.
Dry-fit the tub and confirm the rough-in
This is the stage people skip when they are eager to “just set the tub,” and it is exactly the stage that prevents expensive do-overs. I remove the old unit, clean the area, and inspect the subfloor before anything goes back in. If the floor has rot, soft spots, or movement, I repair that first; setting a new tub over bad structure is false economy.
- Shut off the water and disconnect the old plumbing carefully.
- Remove the old tub and inspect the framing, subfloor, and drain opening.
- Check that the subfloor is flat and level, then repair any damaged sections.
- Dry-fit the new tub in place and confirm that the drain lines up with the waste opening.
- Mark the tub’s position, stud locations, and any valve or spout openings that need to be cut later.
- Add blocking or ledger support where the tub flange or wall finish will need backing.
I also check the wall thickness before I trust the opening. Finished tile, backer board, and trim can steal more space than you expect, which is why a tub that “fit on paper” sometimes binds in the room. When the manufacturer provides rough-in dimensions, I use those instead of generic bathroom rules. A dry-fit takes patience, but it saves time later because the drain, overflow, and wall finish all stay aligned. Once the tub sits correctly in the opening, the plumbing can be connected for real.
Set the tub, connect the drain, and test for leaks
The physical set is where the project becomes real. I assemble the drain and overflow on the tub first, because that is usually easier on the floor than inside a tight alcove. If the model requires silicone, plumber’s putty, or a specific gasket order, I follow the manufacturer’s sequence exactly. This is one of those moments where “close enough” is not close enough.
- Install the drain and overflow assembly on the tub before lifting it into place.
- Move the tub in with help, especially if it is cast iron or a large soaking model.
- Set the tub level across the rim and along the drain side.
- Use shims only where needed, and only in a way that leaves full support under the base or feet.
- Add the support bed if the tub calls for one. Some acrylic and fiberglass tubs need a mortar bed or adhesive support; others have molded support points instead.
- Connect the waste and trap once the tub is sitting correctly, not before.
- Run water, fill the tub to the overflow, and inspect every joint for leaks.
A watertight seal on the drain connections is the part that protects the room below. I do not trust a visual check alone. I fill the tub, let it sit, and look underneath for any moisture around the trap, the waste-and-overflow assembly, and the floor penetration. If the tub is against an access panel, I leave that opening available instead of sealing everything shut. That single decision makes future repairs far less destructive. Once the plumbing checks out, the room can be closed up.
Close the walls without trapping moisture
This is where the install either looks finished or starts quietly failing. I want the wall material to meet the tub cleanly, but I do not want rigid finish materials packed hard against the rim. A small movement gap matters because tubs flex slightly when filled and emptied, and wall materials move too. If you force everything tight, the caulk or grout becomes the weak link.
For the wet area, I prefer cement board or other water-resistant wallboard behind tile or a compatible surround system. If the installation includes tile, waterproofing belongs behind the finish, not just on the surface. At the change of plane, I use 100% silicone rather than grout, because the joint needs flexibility. That detail is boring only until the first seasonal movement cracks a rigid joint and sends water where it should never go.
- Keep the tub rim protected while finishing the wall surface.
- Do not trap the flange or rim with hard material.
- Use the correct sealant at the tub-to-wall joint.
- Install the faucet trim after the surrounding wall finish is complete.
- Allow sealant to cure before the tub is put into regular use.
When the finish work is done this way, the bathtub stops being a plumbing fixture you have to worry about and starts behaving like part of the room. From there, the remaining question is usually money and scope, which is where a lot of DIY plans break down.
Expect the real costs and know when to hand it to a plumber
The cost of a bathtub project depends far more on scope than on the tub itself. Homewyse currently places a replacement in the rough range of $1,666 to $2,781 per tub, while Angi reports average labor costs of $900 to $2,400 for bathtub replacement, with complex jobs climbing higher. That spread makes sense once you factor in wall repair, flooring damage, moving the drain, and whether the project stays a straight swap or turns into a partial remodel.
| DIY usually makes sense when | Hire a plumber when | Why it matters |
|---|---|---|
| The new tub matches the old rough-in closely | The drain has to move | Drain relocation often means more floor and plumbing work than people expect |
| The subfloor is sound | There is rot or structural damage | Bad framing under a tub can cause flex, cracking, and leaks later |
| The tub is light enough to handle safely | The tub is cast iron or oversized | Heavy fixtures need more hands and more care to avoid damage |
| The bathroom finish is simple | The project includes tile, waterproofing, or electrical work | Complex finishes and jetted tubs raise the risk and may trigger permit requirements |
My practical rule is simple: if the work is limited to a direct replacement and you can see both the drain layout and the floor structure clearly, the job is manageable. If you cannot see what the tub will rest on, or if the drain and wall lines fight the new fixture, bringing in a pro is usually cheaper than fixing a rushed install. The final quality check is where the job pays off, and that is the part I never skip.
The checks I never skip before calling the job done
Before I consider the install finished, I run a last round of checks that take minutes but prevent most callbacks. I fill the tub again and watch the drain connections, I verify that the tub still sits level after everything has settled, and I inspect the caulk line for even coverage. If there is an access panel, I confirm that it actually opens without removing half the wall.
- Photograph the drain and overflow before the wall closes.
- Keep the tub’s spec sheet and installation instructions with the home records.
- Label the access panel location so future work is easier.
- Wait for silicone to cure before heavy use.
- Keep a small amount of matching sealant or trim material for later touch-ups.
The best bathtub installs are the ones that disappear into the room and keep working quietly for years. If I had to reduce the whole process to one habit, it would be this: dry-fit carefully, support the tub properly, and test the plumbing as if the wall will never open again. That is the difference between a bathroom upgrade that lasts and one that turns into a repair project.