
Toilet tanks collect mineral scale, slimy residue, and the kind of hidden buildup that slowly wears down parts you do not see every day. If you need a practical answer for how to clean toilet tank buildup without damaging the mechanism, the safest route is simple, patient, and a little more careful than cleaning the bowl. I’ll walk through what to use, what to avoid, how to clean it step by step, and when the mess is really a plumbing problem.
What matters most before you start cleaning the tank
- Shut off the water first and empty the tank before scrubbing anything inside.
- Use gentle cleaners like white vinegar, mild soap, or a tank-safe product.
- Avoid bleach tablets and abrasive pads because they can shorten the life of rubber seals and plastic parts.
- Let cleaners sit long enough to soften scale, especially if you have hard water.
- Clean more often in hard-water homes, since mineral buildup returns faster there.
- Call a plumber if stains come back fast or if you see worn parts, leaks, or a constant sewer-like odor.
Why the tank gets dirty in the first place
The inside of a toilet tank is a damp, dark, low-airflow space, which makes it a perfect place for mineral deposits, biofilm, and mildew to collect. Biofilm is the slippery film that forms when bacteria and grime cling to wet surfaces, and once it appears, it tends to trap more dirt on top of itself. Hard water can leave white or chalky scale, iron-rich water can stain the tank orange or brown, and slow leaks can leave the same parts wet long enough for residue to spread.
That matters because the tank is not just a water container. It holds the flapper, fill valve, overflow tube, chain, and flush mechanism. When those parts get crusted or sticky, the toilet can run longer, flush weakly, or start leaking from a seal that no longer sits cleanly. I treat tank cleaning as maintenance, not just housekeeping, because it protects the plumbing hardware as much as the porcelain.
Once you know what causes the buildup, choosing the right cleaner becomes much easier, and the next step is picking tools that clean without wearing out the parts.
What to use and what to avoid
I keep the tool list short on purpose. Inside a tank, aggressive cleaning is usually the wrong move. Gentle works better here because the parts are made to move, flex, and seal.
| What to use | Best for | Why it works |
|---|---|---|
| White vinegar | Mineral scale, mild odor, light residue | It helps loosen deposits without scraping the tank hardware. |
| Baking soda | Extra scrubbing power on stubborn spots | It adds mild abrasion without the damage caused by harsh pads. |
| Mild dish soap and warm water | General grime and wipe-down cleaning | Good for regular maintenance and safer around most tank parts. |
| Tank-safe commercial cleaner | Heavier buildup when the label says it is safe for internal parts | Useful when vinegar is too weak, but the product label matters more than the brand name. |
Avoid bleach tablets, strong chlorine cleaners, abrasive pads, steel wool, and boiling water. Those are the shortcuts that tend to create leaks, brittle seals, or surface damage. If your toilet has a proprietary cleaning cartridge or self-cleaning reservoir, follow the manufacturer’s instructions instead of improvising with a household cleaner.
With the right supplies in hand, the actual cleaning process is straightforward, and it starts with shutting the system down the right way.
A safe cleaning routine that protects the parts inside the tank
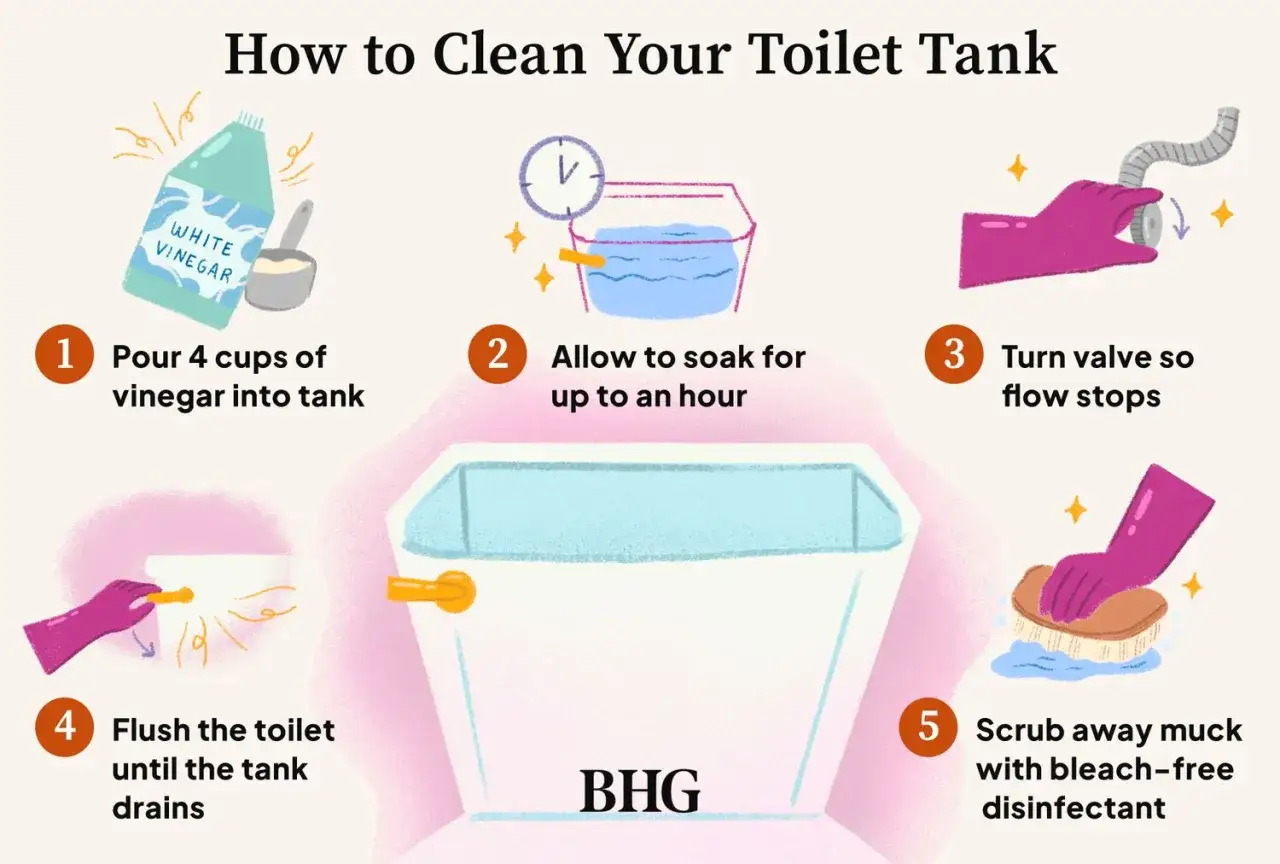
- Turn off the shutoff valve behind the toilet.
- Flush the toilet to drain most of the water from the tank.
- Use a sponge or towel to soak up the remaining water so you can reach the surfaces clearly.
- Wipe away loose dust, slime, and visible residue from the tank walls, lid, and bottom.
- Pour in white vinegar until the stained areas are covered, or use enough to soak the problem spots thoroughly.
- Let it sit for at least 20 to 30 minutes for light buildup. For heavier scale, I prefer several hours or overnight.
- Scrub with a soft brush or an old toothbrush, especially around the flapper, fill valve base, overflow tube, and corners.
- Drain the tank again, rinse with clean water, and wipe away loosened debris.
- Turn the water back on and flush two or three times to clear the system.
The main rule is simple: scrub the grime, not the working parts. I do not pry at the flapper or yank on the chain unless I already know a replacement is needed. A forced repair can turn a cleaning job into a leak.
If the tank looks better but still smells off or shows rust-colored residue, the issue is probably more specific than ordinary dirt, which is where a closer look helps.
How to handle stubborn scale, rust, and odor
Hard-water scale
White, crusty buildup usually means calcium or lime from hard water. Vinegar is the first thing I reach for, but stubborn scale often needs a second soak. In practice, I would rather do two gentle rounds than one aggressive round with a harsh cleaner. A long soak followed by a soft-bristle brush often gets better results than scrubbing hard from the start.
Rust or orange staining
Orange or brown stains are often tied to iron in the water or corrosion on metal hardware. If the stain returns quickly after cleaning, inspect the fill valve, bolts, and any exposed metal parts for rust. If the toilet supply or internal fittings are deteriorating, cleaning alone will not solve it for long. At that point, replacement parts usually make more sense than repeated deep cleans.
Read Also: Well Pump Installation Guide - Get Reliable Water Pressure
Musty smell or dark residue
A musty tank usually points to biofilm or hidden residue around parts that are not obvious at first glance. Clean the underside of the lid, the top edge of the tank, and the areas behind the float and fill valve. If the odor remains after a thorough cleaning, I start thinking about a worn flapper, a slow leak, or poor ventilation in the bathroom rather than just dirt in the tank.
Those stubborn cases are the ones that tell you how often the tank really needs attention, which is more situational than people expect.
How often I would clean a toilet tank in a U.S. home
For most homes, I treat every six months as a solid baseline. In a house with hard water, visible mineral buildup, or recurring odor, every three months is more realistic. If your toilet gets heavy daily use or you see residue forming sooner, shorten the interval rather than waiting for it to become a bigger job.
| Home condition | Practical cleaning interval | Why |
|---|---|---|
| Low buildup, normal city water | Every 6 months | Enough to stay ahead of grime without overhandling the parts. |
| Hard water or visible scale | Every 3 months | Mineral deposits return faster and become harder to remove if ignored. |
| Recurring odor or staining | Clean now, then reassess in 4 to 8 weeks | Fast recurrence can point to a leak or a deteriorating seal. |
I would also check the tank after any repair, especially if a flapper, fill valve, or supply line has been replaced. Fresh parts can reveal old buildup that was already there, and a quick follow-up cleaning keeps the new hardware from starting dirty.
Once you set a rhythm, the tank stays easier to manage, and the final layer is the small habits that keep buildup from coming back so fast.
Small habits that keep the tank cleaner longer
The best maintenance is boring, which is exactly why it works. I keep these habits simple:
- Wipe the tank lid and exterior during regular bathroom cleaning so dust and humidity do not migrate back inside.
- Fix small leaks early, because a constantly wet flapper or valve seat creates the conditions for buildup.
- Use only products labeled safe for toilet tank parts if you choose a commercial cleaner.
- Skip in-tank bleach tablets unless the toilet manufacturer specifically approves them.
- Keep an eye on refill time and water level; a toilet that changes behavior is often telling you something before it fails.
The simplest rule is to clean gently, rinse well, and never assume the tank can take the same treatment as the bowl. When I see recurring rust, brittle rubber, or a toilet that keeps running after cleaning, I stop treating it as a cleaning issue and start treating it as a parts issue. That is usually the moment where a small repair saves a bigger plumbing headache later.