The safest approach is to match the cleaner to the cooktop material
- Glass and induction tops need a cool surface, a nonabrasive pad, and a scraper for stuck-on spills.
- Gas cooktops clean best in pieces, with grates, caps, and burner heads handled separately.
- Stainless steel should be wiped with the grain and dried well to avoid haze and streaks.
- Burnt sugar and plastic need fast, careful removal, especially on glass surfaces.
- Most damage comes from abrasive tools, wet reassembly, and letting residue bake on.
Choose the right method for the surface you have
I never treat every stove top the same, because the surface dictates the method. Glass and induction units tolerate gentle scraping and cooktop cleaner, gas models need attention to removable parts, and stainless steel usually responds best to soft cloths and warm soapy water. If your range has mixed materials, such as a glass center with stainless trim, clean each section separately so one product does not damage another.
| Surface | Best approach | What to avoid | Why it matters |
|---|---|---|---|
| Glass or ceramic | Cool completely, then use a nonabrasive pad, cooktop cleaner, and a low-angle scraper for stuck residue | Steel wool, abrasive powders, knife blades | Prevents scratches, cloudy haze, and permanent marks |
| Gas with grates and caps | Remove parts, wash with mild soapy water, and dry thoroughly before reassembly | Long soaking and rough scrubbing | Helps avoid rust, clogged ports, and uneven flame |
| Stainless steel | Wipe with a soft cloth or sponge, follow the grain, and dry or buff after cleaning | Scrubbing across the grain and harsh abrasives | Reduces streaks and discoloration |
| Mixed-material trims and knobs | Clean separately with a lightly damp cloth and mild soap | Soaking or flooding control areas | Protects seals, finishes, and electrical parts |
Knowing the surface first keeps the rest of the job simple, and it helps you avoid the one mistake that creates permanent marks.
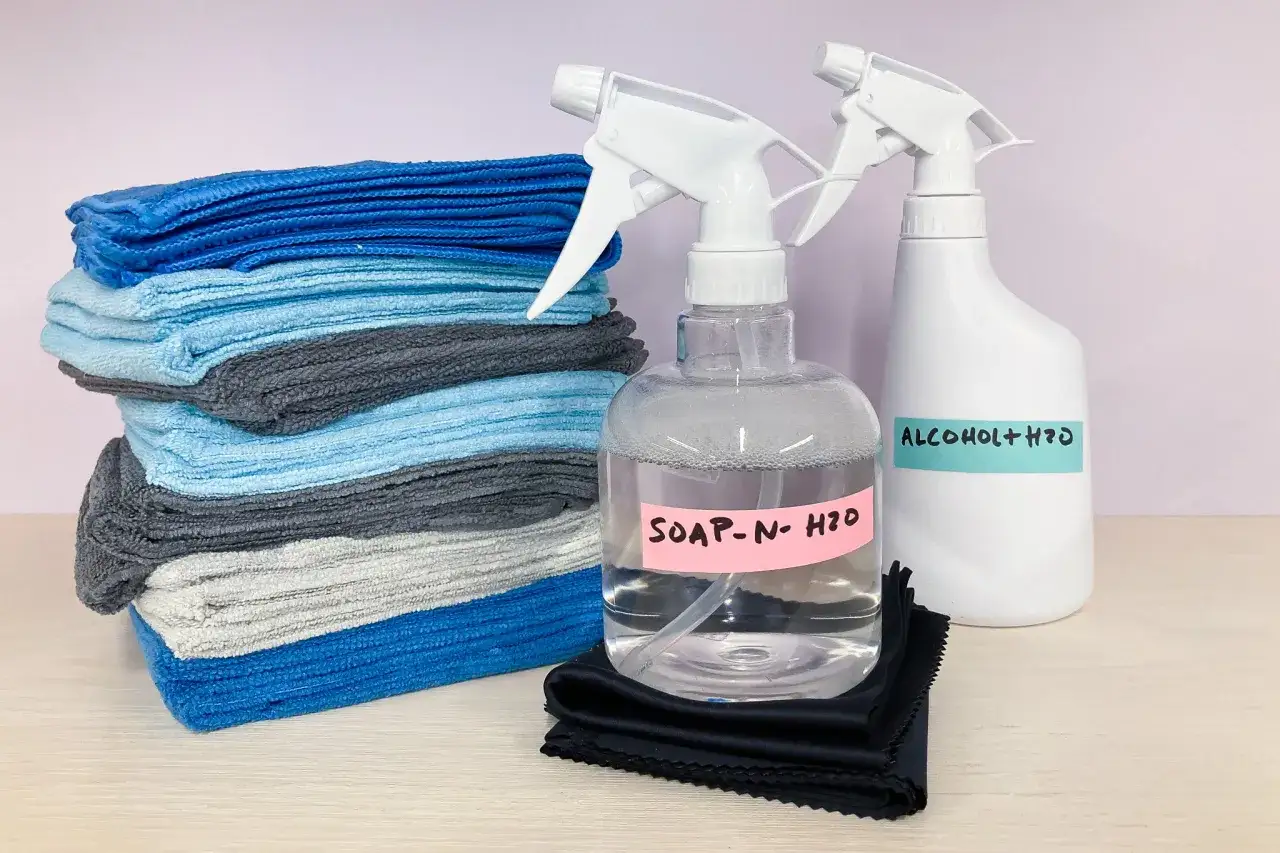
Gather the few tools that make the job easier
With the right tools nearby, cleanup stays simple instead of becoming a project. I keep the set small on purpose: one damp microfiber cloth, one dry cloth, a nonabrasive sponge, a plastic or razor-style scraper made for cooktops, mild dish soap, baking soda, and a towel for drying removable parts. For stainless steel, a dedicated cleaner can help, but it is not mandatory if the surface is only lightly soiled.
- Microfiber cloths for wiping without scratching.
- Nonabrasive sponge for everyday grease.
- Cooktop scraper for burned-on spills on glass.
- Mild dish soap for routine cleaning.
- Baking soda paste for stuck residue.
- Dry towel for grates, caps, and final buffing.
If you can reach for all of that before you start, the rest of the job is just a few calm passes over the surface.
Work through a daily clean before grime has time to harden
For ordinary splatter, I prefer a quick routine that takes about 2 to 5 minutes. The goal is not a dramatic scrub; it is to remove grease before it dries into varnish-like residue.
- Turn off the burners and let the surface cool. On glass, wait until it is warm or fully cool, not hot to the touch.
- Lift off loose crumbs with a dry cloth or soft brush so you are not grinding them into the finish.
- Wipe the surface with warm water and a drop or two of dish soap in a small bowl or spray bottle.
- Use a fresh damp cloth to remove the soap film.
- Dry the cooktop completely so water spots do not set in, especially on stainless steel.
I like this approach because it solves most messes without introducing aggressive cleaners. Once residue has hardened, though, you need a deeper method.
Lift burnt-on grease without scratching the finish
Burnt-on spills are where most people overcorrect and damage the cooktop. The trick is to soften the mess first, then remove it with controlled pressure. On glass or ceramic, a paste made from 1/2 cup baking soda and 3 to 4 tablespoons of water works well. Spread it over the stain, let it sit for about 20 minutes, and then use a cooktop scraper at a shallow angle. For lighter buildup, 10 minutes is often enough.
- Apply the paste only to the stained area so you are not smearing it everywhere.
- Hold the scraper low and move in short, careful strokes.
- Wipe away the loosened residue with a damp cloth.
- Repeat once if needed instead of pressing harder.
For stainless steel, I use a paste of dish soap and baking soda, leave it for 5 to 10 minutes, then scrub gently with a sponge following the grain. If the spill is sugary, move quickly, because candy, syrup, and jam can bond to glass when they cool and leave permanent marks.
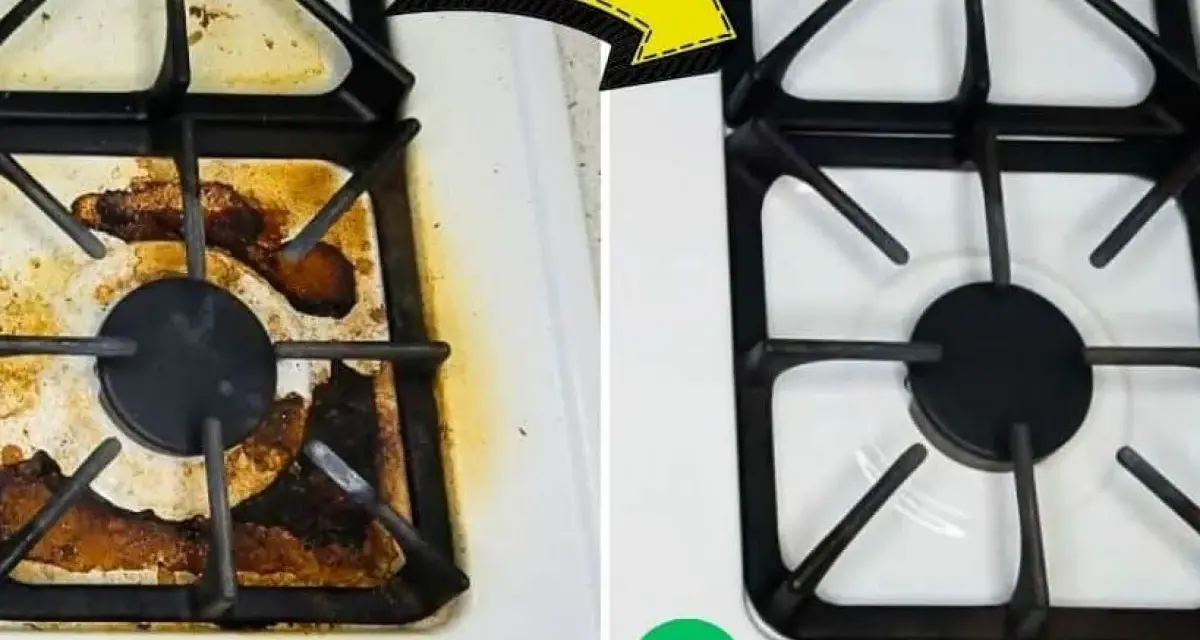
Clean gas burners, grates, and knobs separately
Gas ranges need a little more patience because the visible grime is only part of the mess. Food can collect under grates, around burner caps, and in the small openings that control flame flow. I always remove the parts once the cooktop is fully cool, then clean them one by one.
- Wash grates and burner caps in hot, soapy water with a soft sponge.
- Do not soak them for long unless the manual clearly allows it.
- Dry every piece completely before putting it back together.
- Use a soft brush or cotton swab to clear visible debris from burner heads and ignitors.
- Wipe knobs separately and keep water away from seals or electrical areas.
A misaligned cap or a damp burner part can cause weak ignition or an uneven flame, which is why drying matters as much as cleaning. Once those pieces are back in place, the cooktop itself is much easier to finish cleanly.
Avoid the mistakes that cause scratches and haze
Most bad results come from shortcuts, not from the cleaning itself. I would avoid these habits every time:
- Using steel wool, scouring powder, or a rough scrub pad on glass or stainless steel.
- Dragging pots and pans across a glass top, which can leave metal marks.
- Spraying cleaner onto a hot surface, where it can flash-dry and streak.
- Leaving cleaner residue behind instead of buffing it off.
- Reassembling grates or caps while they are still wet.
- Using oven cleaner on a cooktop unless the manufacturer specifically approves it.
- Ignoring chips, cracks, pitting, or melted plastic that has already bonded to the surface.
If a glass top has already pitted or cracked, cleaning will not reverse that damage. At that point, the right move is repair rather than more scrubbing.
Keep the next cleanup short by changing a few habits now
The easiest stove top to clean is the one that never gets a full crust of grease. I get the best results from small habits: wipe spills while they are still fresh, use lids when simmering sauces, check that pan bottoms are dry before cooking, and spend a minute after dinner on any splatter near the burners. For glass tops, a quick wipe after each use is usually enough to prevent the cloudy film that makes a deep clean feel endless.
- Keep a microfiber cloth in the kitchen, not in a distant laundry closet.
- Clean sugar-based spills right away instead of waiting until the next day.
- Use cookware with smooth bottoms to reduce scratching.
- Reset the cooktop once a week with a more careful wipe-down.
That is the approach I trust in real kitchens: stay gentle, match the method to the material, and clean the spill before heat turns it into a job you do not want to repeat.