Outdoor pools lose chlorine faster than most owners expect, especially once sunlight, leaves, sunscreen, and heavy swimmer load start working against the water. This guide explains how to shock a pool safely, how to choose the right chlorine product, what to test first, and when the water is actually ready to use again. I also call out the mistakes that waste product or make the chemistry worse, because the difference between a clean pool and a frustrating one is often a small detail.
Key points to get pool shock right
- Test pH and free chlorine first; the CDC recommends pH 7.0-7.8 and at least 1 ppm free chlorine in pools, or 2 ppm if cyanuric acid is used.
- For most outdoor residential pools, liquid chlorine is the simplest shock option; cal-hypo is useful too, but it raises calcium.
- Run the pump, brush the walls, and add chemicals to water, not water to chemicals.
- Do not swim until the water has circulated, the chlorine level is back in range, and the label allows re-entry.
- If the pool is still cloudy or green after shocking, the real issue may be filtration, high CYA, or an algae load that needs more than one treatment.
What pool shocking actually fixes
Pool shocking is a deliberate chlorine reset, not a replacement for normal sanitation. I use it when the water smells sharp, looks dull, turns cloudy after a busy weekend, or starts fighting back after rain, pollen, and sunscreen have loaded the water with organics. In practical terms, the process gives the pool a larger dose of oxidizer so it can burn through contaminants faster than routine dosing.
The main thing to understand is the difference between free chlorine and combined chlorine. Free chlorine is the active sanitizer doing the real work. Combined chlorine is chlorine that has already reacted with waste and is no longer helping much. Shocking helps clear that load and gives the water its disinfecting margin back. If the pool has gone green, shock can be part of the fix, but it works best when circulation and brushing are helping instead of being ignored.
That leads straight to the part most people skip: testing before dosing.
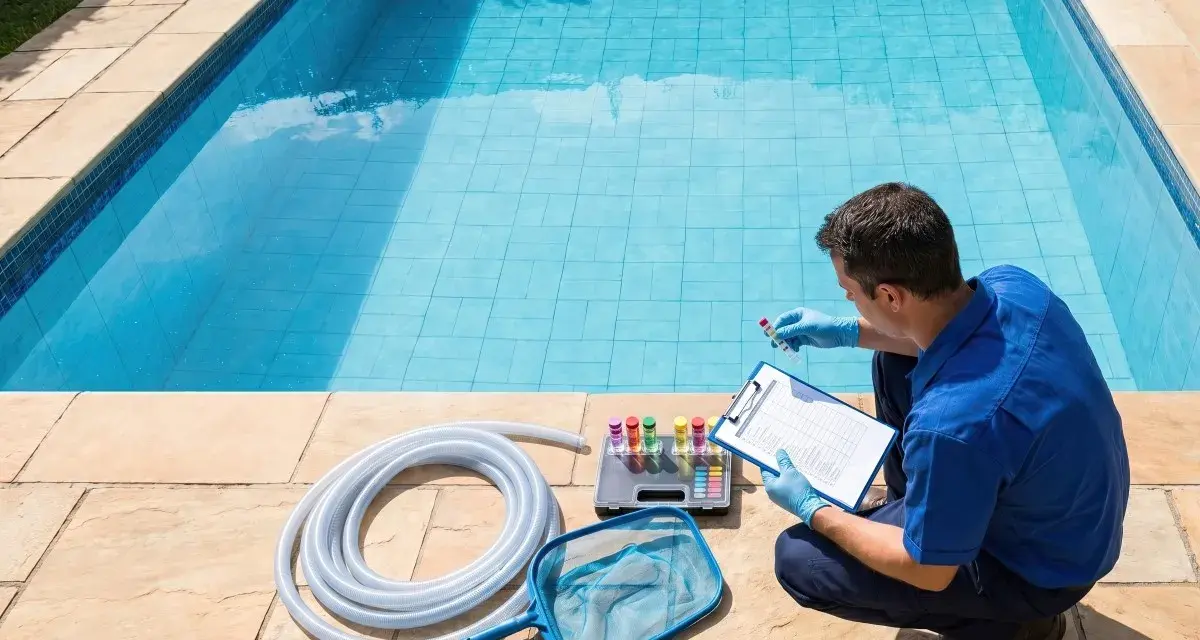
Test the water before you add anything
I never guess at shock treatment when I can test first. The basic numbers tell me whether the pool needs a chlorine boost, a pH correction, or a different approach entirely. CDC guidance keeps the sanitation baseline simple: pH 7.0-7.8 and at least 1 ppm free chlorine in pools, or 2 ppm if cyanuric acid is being used. That is the floor for healthy pool water, not a shock target, but it tells you whether the pool is already under-disinfected before you start.
| Reading | Practical target | Why I care |
|---|---|---|
| pH | 7.0-7.8, with 7.2-7.4 as a good starting point before shocking | Chlorine works better when pH is in range, and water is less harsh on swimmers and equipment |
| Free chlorine | At least 1 ppm in pools, or 2 ppm if cyanuric acid is used | This is the sanitizer reading that matters most |
| Test method | DPD kit if possible | High chlorine can bleach some strips and give a false low reading |
If your pool uses stabilized chlorine, remember what CYA, or cyanuric acid, actually does: it protects chlorine from sunlight, but too much of it can slow the chlorine down. That is one reason an outdoor pool can look like it has plenty of sanitizer and still feel off. If the stabilizer is already high, I prefer unstabilized chlorine instead of adding more of the kind that keeps stacking the problem.
Once I know the numbers, I can choose the right chlorine product instead of guessing.
Choose the right chlorine product
Not every shock product behaves the same way in an outdoor pool, and that matters more than most labels admit. For a backyard pool in the United States, I usually look at four categories and pick the one that matches the water, not the marketing copy.
| Product | Best use | Main tradeoff |
|---|---|---|
| Liquid chlorine | Routine shock, especially when CYA is already in the pool | Fast, clean, and simple, but you have to measure it accurately |
| Cal-hypo granules | Strong oxidation when calcium is not already high | Adds calcium hardness, which can become a problem in hard water |
| Dichlor or trichlor | Only when you intentionally want to add stabilized chlorine | Also adds CYA, which can make future shocking less efficient |
| Non-chlorine oxidizer | Light oxidation or faster re-entry situations | It is not a sanitizer and is not my first choice for algae or dirty water |
For most outdoor residential pools, liquid chlorine is the cleanest choice because it raises chlorine without quietly pushing calcium or CYA in the wrong direction. Cal-hypo has a place, but I am cautious with it in pools that already run hard. Stabilized products are the ones I would avoid using as routine shock if the pool already sees a lot of sun, because they can turn a short-term fix into a chemistry problem. Once you know the product, the next question is how to add it without creating a chemical mess of your own.
Add the shock safely and evenly
The safest approach is simple: pump on, pool empty, chemicals handled slowly, and nothing mixed unless the label says to do it. I wear gloves and eye protection, keep children and pets away, and open the container outside so any dust or fumes can disperse. The Virginia Department of Health is direct about the basics: add chemicals to water, not water to chemicals, and never add pool chemicals while the pool is in use.
- Measure the pool volume and read the product label before you pour anything.
- Start the circulation system first so the water is moving.
- Add the chlorine slowly at the return line or around the perimeter, following the package directions exactly.
- For granular products, do not assume every brand should be pre-dissolved; some are meant to be broadcast, while others are not.
- Brush the floor, walls, steps, and corners after application so the sanitizer reaches dead spots.
- Keep the pump running for several hours after treatment so the water is fully mixed.
For a rough liquid-chlorine example, 1 gallon of 10% product raises 10,000 gallons by about 10 ppm of free chlorine; 1 gallon of 12.5% raises it by about 12.5 ppm. That rule of thumb makes planning easier, but I still trust the label over a shortcut, especially if the pool is small, the water is already cloudy, or the product strength is not exactly what I expected.
I also keep the container dry, shaded, and in its original packaging, because CDC chemical-safety guidance says pool chemicals should be stored below 95 F/35 C, away from moisture, and out of direct sunlight. Once the chlorine is in, the only responsible move is to test before letting swimmers back in.
Know when the pool is safe to use again
I do not use the clock alone to decide when to swim. After a chlorine shock, I want the water to circulate, the chlorine level to come back into the normal operating range, and the pH to stay in line. That often means several hours and sometimes overnight for a residential pool, but the test result matters more than the elapsed time. Chlorine is not instant, and a strong dose still needs time and circulation to do its job.
- The water is clear, not hazy or foamy.
- The free chlorine reading is back in a normal operating range.
- The pH is still between 7.0 and 7.8.
- No other chemicals were added at the same time unless the label allows it.
- The product label does not require a longer wait.
If you used a non-chlorine oxidizer, re-entry can be much sooner, but only if the label says so. I still test first, because a fast return to swimming is not worth an irritated eye or a bad water reading. If the water still looks wrong after that, the problem is usually filtration or algae, not a lack of enthusiasm.
What to do when shocking does not clear the water
When a pool stays cloudy after shocking, I look beyond the chlorine first. The most common reason is not that the shock failed, but that the filter was not doing enough work or the pool chemistry needed a second correction. A strong chlorine dose cannot compensate forever for poor circulation, a dirty filter, or very high stabilizer.
- Cloudy but not green: clean or backwash the filter, brush the pool, and keep circulation running longer.
- Green water: brush aggressively, remove debris, and repeat the treatment only after you know the first dose was not wasted by weak circulation or a tired product.
- Strong smell or red eyes: that is often chloramines and pH imbalance, not a sign that the pool has "too much chlorine."
- Strip reads oddly after shocking: retest with a DPD kit if you can, since high chlorine can bleach some strips and give a false low reading.
- The problem keeps coming back: check CYA, filter condition, and swimmer load before buying more shock.
This is also why I do not treat pool shock as a weekly ritual by default. It is a tool, and it works best when the rest of the system is already in decent shape. That makes the last step less about emergency fixes and more about keeping the pool from drifting in the first place.
The routine that keeps pool shock from becoming a weekly chore
The easiest way to make shock treatment feel routine is to stop the water from getting badly out of balance. For an outdoor pool, I would rather correct a small problem early than rescue a neglected one later. A steady maintenance pattern keeps the water clearer, the chemistry easier to read, and the chlorine demand far more predictable.
- Test free chlorine and pH at least twice a week during heavy use or hot weather.
- Brush the walls and waterline weekly so residue does not build up.
- Empty baskets and clean the filter on schedule.
- Watch stabilizer levels if you use stabilized chlorine products.
- Shock after parties, storms, or a run of very hot days.
When I keep that rhythm, shock treatment stops feeling like a crisis response and becomes just another controlled part of outdoor pool care. The water stays clearer, the chemistry is easier to manage, and I spend far less time guessing what the pool needs next.