Winter damage usually starts where wind and water get the first chance to enter: gutters, gaps, hoses, and exposed plumbing. Knowing how to winterize your home is less about one dramatic project and more about a sequence of exterior fixes that block water, wind, and freeze damage before they start. I focus on the outside first because that is where the most expensive problems usually begin, and the good news is that many of the smartest moves are simple.
The fastest way to protect a house before winter is to stop water, air, and freeze damage at the exterior
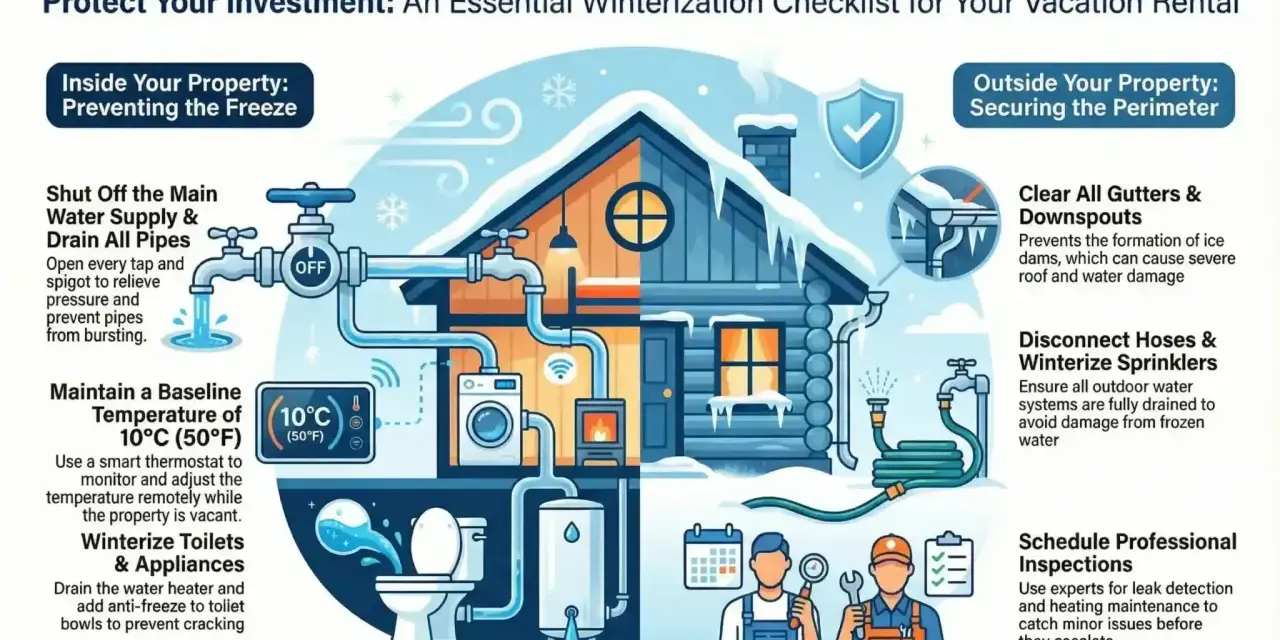
- Clean gutters and make sure downspouts move water away from the foundation.
- Disconnect hoses, drain outdoor faucets, and shut down sprinkler lines before the first freeze.
- Use caulk on stationary gaps and weatherstripping on moving parts like doors and operable windows.
- Insulate exposed pipes in garages, crawlspaces, and exterior walls first; the cheap fixes often pay back fastest.
- Store or secure patio furniture, tools, grills, and planters so snow, ice, and wind do not damage them.
Start at the roofline and foundation
I always begin where water collects. Clean gutters, clear roof valleys, and check that downspouts are actually carrying runoff away from the house instead of dumping it beside the foundation. If melting snow has nowhere to go, it will find seams, cracks, and weak spots, then freeze again and make the damage worse.
The detail I rarely skip is grading. The ground should slope away from the house for at least the first 5 feet, and a useful rule of thumb is about 3 inches of drop over that distance. That sounds small, but it helps keep water from sitting against the foundation during repeated freeze-thaw cycles. I also look for loose shingles, cracked flashing, and any gutter sections that sag or pull away from the fascia, because those are the places that fail first under snow and ice.
- Remove leaves, pine needles, and roof grit from gutters and downspouts.
- Make sure downspout extensions carry water several feet away from the wall.
- Check for standing water near the foundation after a rain.
- Repair missing shingles or damaged flashing before the first storm.
Once the roofline and drainage are under control, I move to the water lines that are most likely to split in a cold snap.
Protect hose bibs and irrigation before the first freeze
Outdoor faucets are a classic winter failure point because the problem often starts inside the wall where you cannot see it. The routine is straightforward: disconnect hoses, splitters, timers, and anything else attached to the spigot; shut off the interior supply valve if the home has one; then open the outside faucet so the remaining water can drain out. A cover helps, but I treat it as the last layer, not the only one.
Modern frost-proof spigots still need attention. If a hose stays attached, water can back up and freeze where you least want it. I also shut down irrigation systems before hard freezes, following the manufacturer’s procedure or hiring a pro if the system needs to be blown out. That is one of those jobs where the right method matters more than speed.
- Remove every hose, nozzle, and attachment from exterior faucets.
- Turn off the inside shutoff valve for the hose bib, if your system has one.
- Open the outside faucet and let it drain completely.
- Install an insulated faucet cover once the line is dry.
- Winterize sprinkler or drip lines before nighttime temperatures stay below freezing.
With the water exposed to cold weather under control, the next step is to stop drafts from stealing heat through the shell of the house.
Seal the exterior openings that let cold air in
The Department of Energy is clear on the split: caulk belongs on stationary joints, while weatherstripping belongs on moving parts. That distinction matters more than most homeowners realize. If I use the wrong product in the wrong place, the fix looks tidy for a week and then fails as soon as temperature swings and movement start working on it.
| Material | Best use | What I avoid |
|---|---|---|
| Caulk | Cracks and joints around trim, siding penetrations, and stationary frame edges | Moving doors and windows |
| Weatherstripping | Doors, operable windows, and other parts that open and close | Wet surfaces, frozen surfaces, and high-wear spots unless the product is rated for them |
| Low-expansion spray foam | Penetrations around plumbing, wiring, and irregular gaps that need a tighter seal | Places where expansion could distort trim or where heat exposure is a concern |
I also follow two practical rules: apply weatherstripping to clean, dry surfaces above 20°F, and buy a little extra material so the cuts and corners do not leave me short. Measuring twice and adding 5% to 10% for waste is not overcautious; it is just cheaper than making a second trip in cold weather.
For doors, I want a tight seal at the jamb, threshold, and bottom edge without making the door hard to close. For windows, I check the sash, the frame, and the places where the lock pulls the unit snug. If a gap is so large that caulk keeps cracking or tape keeps peeling, that is a sign the issue is not a winter problem alone. It is a repair problem.
After the air leaks are under control, I shift to the insulated parts of the house that quietly waste heat and create freeze risk.
Insulate the spots that are easy to overlook
The easiest insulation win is often the one nobody sees. Exposed hot-water pipes in garages, crawlspaces, utility rooms, or along exterior walls lose heat quickly and can freeze in severe weather. Insulating those pipes is cheap, fast, and worth doing early. One Department of Energy project notes that insulating hot water pipes can cost about $10 to $15, take around 3 hours for a small house, and deliver 3% to 4% annual energy savings, while also helping protect vulnerable lines from freezing.
I start with the first 3 feet of pipe from the water heater and any cold-water inlet lines that run through unheated space. If the water heater is gas-fired, I keep insulation at least 6 inches from the flue. That is the kind of detail that prevents one good idea from becoming a safety issue.
- Sleeve hot-water pipes first, especially the runs closest to the water heater.
- Insulate cold-water pipes in unheated spaces if they are exposed to freezing air.
- Check the attic hatch, crawlspace access, and utility penetrations for gaps.
- Use the right sleeve thickness so it fits snugly instead of slipping out of place.
- Seal around pipe and wire penetrations where exterior air can sneak in.
This is also where I remind myself that insulation works best when it is paired with air sealing. Empty insulation only slows heat loss; it does not stop cold air from moving through gaps. Once the thermal envelope is improved, the outdoor clean-up becomes the last big layer of protection.
Clear the yard and store the things winter breaks first
Outdoor clutter turns into winter damage faster than most people expect. Patio chairs tip in wind, cushions soak up moisture, planters crack when the soil freezes, and lightweight decor becomes a projectile in a storm. I try to put anything fragile, wet, or wind-prone inside before temperatures stay low for good.
Grills deserve a separate check. I clean them, disconnect or secure accessories according to the manufacturer’s instructions, and make sure they are not sitting where snowmelt will drip into burners or control parts. Firewood should be stacked off the ground and away from siding. Young trees and shrubs may also need staking or protection, but I only add wraps or guards when the plant or the site genuinely needs them. Overdoing that part can trap moisture and create a different problem.
- Bring in patio cushions, umbrellas, small tables, and lightweight decor.
- Drain and coil hoses instead of leaving them outside in a frozen bundle.
- Store garden tools, sprinklers, and watering timers in a dry place.
- Move planters to a sheltered area or empty them if the material is prone to cracking.
- Trim back branches that hang over the roof or scrape siding in wind.
- Secure trash bins, recycling carts, and anything else that can blow across the yard.
With the yard cleared, the final step is a short walkaround that catches the misses before the first hard freeze does.
The final walkaround I use before the first hard freeze
I finish with a slow circuit around the property. I check that every hose is disconnected, every faucet cover is in place, every downspout extension is aimed away from the house, and every door still closes tightly after the weatherstripping settles. Then I look for the small warning signs that say a bigger repair is coming: a sagging gutter, a cracked spigot, a damp foundation corner, or shingles that have started to lift.
If I see repeated ice dams, active leaks, or drainage that keeps sending water back toward the foundation, I stop treating it as routine maintenance and bring in a roofer, plumber, or drainage contractor. Ready.gov gives the same core advice in simpler terms: keep the home sealed, insulated, and protected from frozen pipes. That is the whole game, really. Prevent the failure points before winter turns them into emergencies.
The most useful winterization plan is not complicated. It is a sequence: move water away, shut down outdoor plumbing, seal the shell, insulate the vulnerable spots, and clear everything the weather can damage. If I do those jobs in that order, the house is usually ready long before the first hard freeze arrives.