Replacing a sump pump is one of those basement jobs that looks bigger than it is until you break it into a few controlled steps. In this guide, I walk through the safest way to swap the unit, match the right fittings, rebuild the discharge connection, and test the system so the basement stays dry when the next storm hits. I usually treat the process behind how to replace a sump pump as three things at once: safe shutdown, clean plumbing, and a final water test.
The few checks that matter before the first storm
- Cut power at the breaker and verify the circuit is dead before touching the pit.
- Match the replacement to the pit depth, discharge size, and float travel, not just the old model name.
- Replace a worn check valve while the system is open so water does not fall back into the basin.
- Set the pump level, keep the float free, and test the shutoff cycle with clean water.
- Plan for a pro if you need new wiring, a new circuit, or the pit keeps refilling after the swap.
When a replacement is the better call
I start by deciding whether the pump itself is the problem or whether a small part has failed. If the motor is loud, the float sticks, the unit cycles constantly, or the housing is rusted and tired, replacement is usually the cleaner move. I also lean toward replacement when the pump is older than about a decade, because chasing one part after another rarely pays off in a system that is supposed to protect the whole basement.
Repair can still make sense if the issue is limited to a float switch, a loose plug, or a check valve that is no longer sealing. But if the pump runs and still moves very little water, or if it trips breaker after breaker, I do not waste much time trying to rescue it. Once the failure is clear, the next step is choosing a replacement that actually fits the system in front of you.
Choose the right pump and fittings
This is the part people rush, and it causes the most callbacks. In 2026, Angi puts typical professional sump pump replacement at about $309 to $755, with the total moving higher or lower depending on the unit and labor. That range is useful because it shows the real split: the pump is only part of the cost, and the rest comes from how much fitting, rewiring, or discharge-line work the job needs.
| Type | Best for | What I like about it | Tradeoffs |
|---|---|---|---|
| Pedestal | Shallower pits and lighter-duty use | Cheaper, easier to service, and the motor stays out of the water | Noisier and usually less powerful |
| Submersible | Frequent heavy water, deeper basins, or quieter operation | Quieter, stronger, and hidden in the pit | Costs more and is harder to service later |
I also check the discharge side before I buy anything. Lowe's recommends matching the discharge fitting to the pump and using tubing that is at least 1 1/4 inches inside diameter, preferably 1 1/2 inches, because wider pipe takes less work from the pump. That detail matters more than people think; a good motor still struggles if the pipe is undersized or the fittings are mismatched.
- New pump sized for your basin and discharge opening
- Check valve sized for the outlet
- PVC pipe, primer, and cement if you need to rebuild the riser
- Rubber coupling or union, plus stainless hose clamps
- Paver or pump stand if the pit bottom is uneven
- Noncontact voltage tester, tape measure, screwdriver, level, bucket, and towels
Once the pump and parts are matched, the physical swap becomes much easier and far less messy.
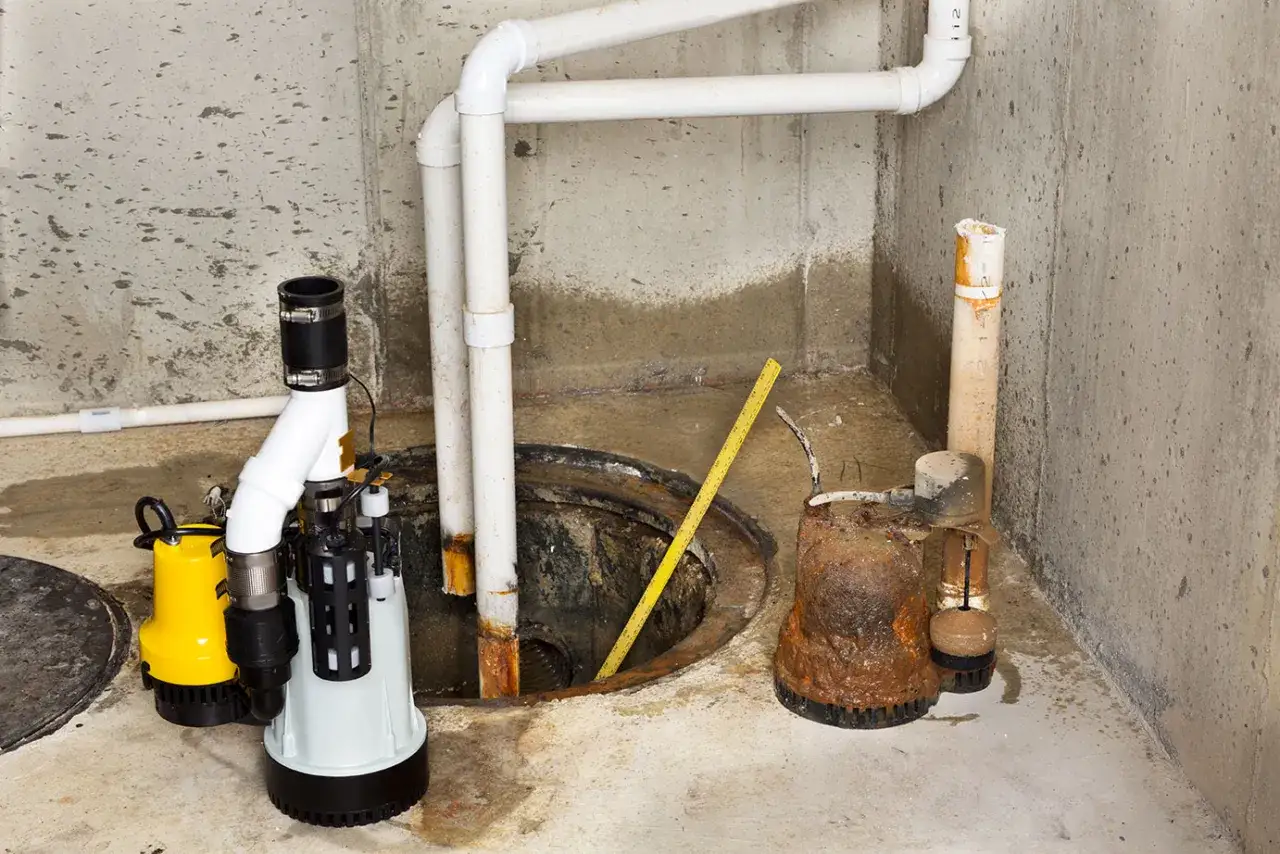
Remove the old pump without making a mess
- Shut off power at the breaker. I never trust the switch alone. Verify the outlet is dead with a tester before you touch the pump or the cord.
- Lower the water level if needed. If the pit is full, scoop or pump enough water out to expose the connections. A dry or nearly dry basin is much easier to work in.
- Disconnect the discharge line. Loosen the clamp at the check valve or rubber union, then separate the pipe carefully. If the old system has no union, you may need to cut the line above the pit.
- Lift the pump out of the basin. Keep the cord and pipe under control so you do not drag sludge across the floor.
- Clean and inspect the pit. Remove gravel, silt, and anything that could jam the float or clog the inlet. I also check for cracks in the basin and signs that the pump was sitting unevenly.
Do not rush this stage. A clean basin gives you a better installation and makes the next steps much simpler, which is exactly what you want before you start rebuilding the plumbing.
Install the new unit and reconnect the discharge line
This is where the new pump either settles in correctly or starts causing trouble later. I dry-fit everything first, because once PVC cement is on the joints, the clock starts ticking. If the pump manual calls for a specific adapter, anti-airlock hole, or valve arrangement, I follow that exactly rather than improvising.
- Set the pump level. Place it on the basin bottom, a paver, or a pump stand if needed. The housing should sit flat, and the float must move freely without touching the wall or lid.
- Line up the outlet. Rotate the pump so the discharge port points cleanly toward the existing pipe. That reduces stress on the connection and makes future service easier.
- Install the check valve in the correct direction. The arrow on the valve should point away from the pump and toward the discharge run. A bad valve choice or a backwards valve creates backflow and extra cycling.
- Join the pipe. Use the correct fitting for your pump, then connect it to the main discharge line with a union or rubber coupling. If you need PVC, prime and cement it according to the pipe instructions.
- Keep the line sloped away from the basin. Any trapped water should drain out of the line, not sit there and freeze or roll back into the pit.
- Restore power through a GFCI outlet. The pump should be on a protected circuit, and I avoid extension cords because they add risk and can reduce performance.
If the pit cover is open, this is also the moment to fit a lid with a clean cutout for the pipe and cord. A proper cover reduces noise, keeps debris out, and prevents a lot of unnecessary frustration later.
Test the float, check valve, and shutoff cycle
I do not count the job as done until I have watched the pump cycle at least once from start to finish. Fill the basin with clean water until the float lifts and the pump turns on. Then watch the water level fall, the pump shut off, and the discharge line empty the way it should. The whole point is to confirm that the system reacts smoothly, not just that the motor spins.
- The float rises freely and does not rub the pit wall.
- The pump starts without hesitation once the water reaches the trigger point.
- The discharge flow is strong and steady, not sputtering.
- The pump shuts off when the water drops below the float.
- Water does not run back into the basin after shutoff.
- No leaks appear at the fitting, union, or check valve.
If you hear rapid on-off cycling, the issue is usually the float setting, a bad check valve, or a poorly sized discharge line. Catching that now saves you from discovering it during the first hard rain.
The mistakes I see most often
The failures I see after a replacement are usually basic, and that is what makes them annoying. Most of them are preventable with a little patience during setup.
- Using the wrong pipe size. A smaller line makes the pump work harder and can shorten its life.
- Reusing a worn check valve. If the flap does not seal, water falls back into the pit and the pump cycles too often.
- Setting the pump unevenly. A tilted unit can vibrate, shake loose, or make the float stick.
- Letting the float touch the wall or lid. That is one of the fastest ways to create a false failure.
- Skipping the GFCI. Water and an unprotected circuit are a bad combination in any basement.
- Gluing before dry-fitting. I always check alignment first, because a glued mistake costs time and pipe.
- Ignoring a frozen or buried discharge route. If the line outside is blocked, the new pump will inherit the same problem.
Once those mistakes are out of the way, the question becomes whether the job stays DIY-friendly or whether it has crossed into pro territory.
What it costs in the U.S. and when I would call a pro
For a straightforward replacement, the numbers are manageable. A standard pump swap is often a one-visit job, and the material side is usually the pump, a new valve, and a few fittings. Add a new circuit, a damaged discharge line, or a backup system, and the price climbs quickly, which is why I like to estimate the whole path before I start.
- Call a plumber if the basin keeps refilling faster than the new pump can clear it.
- Call an electrician if the outlet is old, ungrounded, or not suitable for a GFCI upgrade you want to make.
- Call a plumber if the discharge line is buried, frozen, cracked, or tied into a system you do not understand.
- Call a pro if you see foundation issues, broken drain tile, or repeated flooding after storms.
- Consider a battery backup if your neighborhood loses power during heavy rain.
I am comfortable with a routine swap, but I stop when the job starts turning into plumbing, electrical, and drainage correction all at once. That is usually the point where paying for clean workmanship is cheaper than paying for water damage.
The checks that keep the basement dry
After the new pump is in, I think beyond the first test cycle. The real win is a system that stays reliable through the next storm, not just the next five minutes. I like to check the basin after a heavy rain, listen for unusual cycling, and make sure the discharge point outside stays clear of debris, ice, and standing water.
- Recheck the fitting and valve after the first day of use.
- Look at the discharge outlet after the first hard rain.
- Make sure the pit cover stays seated and does not pinch the cord.
- Test the pump again after any outage or service interruption.
If the pump cycles cleanly, the water leaves the house, and the basin stays dry between storms, the replacement is doing its job. That is the standard I would trust in my own basement, and it is the one I would use before I called the project finished.