The safest replacement is the one that matches the bowl before you touch the bolts
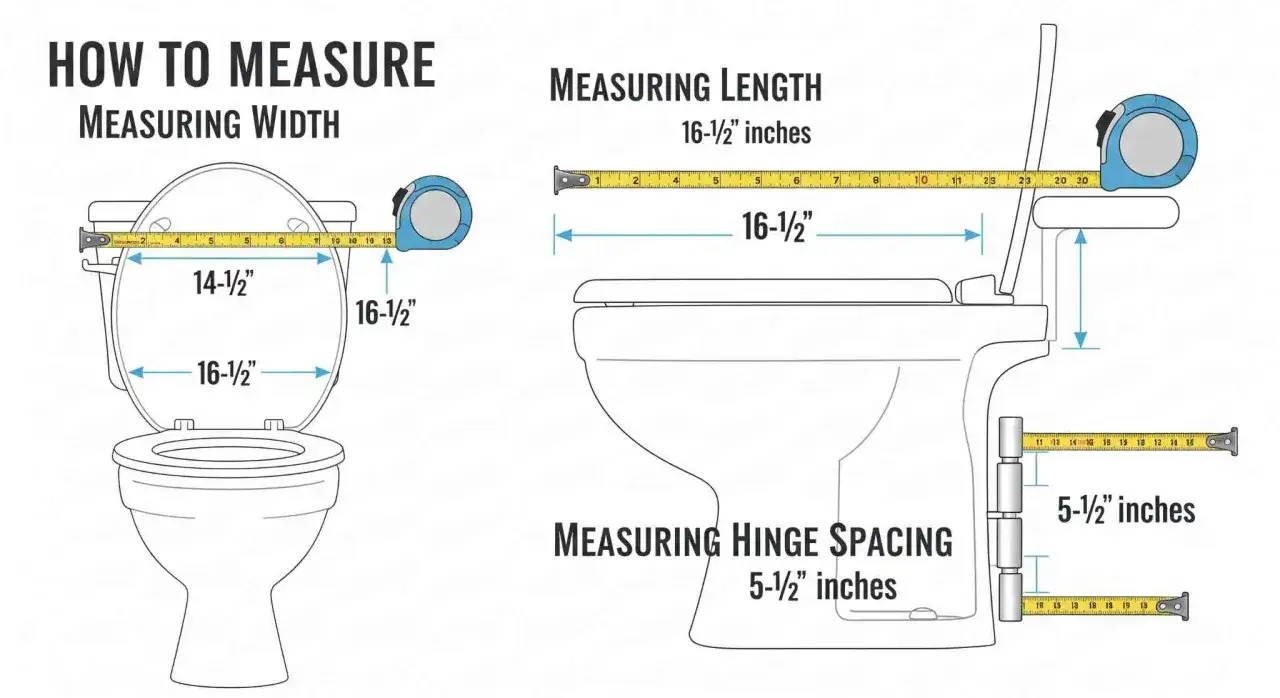
- Measure bolt spacing and bowl length first; most U.S. toilets use a 5 1/2-inch bolt spread.
- Round bowls are usually about 16 1/2 inches long, while elongated bowls are typically 18 to 18 1/2 inches.
- Plastic seats are lighter and easier to clean, while wood and enameled wood feel sturdier.
- Soft-close and quick-release hinges are the most useful upgrades for everyday use.
- Do not overtighten the hardware; porcelain chips more easily than most people expect.
- If the bolts are rusted or stripped, stop before you force them and switch to a safer removal method.
Choose the seat that actually fits your toilet
I always start with two numbers: the bolt spread and the bowl length. In most U.S. bathrooms, the mounting holes sit about 5 1/2 inches apart, and the bowl length is usually about 16 1/2 inches for a round bowl or 18 to 18 1/2 inches for an elongated one. If those measurements are off, the new seat may look close enough in the box and still feel wrong on the toilet.
| Seat type | Best for | Watch out for |
|---|---|---|
| Round | Older or compact bowls, tighter spaces | It will feel too short on an elongated bowl |
| Elongated | Most modern U.S. toilets | It will not sit correctly on a round bowl |
| Soft-close | Households that want less noise and fewer slams | The hinge quality matters more than the marketing |
| Quick-release | Frequent cleaning | The release mechanism varies by brand |
| Bidet or heated | Comfort and hygiene upgrades | May need a nearby GFCI outlet and extra clearance |
Material matters too. Plastic is lighter and usually easier to lift off for cleaning, wood feels more solid, and enameled wood gives you a harder surface with less of the cold-plastic feel. If you are buying a specialty seat, check the bolt pattern and any included adapter before you leave the store. Once the fit is right, the rest of the job is mostly careful handling of the old hardware.
Gather the tools and prep the area first
The tools are simple: a flathead screwdriver, an adjustable wrench or nut driver, a rag, mild cleaner, and gloves if the old hardware is grimy. I also keep a tape measure nearby so I can verify the fit before I open the box, not after the seat is half installed. If the bolts look rusty, have penetrating oil ready; if they are frozen solid, a small hacksaw or bolt cutter can be the last resort.
- Wipe the bowl rim and the area around the bolt holes before you start.
- Clear the floor so you are not balancing tools near the toilet base.
- Check whether the seat uses bottom-fixed hardware or a top-access quick-attach design.
- Lay the new bolts, washers, and nuts out in order before installation.
- Keep a towel nearby to protect the porcelain if a tool slips.
I prefer to clean first because grime falls into the bolt holes once the old seat comes off, and that makes the next step messier than it needs to be. With the area prepped, the removal is straightforward and much less likely to turn into a wrestling match. That is the point where patience saves more time than force ever will.
Remove the old seat without stressing the porcelain
Most old seats come off in a few minutes if the hardware has not rusted into place. The main rule is simple: do not force a stuck bolt hard enough to crack the bowl. Porcelain is durable in daily use, but it does not like side pressure or sudden torque.
- Lift the lid and the seat.
- Pop off the hinge caps if the model has them.
- Hold the bolt head steady and loosen the nut underneath by turning counterclockwise.
- Remove the washers, then lift the seat and hinges away from the bowl.
- Clean the porcelain before the new seat goes on.
If the seat uses a top-fix or quick-release hinge, release the latch from above instead of twisting the hardware from below. If the bolt is rusted, a little penetrating oil and patience are better than brute force. I only cut bolts when they are truly seized, because one careless slip with a saw near the bowl can create a bigger repair than the seat itself.
Install the new seat in the right order
Once the old hardware is off, the new seat should go onto clean porcelain and line up before anything is fully tightened. The goal is a centered seat that feels firm but not crushed. I tighten in small increments because porcelain and plastic both forgive a gentle hand more than a heavy one.
For bottom-fixed seats
- Set the seat on the bowl and line up the hinges with the mounting holes.
- Feed the bolts down through the hinges and the bowl.
- Add washers and nuts underneath if the hardware uses them.
- Tighten each side a little at a time so the seat stays centered.
- Snap the hinge covers back on, then open and close the lid to test the fit.
Do not fully tighten one side before the other. That is how seats end up crooked even when the hardware is technically secure.
Read Also: Clean a Sink Drain - The Right Way, Every Time
For top-fixed or quick-attach seats
Some modern seats use top-access bolts or a quick-release hinge. In that case, set the seat in position, insert the bolt through the top of the hinge, and let the wing nut catch from underneath. Then tighten from above until the hinge is secure. If the model has a release button, make sure both sides click fully into place before you test the seat.
If the kit includes washers or special bushings, use them exactly where the instructions show. Those small parts matter more than people expect, especially on a toilet with slightly enlarged mounting holes. Once the seat is on, a final open-and-close test tells you whether the fit is right or whether one side still needs a small adjustment. From there, the real value is in catching problems early instead of living with a seat that shifts every time someone sits down.
Fix the problems that show up after installation
If the seat feels off after installation, the cause is usually obvious. I look for wobble, misalignment, rusted hardware, or a hinge that is not fully seated. Most of those problems are fixable without starting over, as long as the porcelain is still intact.
| Problem | Likely cause | What I do |
|---|---|---|
| Seat wobbles | Nuts tightened unevenly or washers missing | Loosen slightly, center the seat, and tighten both sides gradually |
| Seat sits crooked | Hardware was tightened before alignment | Back off the bolts, press the seat into position, then retighten in small steps |
| Porcelain feels stressed | Hardware is overtightened | Stop immediately and reduce the tension before a chip forms |
| Bolts will not move | Rust, corrosion, or stripped plastic | Use penetrating oil first, then cut only if the hardware is beyond saving |
| Seat slams shut | Standard hinge instead of soft-close | Replace the seat with a soft-close model if the noise bothers you |
If the seat keeps loosening after a few days, the hardware kit is probably the weak point, not your installation. That is when I replace the fasteners or move to a better seat entirely. A seat that stays put is usually the result of decent hardware and modest tightening, not extra muscle.
Know when a simple swap is not the best answer
There are times when I would not spend energy reviving the old setup. If the seat is cracked, the hinge keeps loosening, or the finish has gone rough and stained, replacement is the right call. That is also the moment to decide whether you want a standard seat, a soft-close lid, a quick-release model, or a bidet seat with extra comfort features.
- Choose soft-close if slamming is the main complaint.
- Choose quick-release if you want faster cleaning around the hinges.
- Choose an elevated or accessibility-focused seat if sitting and rising are getting harder.
- Choose a bidet or heated seat only if you have the outlet and clearance it needs.
- Choose a better bolt kit if the old hardware is the real failure point.
As a budget anchor, many soft-close seats in U.S. big-box stores sit around the $30 mark, while electric bidet seats are a much higher-budget purchase and often need a nearby GFCI outlet. I find that useful because it keeps the decision grounded: if the old seat is just dirty and loose, a standard replacement is enough, but if comfort, hygiene, or noise are the issue, the upgrade can be worth it. Once the new seat is selected for the way you actually use the bathroom, the last job is making sure it stays that way.
The checks I make to keep a new seat quiet and steady
After installation, I check the seat again after a day or two. Plastic parts settle, and a quarter-turn on each side is often all it takes to keep the seat centered. I also clean around the hinges with a mild, non-abrasive cleaner so soap residue does not build up and make the hardware feel sticky.
If the seat still works loose after that, I stop chasing it and replace the fasteners with a better set. That is usually the cleaner fix, and it avoids repeated over-tightening on the porcelain. A clean fit, the right bowl shape, and evenly tightened hardware are what make this job feel easy instead of annoying, and that is the difference between a seat that looks installed and one that actually stays put.