Removing a bathtub drain is usually a small plumbing job, but it becomes frustrating fast when the fitting is corroded, the stopper style is unfamiliar, or the tub finish is easy to damage. This guide walks through the drain types, the tools that actually help, the safest removal methods, and the points where I would stop and rethink the approach. The goal is simple: take the assembly out cleanly, without cracking the tub or stripping the drain flange.
The few details that decide the job
- Start by identifying the stopper style, because the removal method changes a lot from one tub to another.
- A standard drain wrench is the cleanest way to loosen a crossbar-style drain from above.
- Trip-lever and hidden-linkage drains usually come out through the overflow plate first.
- Penetrating oil, patience, and the right fit matter more than brute force.
- Protect the tub finish before you turn anything, especially on porcelain, acrylic, or fiberglass.
- Once the drain is out, clean the threads and inspect the seal before installing a replacement.
Identify the drain style before you turn anything
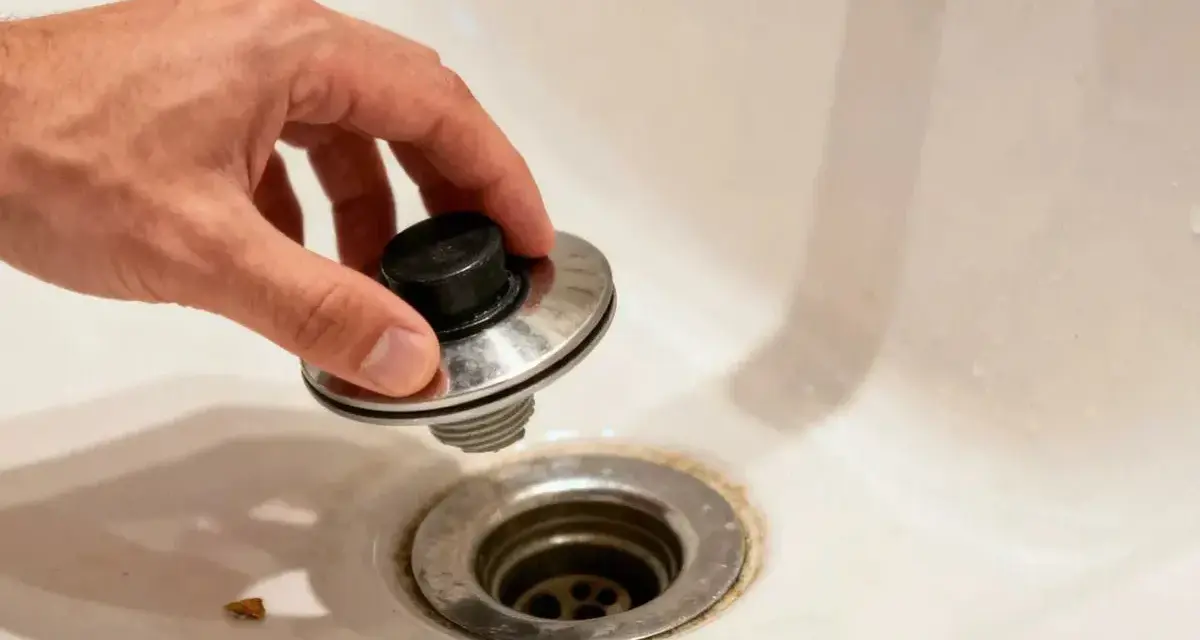
I always start here, because the drain style tells me whether I can work entirely from the tub opening or whether I need to go through the overflow. A bathtub drain is not one single design. Some assemblies unscrew as a unit, some have a removable stopper sitting inside a fixed flange, and others hide part of the mechanism behind the overflow plate.
| Drain style | What you usually see | Typical removal path | Difficulty |
|---|---|---|---|
| Crossbar drain | Visible X-shaped bars inside the opening | Use a drain wrench or pliers to turn the body counterclockwise | Moderate |
| Lift-and-turn / push-and-pull | A small knob or cap on top of the stopper | Unscrew or lift the stopper first, then inspect the body underneath | Easy to moderate |
| Toe-touch | Spring-loaded stopper that opens with a press | Usually the top piece comes off before the drain body is addressed | Easy |
| Trip-lever | Lever on the overflow plate, not on the drain itself | Remove the overflow plate and linkage before touching the drain body | Moderate |
| Pop-up or plunger style | Hidden mechanism connected to the overflow | Remove overflow cover, linkage, and plunger assembly first | Moderate to harder |
The important distinction is this: sometimes you are removing only the stopper, and sometimes you are removing the entire threaded drain fitting. That difference decides the tools, the amount of force, and how much of the tub plumbing you need to expose. Once I know what I am looking at, the rest of the job becomes much more predictable.
Gather the right tools and protect the tub finish
A lot of drain damage happens before the drain even moves. The wrong tool slips, the chrome gets gouged, and suddenly a simple removal turns into a replacement job. I keep the setup plain and deliberate.
- Drain wrench or tub drain extractor
- Locking pliers or needle-nose pliers
- Flathead screwdriver
- Penetrating oil
- Rags or a towel for protecting the surface
- Painter's tape for extra finish protection
- Flashlight
- Small bucket or tray for screws and loose parts
In most U.S. hardware stores, a basic drain wrench is inexpensive, often around $10 to $25, and a drain extractor set usually sits in the $15 to $30 range. That is cheaper than paying for a scratched tub or a stripped fitting. If the tub is porcelain, acrylic, or fiberglass, I cover the surrounding surface before I apply any torque at all. One bad slip can do more harm than the drain itself.
If the drain has visible corrosion, I also apply penetrating oil and give it time to work. Ten to fifteen minutes is usually enough for light buildup, but I am perfectly willing to wait longer if the fitting looks stubborn. That patience often saves the finish and the threads, which leads directly into the cleanest removal method.
Remove a standard crossbar drain from above
This is the method I use most often on older and simpler tubs. If you can see the crossbars in the drain opening, the fitting is usually meant to accept a drain wrench. The wrench locks into the cross shape, which gives you a much better grip than pliers alone.
- Take out any stopper piece so the crossbars are visible.
- Insert the drain wrench so it seats firmly in the cross shape.
- Hold the tool straight and turn counterclockwise with steady pressure.
- If the tool slips, stop and reset it instead of forcing the turn.
- Once the drain breaks loose, finish unscrewing it by hand.
- Lift the drain body out and wipe away old putty or debris.
The first turn is the important one. If the fitting cracks free, the rest of the job is usually easy. If it resists and then suddenly jumps, I back off and check whether the tool is seating correctly. A slipping wrench rounds the internal crossbars, and that makes the next step worse rather than better. When the drain is only lightly sealed with old plumber's putty, a gentle rocking motion can help, but I avoid aggressive prying because it does nothing useful to the tub finish.
For a drain with no clean wrench seat, locking pliers can work, but they are my second choice. They are better for a rough, damaged fitting than for a good one. If the chrome is already compromised, the priority shifts from preserving the finish to avoiding deeper damage to the threaded drain shoe beneath it.
Remove trip-lever and hidden-linkage drains through the overflow
Trip-lever and plunger-style drains behave differently because the visible stopper is tied to a linkage behind the overflow plate. I do not try to pull those out from the tub opening first. That usually binds the mechanism and can bend the rod or basket inside the overflow tube.
- Unscrew the overflow plate from the tub wall.
- Pull the plate away slowly so the linkage rods do not drop out unexpectedly.
- Remove the stopper, plunger, or rod assembly as a complete set.
- Set the parts aside in order so you know how they fit back together.
- After the linkage is out, inspect the drain opening and decide whether the body itself also needs to come out.
I am careful here because the parts can be misleading. The lever is only the control point; the actual drain action happens deeper in the overflow tube. If the goal is to replace the whole assembly, the overflow hardware must come out first. If the goal is only to clean a slow drain, this may be enough to remove the hair and buildup that is hanging up the mechanism.
One practical warning: do not force the overflow plate if the screws are rusted. Spray the fasteners lightly, let them sit, and back them out slowly. Rusted overflow screws are small, and stripping one adds avoidable work to a job that should already be straightforward.
Free a seized drain without damaging the tub
When a drain does not move, the instinct is to push harder. That is usually the wrong answer. A seized drain is often held by corrosion, old sealant, or mineral buildup, and extra force only makes the fitting round off or the tub surface chip. My rule is simple: if the drain feels solid but the tool is seated correctly, I improve the setup before I increase the force.
- Reapply penetrating oil and wait again if the fitting is rusty.
- Switch to a better-fitting drain wrench instead of leaning harder on a loose one.
- Protect the finish more aggressively if the tool is slipping.
- Use two-handed, controlled pressure rather than a sudden jerk.
- Stop if the drain spins but does not back out, because that often means the fitting is separating from the shoe or another part is loose below.
I avoid open flame and I am cautious with heat around acrylic or fiberglass tubs. Heat can help in some metal-only situations, but in a bathroom it is rarely worth the risk unless you know exactly what the tub and surrounding plumbing are made of. If the drain is badly corroded, the smarter move is often to use an extractor or bring in a plumber before the fitting becomes impossible to remove cleanly.
There is also a point where the job is no longer about patience and starts becoming about damage control. If the fitting is splitting, the crossbars are collapsing, or the tub flange is already scarred, I stop trying to save the old part and switch to the least destructive method available.
What to inspect once the drain is out
Once the assembly is free, I do not rush to install the replacement. The open drain gives you a chance to see what actually caused the trouble in the first place. That can save a second round of disassembly later.
- Check the threads on the drain body for rounding or corrosion.
- Look for old plumber's putty or sealant packed into the opening.
- Inspect the drain shoe and gasket for cracks or flattening.
- Remove hair, soap scum, and scale from the surrounding area.
- Confirm that the tub surface around the opening is intact and not chipped.
This is also the point where I decide whether the old part is worth reusing. If the finish is pitted, the stopper mechanism is loose, or the threads are chewed up, I usually replace the whole assembly instead of trying to salvage it. That is especially true when the drain has already been removed for a repair or refinishing project, because the extra part cost is small compared with doing the same labor twice.
If you are cleaning the drain before reinstalling it, keep the cleanup mechanical and simple. A brush, rag, and a careful wipe are enough for most jobs. The idea is to leave the threads and sealing surfaces clean enough to seat properly, not to polish the drain into looking new.
What I would do before reinstalling or replacing the assembly
When the old drain is finally out, the cleanest next step is to match the replacement to the old hardware before anything goes back together. I check the stopper style, the finish, the thread pattern, and whether the overflow linkage needs to match a lever, a plunger, or a simple fixed fitting. That small bit of comparison prevents a lot of returns and a lot of guesswork.
If the old drain came out easily and the threads look healthy, I am comfortable reusing the opening with a new seal. If the part fought every turn, however, I treat that as a warning. Corrosion rarely stops at the visible flange. In those cases, replacing the assembly is usually the better long-term move, even if the old part technically still comes out.
The best bathtub drain removal is the one that leaves the tub intact, the threads usable, and the next installation simple. If you remember only one thing, make it this: match the method to the drain style, protect the finish before you turn anything, and stop using force the moment the fitting starts to lose its shape.