A shower valve swap is one of those plumbing jobs where the visible problem is often only half the story. The real question is whether you can replace a cartridge, update the trim, or need to change the valve body hidden behind the wall. In U.S. homes, that choice affects cost, downtime, and whether the project stays a manageable DIY repair or becomes a wall-opening job.
The main decisions that shape the job
- A dripping handle does not always mean the whole valve is bad. In many cases, the cartridge or seals are the real problem.
- Pressure-balancing valves are the safer default for standard showers, while thermostatic valves give tighter temperature control.
- A straightforward replacement in the U.S. often falls around $225 to $575 installed, with more complex work costing more.
- The biggest variable is usually wall access, not the valve itself.
- Leak test before closing the wall. That one step saves a lot of repeat work.
What a shower valve replacement really involves
The valve is the control body behind the wall that mixes hot and cold water and sends it to the shower head, tub spout, or both. The trim on the finished wall is just the visible part: the handle, escutcheon plate, and any decorative cover. If the problem is only inside the valve, I often start by checking the cartridge or stem before I touch the rough-in body.
That distinction matters. A cartridge swap is usually a much smaller repair. A full valve replacement means opening the wall, disconnecting supply lines, fitting a new rough-in valve, and then restoring the wall surface and trim. If the existing valve is corroded, outdated, or incompatible with new trim, the full job is the right move. If not, the simpler repair is usually the smarter one.
That difference also points to the next question: when does a worn part stop being a simple fix and become a full replacement?
When a cartridge is enough and when the whole valve has to go
Not every shower problem deserves a demolition-style repair. If the handle is stiff, the water drips a little after shutoff, or the temperature wanders but the valve body is still sound, a cartridge or seal kit may solve it. When the plumbing is older, corroded, or leaking behind the wall, I start leaning toward a complete replacement.
| Symptom | Likely fix | What it usually means |
|---|---|---|
| Drip from the shower head after shutoff | Cartridge, stem, or seals | Wear inside the valve is common and often repairable |
| Temperature swings during use | Cartridge or pressure-balancing valve issue | The mixing mechanism may be failing or outdated |
| Water behind the wall or ceiling stain below | Full valve replacement and wall repair | There may be a cracked body, failed joint, or hidden leak |
| Handle is loose, stripped, or broken | Trim parts or cartridge | The visible hardware may be the weak point, not the valve body |
| New trim will not fit the old rough-in | Either matching trim or a new valve body | Shower trim is often brand- and model-specific |
I also look at the age of the fixture. Older two-handle and three-handle setups can still be repaired, but they are often poor candidates for a quick cosmetic upgrade because the trim and internal parts are less standardized. Once compatibility becomes a guessing game, replacement starts looking better than repeated parts hunting.
That leads naturally to the most important planning step: choosing the right valve before you cut anything open.
Choose the right valve and trim before you open the wall
This is where many people lose time. Shower trim is not universally interchangeable, and the new valve body has to match the pipe layout, wall depth, and finished trim style. I always tell people to identify the brand and rough-in style first, then buy the valve, then buy the trim that is made for that valve. Reversing that order is how you end up with parts that almost fit.
| Valve type | What it does | Best for | Main tradeoff |
|---|---|---|---|
| Pressure-balancing | Adjusts for pressure changes to help keep water temperature steady | Most standard family showers | Safer and simpler, but not as precise as thermostatic control |
| Thermostatic | Targets a set temperature more accurately | Upgraded showers, multiple outlets, or users who want tighter control | Costs more and can be more involved to install |
| Basic mixing | Blends hot and cold water manually | Older, simpler systems | Less consistent when pressure changes in the house |
| Diverter | Routes water to a different outlet, like a handheld or tub spout | Shower systems with multiple functions | Does not control temperature by itself |
For most U.S. homes, I prefer a pressure-balancing valve unless the shower setup justifies thermostatic control. That choice is practical, not flashy. It helps reduce sudden temperature spikes when someone flushes a toilet or starts the washing machine. If you want more exact control, thermostatic is better, but it only makes sense if you will actually use that precision.
One more detail matters here: rough-in depth. The valve has to sit at the correct distance from the finished wall so the trim mounts cleanly. If the valve is too deep or too shallow, the handle can bind, the escutcheon can gap, or the trim may not seat properly. That is why I check the wall thickness before I order parts, not after.
Once the valve and trim are matched, the rest of the job becomes much more predictable.
Tools, materials, and wall access you should plan for
The actual tool list depends on whether the plumbing is copper, PEX, CPVC, or a mix of materials, but the project usually needs more than a screwdriver and a wrench. If you have to cut the wall from the back side, the job gets cleaner. If not, expect more care with dust, tile, and patching.
- Replacement valve body and matching trim kit
- Shutoff tool or wrench for the main water supply
- Screwdrivers, adjustable wrench, and channel-lock pliers
- Drywall saw or oscillating tool for access
- Tubing cutter, PEX tool, or soldering setup, depending on pipe type
- Plumber’s tape, plumber’s grease, and towels or rags
- Bucket, drop cloth, and wall-patch materials
- Heat shield if you are soldering near finished surfaces
The wall access question deserves more attention than most people give it. If the valve is reachable from a closet, hallway, or the room behind the shower, the install is usually much easier to control. If the only access is through tile from the shower side, the labor and repair scope rise quickly. In those cases, I would rather spend an extra hour planning than rush into a wall I cannot repair cleanly.
With the parts and access sorted out, the replacement itself is straightforward to describe, even if the execution still rewards patience.
How I would replace the valve step by step
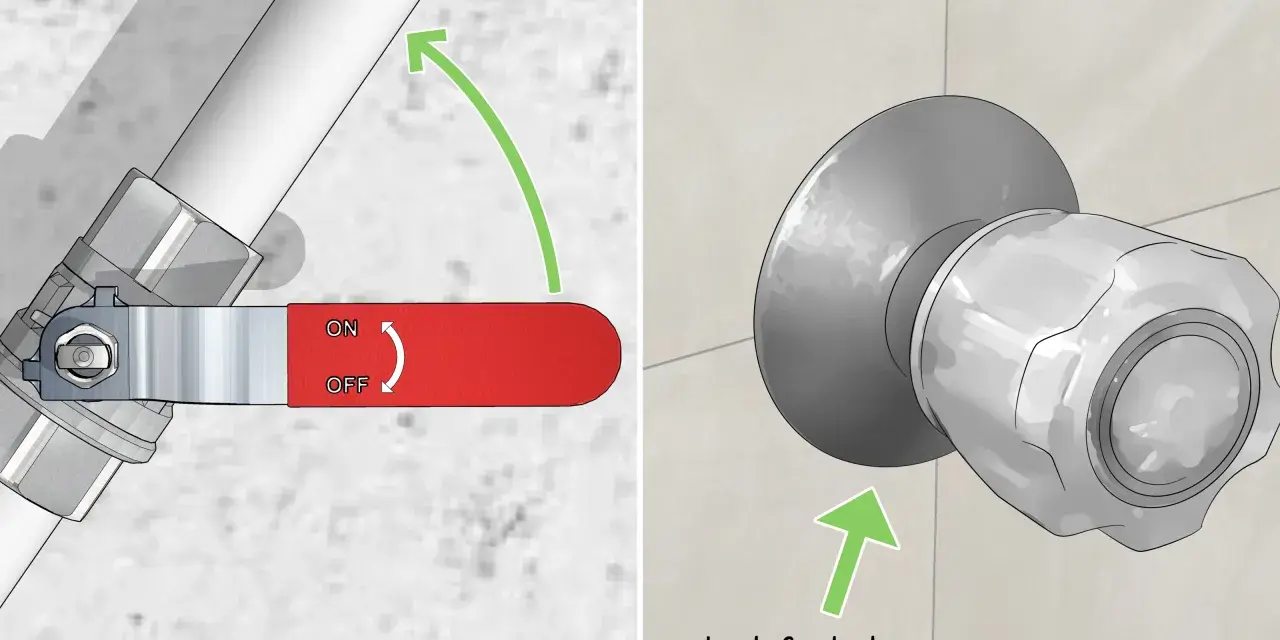
- Shut off the water to the house or branch line and confirm that the shower is fully dead.
- Protect the tub or shower floor with a drop cloth and cover the drain so small parts do not disappear.
- Remove the handle, escutcheon plate, and any trim screws to expose the valve body.
- Open the wall from the back side if possible, or cut an access panel large enough to work comfortably.
- Identify the pipe material and orientation before disconnecting anything. I always check hot, cold, and outlet positions twice.
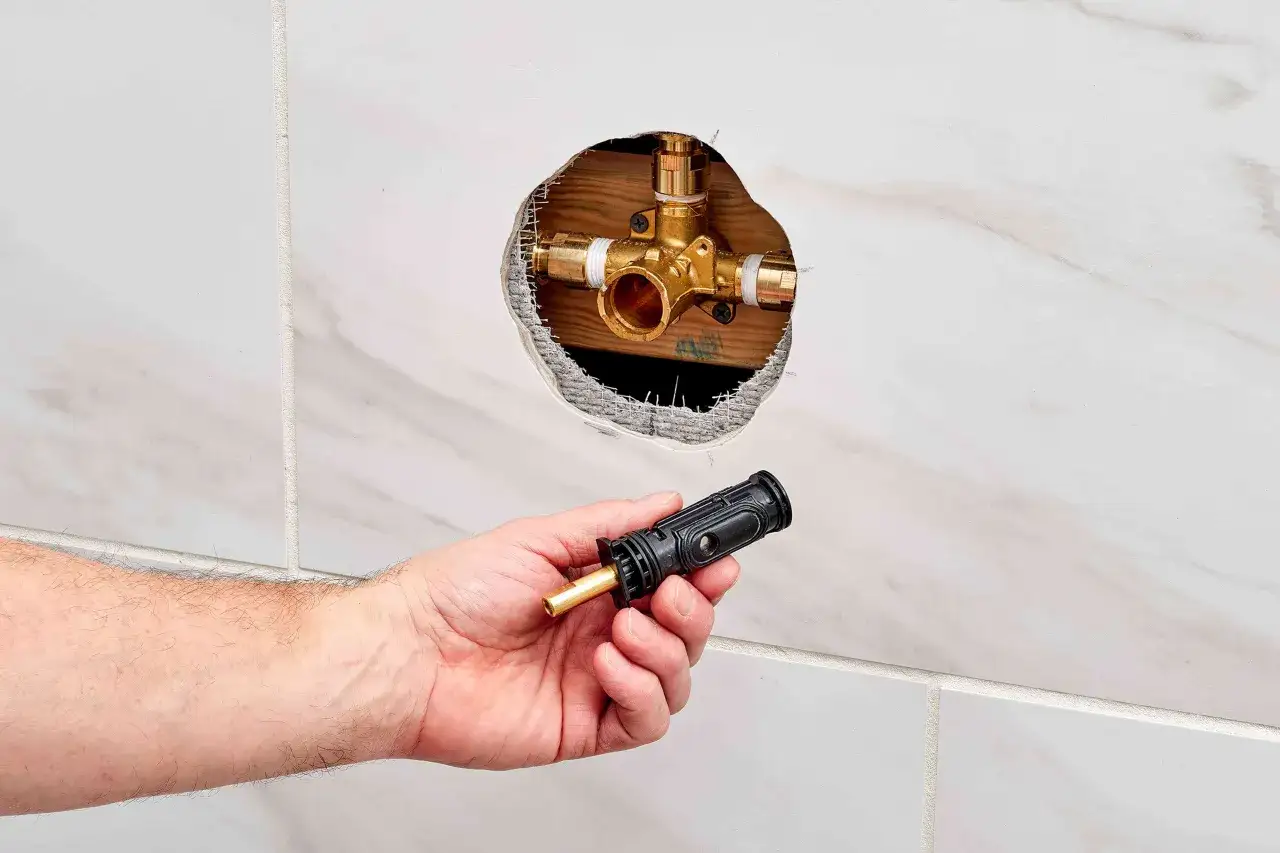
- Disconnect the old valve from the supply lines and outlet piping.
- Set the new valve at the correct depth and secure it so the trim will sit flush later.
- Reconnect the plumbing with the correct method for the material in the wall.
- Turn the water back on slowly and test the valve with the wall still open.
- Check every joint for leaks, then run hot and cold water long enough to confirm the temperature mix and flow direction.
- Only after the valve passes the test should you patch the wall and install the final trim.
The leak test is non-negotiable. I would rather see a drip with the wall open than discover it after tile, paint, and trim are back in place. If the valve has a temperature limit stop, I set it before finishing the job so the hot water range is safe and predictable.
After the mechanical work is done, cost and cleanup become the final questions most homeowners want answered.
What the job costs in the United States
For a typical U.S. shower valve replacement, I would budget about $225 to $575 for a straightforward professional job, with an average around $350. A simple cartridge repair is cheaper, while a full valve swap with hidden damage, tile repair, or pipe changes can climb well above that range. If you are paying hourly, many plumbers fall somewhere around $45 to $200 per hour, depending on location and the complexity of the work.
| Scenario | Typical cost range | What drives the price |
|---|---|---|
| Cartridge or seal repair | $100 to $350 installed | Parts brand, valve age, and labor time |
| Standard full valve replacement | $225 to $575 | Access, pipe type, and trim compatibility |
| Complex replacement with wall or tile repair | $600 and up | Hidden leaks, damaged framing, or difficult access |
| Emergency service | Higher than standard rates | After-hours work and urgent leak repair |
In practice, the cheapest quote is not always the cheapest outcome. If a plumber has to return because the valve was incompatible or a leak was missed behind the wall, the final bill can exceed the quote you thought was expensive. I would rather pay for the right part and a careful install once than pay twice for a rushed one.
The next section is where most avoidable mistakes show up, and it is usually where the hidden costs begin.
The mistakes that turn a simple swap into a bigger repair
The most common problem I see is buying the wrong valve body or trim kit. Shower components are often tied to a specific rough-in model, so “close enough” usually means “not compatible.” The second most common issue is underestimating the wall work. If you cannot reach the valve comfortably, the plumbing becomes harder, and the wall repair usually becomes more expensive than expected.
- Assuming the old trim can be reused with a new valve body
- Cutting too small an access opening to work safely
- Skipping the leak test before closing the wall
- Forgetting to set the temperature limit stop
- Mixing pipe materials without the correct fittings
- Trying to solder near finished surfaces without heat protection
- Ignoring corrosion or mold once the wall is open
I also tell people not to force a valve that is clearly wrong for the space. If the rough-in depth is off, the trim will advertise the mistake every time someone uses the shower. A little extra planning at the start usually beats a lot of cosmetic rework at the end.
There are also a few situations where I would stop the DIY route entirely and bring in a licensed plumber.
When I would stop and call a plumber
If the valve is behind tile, the piping is old and brittle, or the wall opening reveals hidden water damage, I would bring in a pro. The same goes for soldering jobs that sit close to finished surfaces, homes with no local shutoff at the shower, or any case where a permit may be required for the plumbing work. When the wall is open and you can see rusted pipe, softened framing, or mold growth, the job has moved beyond a simple fixture swap.
I also call for help when the system is complicated enough that one mistake affects several outlets at once. That is common in showers with body sprays, hand showers, and diverters tied into the same control set. At that point, the cost of a misread diagram is higher than the labor you are trying to save.
Those are the situations where caution is cheaper than confidence.
The small checks that make the new shower feel finished
Once the valve is installed, the work is not really done until the shower feels right in daily use. I always check handle travel, temperature stability, and the final look of the escutcheon against the wall. If the handle feels too loose, the trim sits crooked, or the hot water comes on too fast, those are not cosmetic nuisances. They are signs that something still needs adjustment.
- Run the shower long enough to flush debris before judging the temperature mix
- Mark the wall opening location before you close it, in case you ever need future access
- Keep the old trim until the new valve passes a full leak test
- Replace brittle screws and worn covers instead of reusing everything
- Take photos of the valve orientation before teardown so the next service call is easier
If I had to leave one practical thought behind, it would be this: a good shower valve replacement is mostly about matching the right parts to the right wall, then proving the install before the wall disappears. When that part is handled carefully, the shower feels more stable, safer, and less fussy every time it is used.