I would treat this as a weekend woodworking project with a very clear payoff: a sturdy outdoor table built from standard lumber, exterior hardware, and a finish that can survive real weather. When I explain how to build a picnic table, I start with the layout, because the proportions and leg angles matter more than fancy joinery. In this guide, I cover the build style, the cut list, the assembly order, and the small details that keep the table flat, stable, and worth keeping outside.
The essentials that keep the build simple
- A 6-foot A-frame table is the easiest and most practical version for most U.S. backyards.
- Plan on roughly $120 to $300 in materials for a basic build, more if you choose cedar or premium fasteners.
- Pressure-treated pine is the budget choice, while cedar is lighter, cleaner-looking, and easier to finish well.
- Use exterior screws, carriage bolts, clamps, a square, and a saw that can make accurate angled cuts.
- Build the top and seats first, then bolt on the legs and braces, then seal every cut end before outdoor use.
- The two biggest failure points are poor leg geometry and weak weather protection.
Choose the build style before you buy lumber
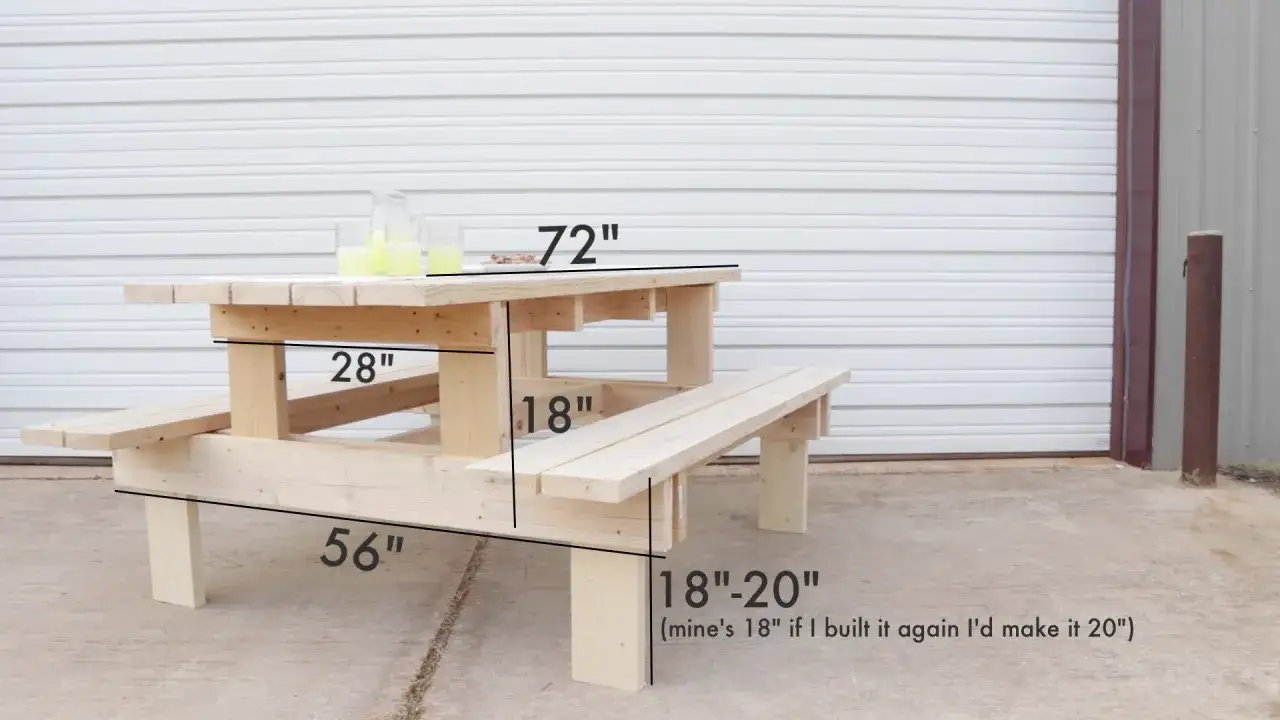
I almost always recommend a 6-foot A-frame table for a first build. It seats six comfortably, fits most patios or yard pads, and keeps the construction simple enough that a careful beginner can finish it without turning the project into a full framing exercise.
| Option | Why I would choose it | Tradeoff |
|---|---|---|
| Scratch-built 6-foot A-frame | Best mix of cost, strength, and customization | Requires accurate cutting and careful layout |
| DIY kit | Fastest route if you want predictable parts | Less flexibility and sometimes thinner lumber |
| Pressure-treated pine | Usually the lowest-cost weather-ready option | Heavier and needs proper drying before finishing |
| Cedar | Better appearance and natural decay resistance | Costs more than pine |
For most American backyards, the sweet spot is still a straightforward wood table in the 6-foot range, around 30 inches high, built with exterior-grade hardware. Once the style is settled, the rest of the job becomes a parts list instead of guesswork, and that makes the project far easier to manage.
The tools and lumber I would line up first
Before I cut anything, I like to stage the whole build. It saves time, but more importantly, it reduces mistakes caused by stopping halfway through to hunt for a clamp or the right bolt size.
| Part | Typical size for a 6-foot table | Purpose |
|---|---|---|
| Tabletop slats | 4 pieces of 2x8 at 72 inches | Main surface |
| Bench slats | 4 pieces of 2x6 at 68 inches | Seating boards |
| Legs | 4 pieces of 2x8, cut to a finished 32-3/4 inches | A-frame support |
| Bench supports | 2 pieces of 2x6 at 61 inches | Carry the seats |
| Tabletop supports | 3 pieces of 2x4 at 28-3/4 inches | Hold the top together |
| Upper leg braces | 2 pieces of 2x6 at 30-3/4 inches | Stiffen the frame |
| Angle braces | 2 pieces of 2x4 at 24 inches | Stop side-to-side wobble |
For tools, I would keep it basic: circular saw or miter saw, drill/driver, tape measure, framing square or combination square, clamps, wrench, sander, and a marking pencil. Add exterior deck screws, carriage bolts, washers, nuts, wood glue, and a stain or sealant made for outdoor use. If you are working with treated lumber, I would let it dry properly before applying the final finish, because wet wood and finish do not cooperate for long.
With the stack of parts ready, the cutting sequence becomes much easier to follow and much less likely to drift off square.
Cut and shape the parts so the table sits flat
This is the part that decides whether the table feels professional or homemade in the wrong way. I would rather spend 20 extra minutes on layout than spend the rest of the weekend trying to fix a rocking frame.
- Cut the tabletop and bench boards to length first so the visible surfaces are consistent.
- Cut the leg blanks, then mark the 30-degree angles at both ends so each pair mirrors correctly.
- Check the finished outer edge of the leg against your plan before making the final cut.
- Ease the lower outer corners of the legs so they do not catch feet or shins.
- Sand the fresh cuts and predrill every location that will take screws or bolts near an end grain edge.
One practical trick matters here: when you cut the leg stock, leave yourself a little margin and trim down to the final fit only after you confirm the angle. That small cushion can save a board if one cut line ends up a hair off. After the parts are shaped cleanly, the tabletop and seats go together much faster.
Build the tabletop and seats before you touch the legs
I prefer to assemble the top upside down on a flat surface. That makes it easier to clamp the boards tight, keep the spacing even, and screw everything together without fighting gravity.
- Lay out the tabletop slats with small spacers between them so rain can drain and the boards can move a little.
- Clamp the slats before driving any screws, because loose boards tend to drift out of line.
- Place the end supports in position, then add the center support so the tabletop stays stiff across its full length.
- Keep screw heads just flush with the surface, not buried deep into the wood.
- Use the same approach for the bench slats so both seats feel balanced.
I am careful not to overdrive fasteners on outdoor furniture. Pushing screws too deep weakens the hold, can split the boards, and makes the surface look rougher than it needs to. Once the top and benches are solid, the frame work becomes a straightforward attachment job instead of a balancing act.
Attach the legs and braces so the frame does not wobble
This is where the table becomes furniture instead of a pile of lumber. I would flip the tabletop carefully, clamp each leg assembly in place, and then bolt everything down in the order the plan calls for.
- Use carriage bolts with washers and nuts so the joints pull tight and stay that way.
- Check that the legs are square to the top before drilling the final holes.
- Install the seat crossmembers and diagonal braces after the leg assemblies are in place.
- Tighten bolts gradually so the frame settles evenly rather than twisting into position.
- Trim any bolt ends that stick out where knees, hands, or clothing could catch them.
The braces are not decorative. They stop the frame from racking when someone leans on a bench or shifts the table across a patio. If the frame still feels soft after the first round of tightening, I would stop and re-check the leg angle before forcing the hardware tighter. A little patience here pays off every time the table gets used.
What usually goes wrong on a first build
Most disappointing picnic tables are not ruined by bad lumber. They are ruined by rushed layout, soft hardware, or a finish that never stood a chance outdoors.
- Skipping predrilling near board ends, which leads to split wood and crooked screws.
- Using interior fasteners that rust early and loosen in weather.
- Driving screws too deep, which reduces holding power.
- Ignoring the leg geometry, which creates a table that rocks on a flat surface.
- Setting the table directly on wet soil, where the lower edges stay damp and rot faster.
- Sealing damp treated lumber too soon, which can make the finish peel or fail early.
I have found that most beginner mistakes are not dramatic. They are small accuracy problems that stack up. If you keep the cuts clean, the holes predrilled, and the frame square, the build is much more forgiving than people expect. From there, the finish and placement become the final layer of protection.
Finish it for weather, then maintain it without much effort
For an outdoor table, I would treat the finish as part of the build, not an optional last-minute step. Seal every cut end, pay extra attention to exposed end grain, and use an exterior stain, paint, or clear sealer that matches how much maintenance you are willing to do later.
If the table will sit in full sun or get hit by rain often, I would put it on pavers, rubber feet, or another dry base instead of bare soil. That one decision slows moisture damage more than most people realize. For a family table on a deck, a yearly inspection is enough in many cases, but I would still check bolt tightness after the first month and again after the first winter.
The small checks I would make before the first cookout
Before I call the project finished, I always do three things: I re-tighten the hardware, I check for any sharp edge or bolt that needs trimming, and I look at the finish in bright light to see whether I missed an end cut or screw head. Those last ten minutes are cheap insurance.
If I were building one for regular backyard use, I would also keep a spare can of finish on hand and plan to recoat the most exposed surfaces before the wood starts looking tired. That is especially true in areas with strong summer sun, heavy rain, or winter freeze-thaw cycles. A good picnic table does not need constant attention, but it does reward a little seasonal care, and that is usually the difference between a piece that lasts a few summers and one that stays useful for years.