A dirty grill does more than look neglected. It cooks unevenly, holds old grease, and can turn a good dinner into a smoky mess. The best way to clean a grill is not one dramatic deep scrub; it is a simple routine that starts while the grates are still warm and ends with a proper reset before buildup gets stubborn. In this guide I cover the fastest safe cleanup, the tools that actually help, how to handle gas, charcoal, and pellet grills, and the small maintenance habits that keep the whole setup organized.
Key takeaways for a cleaner, safer grill
- Clean the grates while they are warm, not scorching hot and not fully cold.
- Use a scraper or chainmail scrubber instead of a cheap wire-bristle brush.
- Empty grease trays, ash, and drip cups regularly so buildup does not affect heat or flavor.
- Wash the outside with mild soap and water; use stainless steel cleaner only when needed.
- Deep-clean gas burners, venturi tubes, and pellet fire pots only when the grill is cool and disconnected from fuel or power.
- Oil dry grates lightly after cleaning to slow rust and reduce sticking.
Start while the grates are still warm
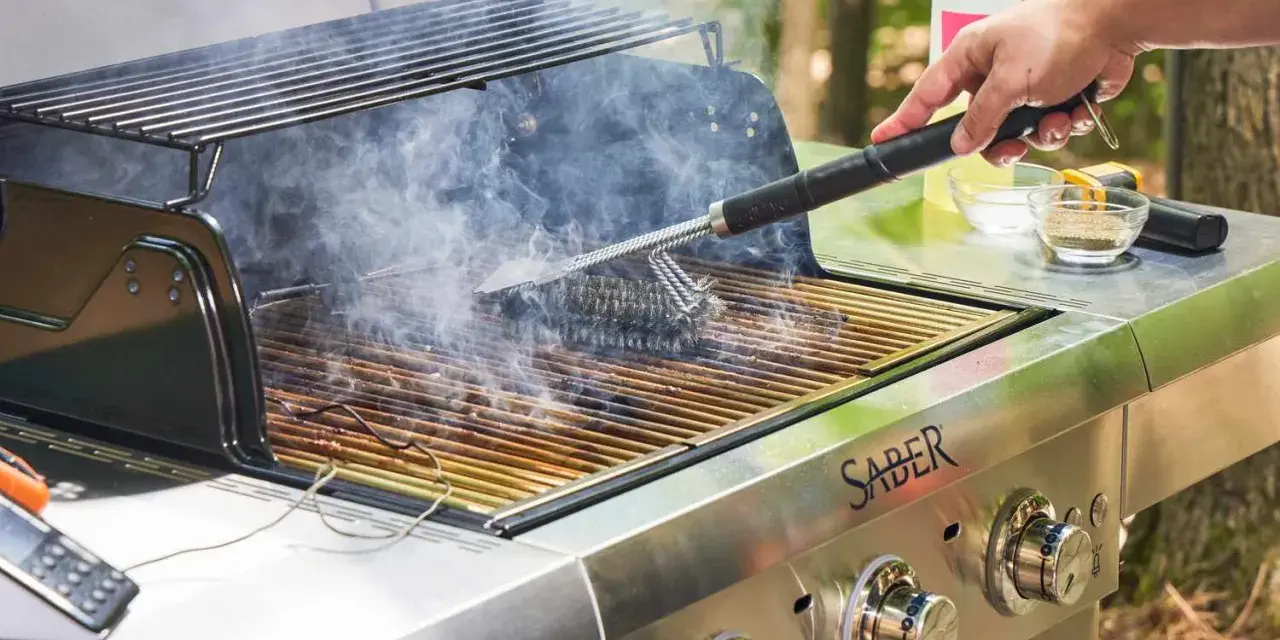
I usually treat post-cook cleanup as a two-minute job, not a weekend project. Once the food comes off, I let the grill stay hot long enough to loosen residue, then I scrape the grates while the grease is still soft enough to lift.
- Let the grill stay on high for a few minutes after cooking, then shut it down.
- Scrape the grate with a sturdy scraper or chainmail scrubber while it is still warm, not glowing hot.
- Brush away loose debris, then wipe the bars with a dry cloth or paper towel if needed.
- If the grate looks sticky, remove it after it cools and wash it with warm water and a few drops of dish soap.
- Dry everything completely and wipe on a thin film of oil if the grate is cast iron or bare steel.
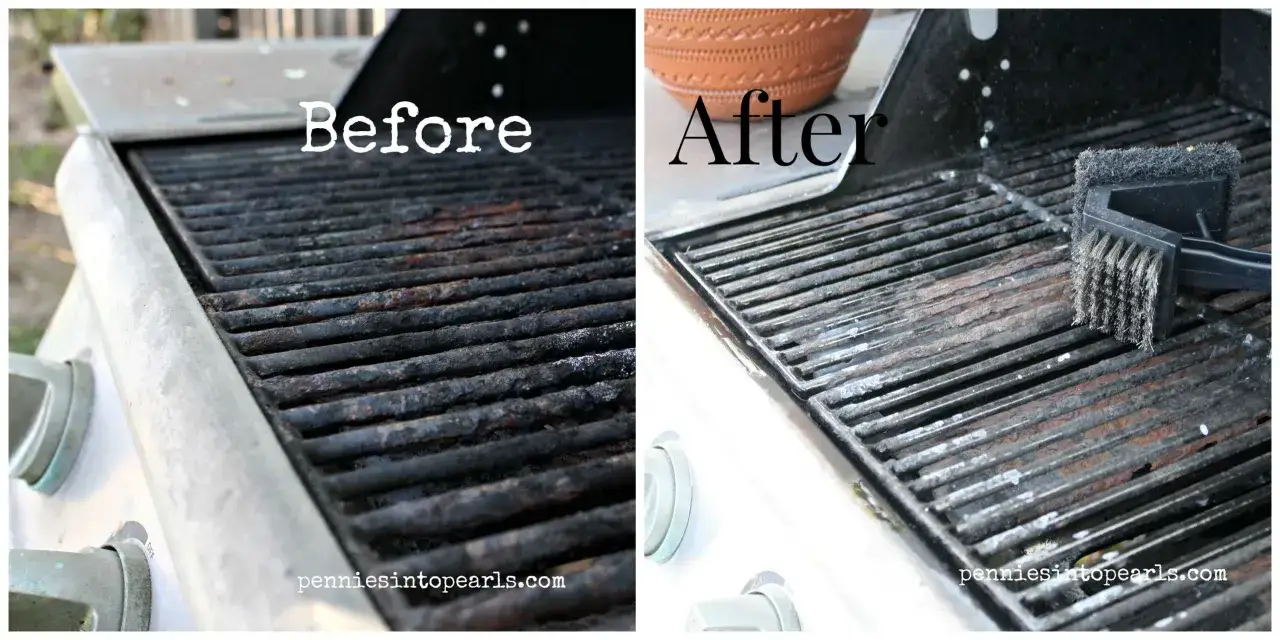
That warm-clean habit matters because burnt-on grease gets harder every minute it sits there. Once this routine is automatic, the heavier cleaning becomes much less frequent, which is exactly where the real payoff starts.
Pick tools that clean without shedding
I do not rely on random gadgets for grill maintenance. I want one tool that removes carbon, one tool that handles corners, and one gentle option for exterior surfaces. The key is matching the tool to the surface instead of attacking every part of the grill the same way.
| Tool | Best for | Why it works | Limits |
|---|---|---|---|
| Chainmail scrubber | Most cooking grates, especially stainless steel and cast iron | It grabs baked-on residue without loose bristles | Needs rinsing and drying after use |
| Grill scraper | Heavy carbon buildup and ridged grates | Fast and simple for stubborn deposits | Must fit the grate shape to be effective |
| Grill stone or pumice block | Durable grates with a lot of baked-on residue | Good for deep abrasion without metal bristles | Can be too aggressive for coated surfaces |
| Nylon pad or microfiber cloth | Exterior panels, side tables, handles, and cool surfaces | Gentle on painted and powder-coated finishes | Not for hot grates or heavy carbon |
I skip loose wire-bristle brushes. The risk is not worth it when there are safer non-wire options that clean just as well. If a grill has porcelain-coated grates, I also stay conservative with anything abrasive so I do not chip the finish while trying to save time.
Once the right tools are in place, the next question is how deeply the grill needs to be cleaned inside the body, not just on top.
Deep-clean the inside before grease becomes a problem
A quick scrape after cooking is maintenance. A deep clean is what keeps heat even, keeps flare-ups under control, and stops old grease from becoming a regular problem. I like to deep-clean the interior on a monthly rhythm during heavy use, then again before storing the grill for a long break.
| Grill type | What to clean | Good rhythm |
|---|---|---|
| Gas grill | Cook box, flavorizer bars or heat tents, burners, drip tray | Monthly, or more often if you grill several times a week |
| Charcoal grill | Ash, bowl, vents, grates | After each cook for ash, full deep clean before and after the season |
| Pellet grill | Grates, fire pot, burn pot, hopper, grease bucket | After long cooks or every 2 to 3 short cooks, plus before storage |
Gas grills
For a gas grill, I start with the grates and work inward. Once the grill is cool, I remove the grates and any flavorizer bars or heat tents, then brush loose grease into the bottom tray. If the burners are exposed and the manufacturer says they can be cleaned, I brush them gently to clear blocked ports. I also check the venturi tubes, because insects and spider webs love those spaces and even a small blockage can throw off the flame.
After that, I empty the drip tray or grease cup, wipe the cook box with warm soapy water if needed, and dry everything thoroughly before reassembly. If you want the grill to heat evenly, this inside-out cleanup matters more than polishing the lid ever will.
Charcoal grills
Charcoal grills are simpler, but they still collect residue fast. Once the coals are fully cold, I remove the ash before it turns damp and clumpy, then wash the bowl with soap and water. I clean the grates while they are still warm from the cook, dry them well, and apply a light coat of oil to keep rust away.
The vents deserve attention too. If the air holes clog with ash, the fire gets harder to manage and you lose the steady heat that makes charcoal worth using in the first place.
Pellet grills
Pellet grills need a little more respect because ash and electronics do not mix well. I unplug the unit, remove loose pellets if I am storing it, and vacuum ash from the fire pot and surrounding chamber only when everything is completely cool. Grease buckets and liners also need regular emptying because they fill faster than most people expect.
If the grill sees heavy use, I treat the fire pot and ash area as a routine cleanup zone, not a once-a-season chore. That approach keeps ignition more reliable and reduces the smoky funk that builds up when ash sits too long.
Once the interior is under control, the parts most people forget are usually the ones that make the biggest difference in how the grill behaves day to day.
Clean the parts that people usually forget
The lid, the grease tray, and the outside surfaces all affect how the grill feels to use, even if they do not touch the food directly. I think of these as the parts that keep the machine pleasant, organized, and safe rather than just edible.
- Grease trays and cups: Empty them before they overflow. Old grease is the source of most ugly flare-ups and most unpleasant smells.
- Inside of the lid: Scrape off flaky carbon, but do not try to polish it to bare metal. A thin seasoning layer is normal; thick tar is not.
- Stainless steel lids and shelves: Wipe with the grain using a microfiber cloth and a mild cleaner, then dry to prevent streaks.
- Painted or powder-coated surfaces: Use warm water with a little dish soap. Harsh abrasives can dull the finish faster than grime will.
- Handles and side tables: These pick up grease from hands and plates, so they benefit from a quick wipe after every cook.
I like this part of the job because it keeps the whole setup organized. A grill that is clean on the outside is easier to maintain on the inside, and that small visual cue makes people more likely to keep up with the routine instead of abandoning it after one messy weekend.
Skip the mistakes that damage the grill
Most grill problems come from cleaning too aggressively, too late, or with the wrong tools. I see the same handful of mistakes over and over, and almost all of them are avoidable.
- Using a loose wire-bristle brush that can shed metal fragments.
- Soaking burners, igniters, or electrical parts that should stay dry.
- Scrubbing porcelain-coated grates with harsh metal tools that can chip the finish.
- Leaving cast iron wet after washing, which invites rust almost immediately.
- Cleaning only the grate and ignoring the grease tray, fire pot, and vent paths.
- Reassembling the grill before every part has dried completely.
- Using strong oven cleaner on food-contact surfaces when mild soap and heat would do the job.
If a grate is warped, a burner is cracked, or a heat plate has holes, cleaning will not fix the real issue. At that point, replacement is the better answer, because a damaged part usually creates more cleaning trouble than it solves.
The cleanup kit I would keep beside the grill
I get better results when the cleaning tools live next to the grill instead of inside the garage somewhere. A small lidded tote or hanging caddy keeps the routine short, which is important because convenience is what makes maintenance stick.
- Chainmail scrubber or sturdy scraper
- Microfiber cloths
- Mild dish soap in a small spray bottle or bucket
- Non-scratch sponge for exterior panels
- Disposable gloves for greasy deep cleans
- Shop vacuum or handheld vacuum for ash and loose debris
- Food-safe oil for cast iron or bare steel grates
- Trash bags for old liners and grease cup cleanup
If I had to reduce the whole process to one habit, it would be this: do two minutes of work while the grill is still warm and five more on the tray, bucket, or ash pan before the mess hardens. That is the routine that keeps flavor cleaner, heat more even, and deep cleans far less intimidating.