A shower faucet that drips, binds, or swings from cold to scalding usually has a smaller problem inside the valve than people expect. This guide shows how to fix shower faucet problems step by step, from identifying the failure to replacing the right internal part and deciding when the body itself is too worn to save. I focus on the repairs that actually matter in U.S. homes, where the wrong cartridge, the wrong seal, or a missed leak behind the wall can turn a quick job into a mess.
The quickest fix depends on what the shower is actually doing
- A drip from the showerhead when the handle is off usually points to the cartridge, seats, springs, or pressure-balancing parts inside the valve.
- A leak around the handle or trim often means worn O-rings, a loose bonnet nut, or mineral buildup on the stem.
- Sticky handle movement usually comes from scale or a failing cartridge, not the trim plate itself.
- Water stains, damp drywall, or dripping sounds behind the wall call for a plumber, not a cosmetic repair.
- Most single-handle shower repairs are part replacements, not full valve swaps.
What the leak pattern usually means
I start by looking at where the water shows up, because that tells me whether I am dealing with a cartridge issue, a sealing issue, or a hidden supply problem. The visible symptom matters more than the brand name at first.
| What you see | What usually causes it | What I check first |
|---|---|---|
| Drip from the showerhead when the faucet is off | Worn cartridge, damaged seats and springs, or a tired pressure-balancing insert | Brand, model, and correct internal part match |
| Leak around the handle or trim plate | O-rings, a loose bonnet nut, or mineral buildup on the stem | Trim removal and seal condition |
| Hard-to-turn or sticky handle | Scale buildup or a failing cartridge | Whether the handle still moves smoothly after pressure is relieved |
| Temperature swings when another faucet runs | Faulty pressure-balancing unit | Whether the valve is designed to stabilize hot and cold pressure changes |
| Water stains below the shower or a damp wall | Valve body leak or supply connection leak | Stop using the shower and inspect for hidden damage |
A pressure-balancing unit is the internal part that keeps shower temperature from jumping when household pressure changes, so a sudden cold blast or scalding spike is not just annoying, it is a clue. Once you know which symptom you have, the next step is gathering the right parts before opening the valve.
What to gather before you open the valve
There is no reason to start tearing trim off before you have the replacement part identified. I want the cartridge number, the handle style, and the shutoff plan settled first, because a five-minute check saves a second trip to the store.
| Item | Why I keep it nearby | Typical cost |
|---|---|---|
| Replacement cartridge or seal kit | Must match the valve brand and series | $20-$80 |
| Cartridge puller | Helps free a stuck part without prying the valve body | $10-$25 |
| Strap wrench | Loosens a bonnet nut or trim without marring the finish | $10-$20 |
| Silicone plumber's grease | Helps O-rings seat cleanly | $5-$10 |
| Flashlight, towel, small container | Keeps screws and trim parts from disappearing | $0-$10 |
- Shutoff access, either at the main water valve or at service stops behind the trim.
- A replacement cartridge or compatible repair kit for your exact valve.
- Flat and Phillips screwdrivers, Allen keys, and needle-nose pliers.
- A towel for the tub or shower floor and a bowl for small fasteners.
In practical terms, most DIYers spend about $30-$80 on the part and another $10-$25 on tools if they do not already own them. If the trim comes off cleanly and the valve body is sound, you are ready for the actual repair.
How I replace the cartridge without damaging the trim
This is the repair that solves most single-handle shower faucet problems. The trick is not force. The trim and valve body are usually softer than people think, and once they get scarred, the job becomes harder than it needed to be.
- Shut off the water at the main or at the valve's service stops if your shower has them.
- Open the shower handle to relieve pressure and drain the line.
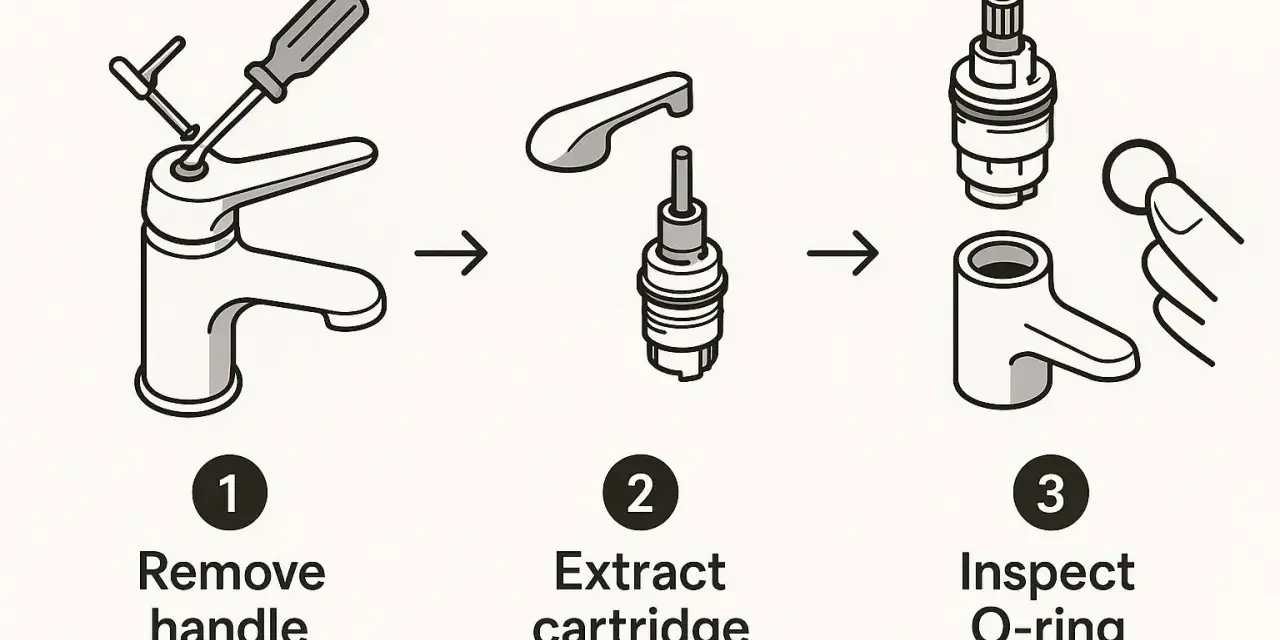
- Remove the handle, then remove the escutcheon, which is the trim plate covering the valve opening.
- Keep the screws and small parts in a container so nothing falls into the drain.
- Take a quick photo of the cartridge orientation before you remove anything. That photo saves mistakes during reassembly.
- Remove the retaining clip, bonnet nut, or retainer ring, depending on the valve design.
- Pull the cartridge straight out. If it is stuck, use a cartridge puller instead of prying against the brass body.
- Clean the valve cavity and check for cracked plastic, torn O-rings, or heavy mineral scale.
- Install the new cartridge in the same orientation, and use a light coat of silicone grease only if the manufacturer allows it.
- Reassemble the trim, turn the water back on, flush the valve for 30 to 60 seconds, and test both hot and cold positions.
If the handle has a temperature limit stop, reset it before you call the job finished. That small adjustment matters more than people realize, especially in homes with pressure-balanced valves. Once the shower is back together and tested, the next question is whether the problem was actually something else.
When the problem is not the cartridge
Not every shower repair ends with a new cartridge. Some faucets leak because the valve style itself is different, and some fail because a separate internal part is doing the real damage. I treat these as different jobs, not the same job with a different guess.
Two-handle compression valves
If one handle controls hot and the other controls cold, the leak may come from a washer, stem, or valve seat on just one side. A new washer can fix a minor drip, but a pitted seat usually means the repair will be temporary unless the seat is resurfaced or replaced.
Diverters and tub spouts
If water continues to dribble from the tub spout when the shower is on, the diverter may not be sealing well. That part is easy to overlook because the shower still works, but the wasted water and weak spray are clear signs that the routing mechanism is failing.
Read Also: Cut PVC Pipe Cleanly - Master Perfect Plumbing Joints
Pressure-balancing and thermostatic valves
If the temperature jumps when someone flushes a toilet or runs another sink, the shower is telling you that the balancing mechanism is not doing its job. On some valves, the internal mixer cap or pressure-balancing unit is the part that actually fixes the problem, not the visible trim. That is why matching the internal assembly to the valve style matters more than buying a generic part and hoping it fits.
If none of these cases fit, the valve body or in-wall piping may be the real fault, and that changes the repair budget fast.
Repair the valve or replace it
This is the decision point that saves the most money. If the valve body is intact and the part is still available, repair is usually the smart move. If the body is corroded, cracked, or obsolete, replacement is the better long-term answer even if it costs more upfront.
| Option | Typical cost | Best for |
|---|---|---|
| Cartridge or seal swap | $20-$80 for parts, $100-$350 with a plumber | Most drips, stiffness, and moderate temperature drift |
| Pressure-balancing insert or diverter part | $30-$120 for parts, $125-$350 installed | Temperature swings or routing problems |
| Full valve replacement | $225-$575 when the valve is accessible, $350-$800+ with wall work | Cracked, corroded, or discontinued valves |
Typical U.S. ranges for a bathroom shower repair can climb quickly if tile or drywall has to be opened, and hidden water damage can push the total past $1,000. The logic is simple: if the body is sound, replace the part; if the body is failing, replace the valve before the leak gets worse. That decision is easier to make once you know how to keep the problem from returning.
How to keep the shower working after the fix
A good repair should last, and most repeat failures come from the same few habits. The valve does not need babying, but it does need a little respect.
- Write down the exact cartridge number or keep a photo of the packaging.
- Move the handle through its full range every few months so mineral scale does not lock it in place.
- Do not force a stiff handle closed; that is how stems and seals get damaged.
- If you have hard water, expect more scale and clean the showerhead and trim area more often.
- Check for a slow drip again after a week, not just right after reassembly, because a weak seal can take time to show itself.
- If the drip returns quickly, assume the part is wrong, damaged, or fighting a worn valve body rather than swapping random pieces.
For me, the value is in preventing a second repair call. A shower valve that is identified correctly the first time usually stays quiet for years, while a guessed-at part often fails again almost immediately.
The rule I use on a real shower repair
When I open a shower, I follow one rule: start with the smallest part that matches the symptom, and stop as soon as the problem points to the wall. That means cartridge first for most drips, a different internal part for temperature swings or diverter trouble, and a plumber the moment water is getting behind the finish.
- If the leak is visible at the showerhead or handle, start with the cartridge or seal kit.
- If the handle is sticky but the valve body is dry, clean and replace internal parts before considering a full swap.
- If you see staining, softness, or active moisture behind the wall, do not keep testing the faucet.
That is the cleanest way to restore a shower without turning a small leak into drywall repair, tile work, and a much larger plumbing bill.