A frozen pipe is a time-sensitive plumbing problem: the line may be blocked now and split open by the time it thaws. The practical side of frozen pipe repair is simple in concept and strict in execution. I focus here on how I would diagnose the damage, thaw exposed pipes safely, decide when a pipe has moved from frozen to burst, and prevent the same failure from coming back in the next cold snap.
The safest approach is to relieve pressure first, thaw gently, and inspect for cracks before you restore full water flow
- Open the faucet served by the frozen line so melting water has somewhere to go.
- Use gentle heat only, starting near the faucet and moving toward the coldest section.
- Skip open flames, torches, and anything that can overheat plastic pipe or ignite nearby material.
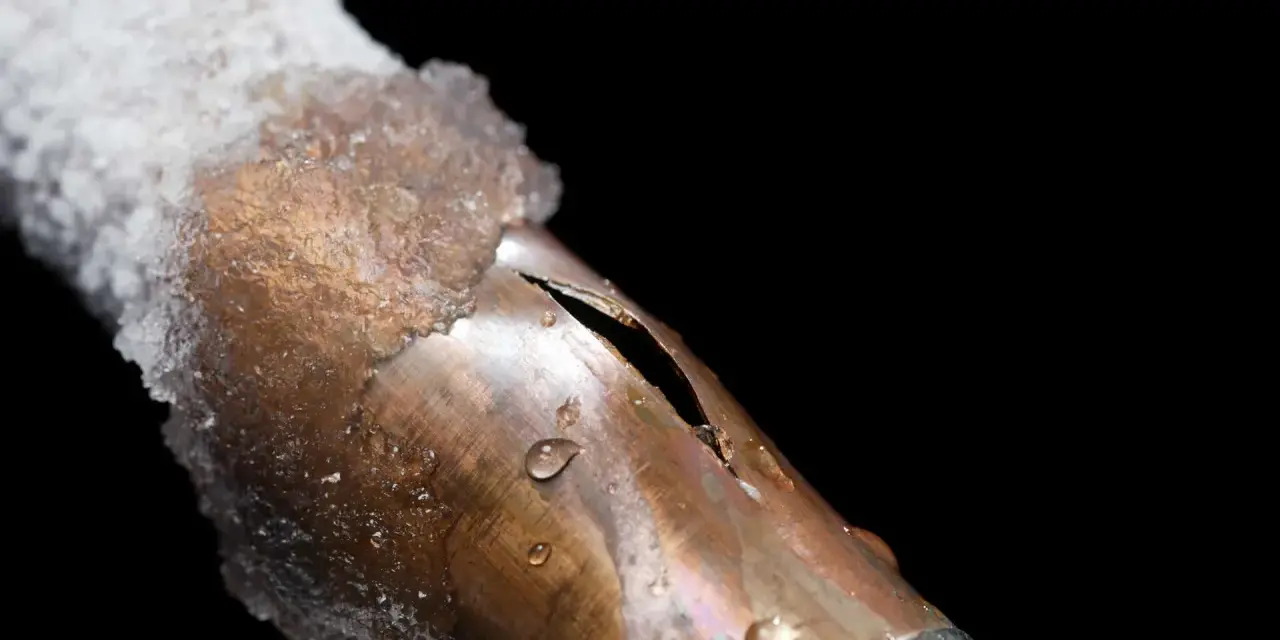
- If you see a bulge, split, water stain, or ceiling drip, shut off the main water valve right away.
- Accessible thawing is often a DIY job; hidden, cracked, or burst lines are usually not.
- Prevention matters most on exposed runs in basements, crawlspaces, garages, and exterior walls.
How to tell whether the line is frozen or already damaged
When only one faucet slows to a trickle and the rest of the house still works, I usually suspect a localized freeze. A line that has gone completely dead, especially if it sits on an exterior wall or in an unheated space, needs more caution. The difference matters because a frozen pipe can often be thawed safely, while a split line can turn into a leak the moment ice starts to move.
| Sign | What it usually means | What I do |
|---|---|---|
| One fixture has a weak trickle | Ice blockage in that branch line | Keep the faucet open and thaw the exposed run slowly |
| Pipe feels icy or has frost | Freeze is likely at or near that spot | Warm the area from the faucet end back toward the cold section |
| Bulge, split, or wet spot appears | Pipe may already be cracked | Shut off the main water and stop DIY work |
| Pressure returns, then drops again | Partial thaw or refreeze | Keep the line warm and inspect for hidden leakage |
I also pay attention to location. Pipes in kitchen sink cabinets, uninsulated basements, crawlspaces, garages, and walls that face the outdoors fail first because cold air reaches them faster than the rest of the plumbing. Once I know what I am dealing with, I can choose the right thawing method instead of making the split worse.

Safe thawing steps that reduce the chance of a burst
For an exposed, accessible pipe, I keep the process controlled and boring. That is the point. Fast heat is the mistake that turns a nuisance into a rupture, especially when water pressure is building behind the ice.- Open the faucet served by the frozen line.
- If possible, warm the room first by raising the thermostat and opening cabinet doors so heat can reach the pipe.
- Apply gentle heat with a hair dryer, heating pad, or warm towels.
- Start near the faucet and work back toward the coldest section in short passes.
- Keep the heat moving so one spot does not overheat, soften, or scorch.
- Watch the faucet as the ice melts; the first signs of flow tell you whether the blockage is clearing.
- Stop immediately if you see a drip, stain, split, or any sign that water is escaping into a wall or floor cavity.
I never use a blowtorch, kerosene heater, charcoal device, or open flame. I also avoid aggressive heat on plastic piping, because PVC and PEX can deform before the ice is fully gone. If the pipe is hidden behind drywall, under a slab, or buried where I cannot see the full run, I do not guess - I call in a plumber with the right thawing equipment. That keeps the problem from moving from the pipe into the structure.
What changes when the pipe has already burst
Once the pipe has split, the job is no longer just thawing. It becomes water control, safety control, and damage control. I shut off the main water supply first, because every minute of pressure can add more water to the same failure point.
- Turn off the main water valve immediately.
- If water is near outlets, appliances, or an active electrical panel, keep clear and shut off power only if it is safe to reach the breaker.
- Open faucets to relieve trapped pressure and help drain the line.
- Move furniture, rugs, and stored items out of the wet area.
- Document visible damage with photos before cleanup starts, especially if insurance may be involved.
- Call a plumber for the pipe repair and, if needed, a water-damage contractor for drying and restoration.
In practice, a burst line is rarely just a plumbing bill. If water has reached drywall, insulation, subflooring, or ceiling cavities, the repair grows quickly because the hidden materials have to be opened, dried, and replaced. That is why cost and cleanup should be considered together, not as separate problems.
What the repair usually costs in the U.S.
The bill depends on whether I am paying for a simple thaw, a short pipe replacement, or a full burst-pipe restoration. In many U.S. markets, plumbers often charge roughly $45 to $200 per hour, with emergency calls adding extra. A straightforward thawing visit may stay relatively modest, but a burst line with drywall, flooring, or insulation work can climb fast.
| Scenario | Typical cost range | What drives the price |
|---|---|---|
| Accessible frozen pipe, no damage | About $100 to $300 | Service call, thaw time, and access to the line |
| Minor split in an exposed pipe | About $300 to $800 | Section replacement, fittings, and labor |
| Burst pipe with cleanup and restoration | About $500 to $5,000+ | Water extraction, drying, wall repair, and finish replacement |
| After-hours emergency response | Often $100 to $300 extra | Late-night dispatch and urgent scheduling |
These numbers are not fixed quotes, but they are useful for setting expectations. I think the real financial decision is simple: if the line is exposed and clearly intact, a cautious thaw may be worth trying; if the pipe is hidden, cracked, or already leaking, paying for a pro usually costs less than chasing a bigger repair later. That threshold is what separates a manageable winter issue from a restoration project.
When I stop the DIY fix and call a plumber
There is a point where patience stops helping. I stop working on the line and bring in a plumber when any of the following shows up:
- The pipe is inside a wall, ceiling, crawlspace, or slab and I cannot see the full run.
- Water pressure does not return after a reasonable thawing attempt.
- The pipe shows corrosion, a bulge, discoloration, or an actual crack.
- There is water staining, mold odor, or soft drywall near the line.
- The affected area is close to wiring, fixtures, or an electrical panel.
- The same line keeps freezing, which usually means the insulation or air sealing is not good enough.
That is the cleanest way to think about it: if I cannot verify the pipe’s condition by sight and touch, I do not keep improvising. A hidden freeze can be thawed in the wrong place and fail in the right one, which is exactly how a small problem becomes a major leak.
How to keep the same pipe from freezing again
Prevention is less dramatic than emergency repair, but it pays for itself almost immediately. I focus on the places where cold air gets in and warm air gets out, because those are usually the conditions that put a pipe at risk in the first place.
- Insulate exposed pipes in basements, crawlspaces, attics, and garages.
- Seal gaps around pipe penetrations, sill plates, windows, and utility entries.
- Open kitchen and bathroom cabinet doors during hard freezes so room heat can reach the plumbing.
- Let a faucet served by an exposed line drip at a slow trickle during severe cold.
- Keep the thermostat steady, and do not let the house fall too cold overnight or while you are away. A common rule of thumb is to keep it at 55 F or higher when the home is empty in winter.
- Disconnect garden hoses and shut off outdoor spigots before the first hard freeze.
- Use heat tape or heat cable only on pipes that are suitable for it and only as the manufacturer directs.
The best prevention move is usually the one that removes cold air from the equation, not just the one that adds heat. Once that is handled, the last step is a final inspection that confirms the fix really held.
The last inspection that saves the repair
After water starts flowing again, I do not treat the line as finished immediately. I watch it under light pressure first, then I inspect every reachable joint, valve, and transition point for the next 15 to 30 minutes. If the pipe is in a basement or crawlspace, I check again after the area has warmed back up, because some leaks only show once the metal or plastic expands and settles.- Confirm normal flow at the affected faucet and at nearby fixtures.
- Run a dry paper towel around fittings to catch tiny leaks that are hard to see.
- Check the ceiling, baseboard, cabinet floor, and wall surface near the freeze point.
- Look for a return of dripping, cloudy water, or a pressure drop after the line has been in use for a while.
- Reinspect the area the next day if the freeze happened in a concealed space.
The real goal is not just to get water back on. It is to make sure the pipe is sound, the hidden damage is contained, and the cold air path that caused the freeze is fixed before the next storm hits.