
Learning how to grow sprouts at home is mostly about clean seed, steady moisture, and disciplined draining. In a small jar, a handful of beans or brassica seeds can turn into crisp, edible greens in just a few days. This guide walks through seed selection, the simplest setup, safe rinsing habits, harvest timing, storage, and the mistakes that usually ruin a batch.
The fastest route to fresh sprouts is a clean jar, the right seed, and strict drainage
- Start with seeds sold for sprouting, not random garden seed packets.
- Use 1 to 2 tablespoons of seed in a quart-size jar for a small batch.
- Soak small seeds for 6 to 8 hours and larger seeds for 8 to 12 hours.
- Rinse and drain 2 to 4 times a day so the seeds stay moist but never sit in water.
- Most home batches are ready in about 3 to 6 days, depending on the seed.
- Throw the batch out if it smells sour, feels slimy, or develops fuzzy mold.
Choose seeds that are worth sprouting
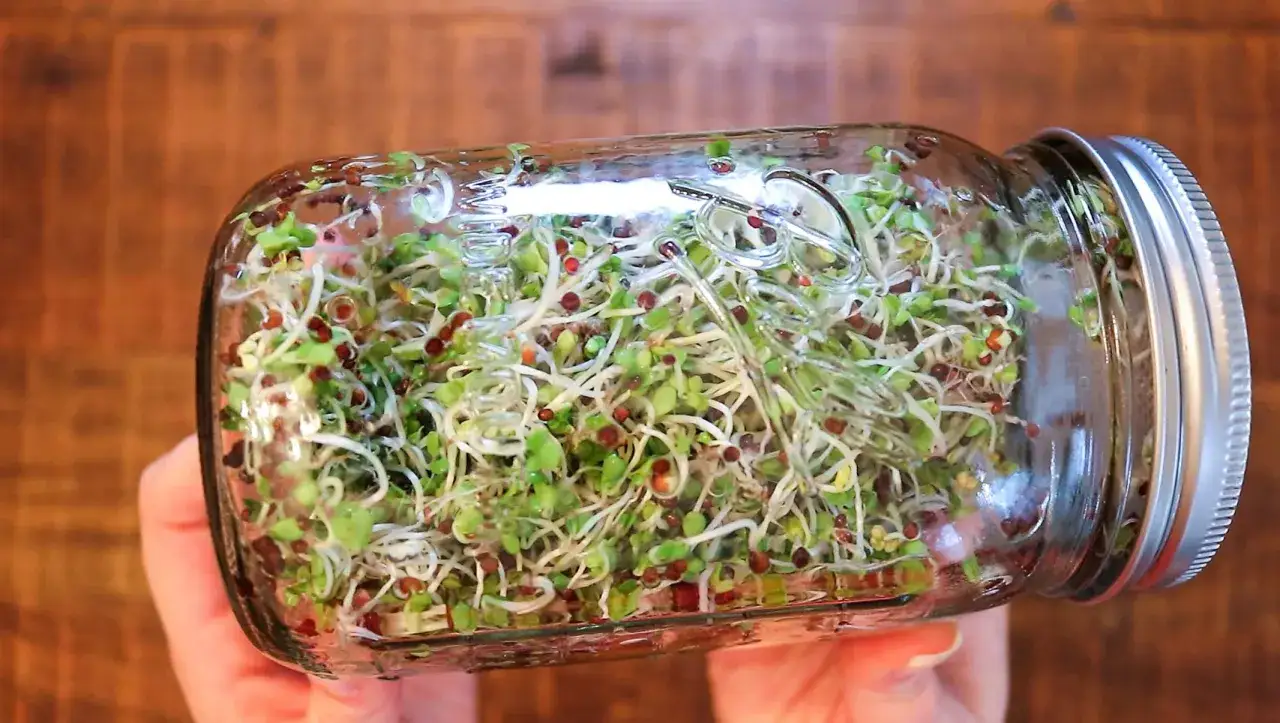
I buy seed that is labeled for sprouting, because that removes most of the guesswork. Fresh, clean seed matters more than any fancy container; if the seed is weak or contaminated, the best technique in the world will not fix it. For a first batch, I stick to mild, fast seeds such as alfalfa, broccoli, radish, mung bean, or lentil.
Typical home ranges are easier to think about than exact timelines, because temperature and seed size both change the pace. Small seeds usually soak less and finish sooner, while larger beans and peas need more time in water and a little more patience afterward.
| Seed group | Typical soak time | Typical harvest window | Flavor and use |
|---|---|---|---|
| Alfalfa, broccoli, clover, cress | 6 to 8 hours | 3 to 5 days | Mild, tender, and good on sandwiches or salads |
| Radish, mustard | 6 to 8 hours | 3 to 5 days | Peppery and bright, with more bite |
| Mung bean, lentil, pea | 8 to 12 hours | 4 to 6 days | Crisp, fuller, and useful in stir-fries |
| Sunflower | 8 to 12 hours | 5 to 7 days | Nutty, meatier, and a little more substantial |
If you only have one or two kitchen sessions to learn the routine, start with a mild seed first and save the stronger-flavored brassicas for later. Once the seed choice is sorted, the setup itself is refreshingly simple.
Set up a clean sprouting station without buying much gear
A wide-mouth quart jar, a mesh sprouting lid or cheesecloth, and cool water are enough for most batches. I also keep a bowl or small rack nearby so the jar can rest at a tilt and drain completely; standing water is what causes a sour smell and sticky seed coats. Wash the jar, lid, and your hands with hot soapy water before you start, and let everything dry.
If I want a small, low-fuss routine, I use the jar method. If I want more volume every week, a tray sprouter gives the seeds more space and better airflow, but it also adds cleanup and another thing to store.
| Setup | Best for | Why I use it | Trade-off |
|---|---|---|---|
| Jar with mesh lid | First batch or small harvests | Cheap, compact, and easy to clean | Smaller yield and more manual rinsing |
| Tray sprouter | Repeated larger batches | More capacity and airflow | More gear to manage |
- Jar for soaking, rinsing, and draining.
- Sprouting lid or cheesecloth to keep the seeds in while water drains out.
- Clean towel or rack to help the jar stay angled.
- Cool, potable water for every rinse.
That is all the hardware I recommend at the beginning. With the kit ready, the actual sprouting process is just a repeatable sequence of soaking, draining, and rinsing.
The jar method I use for a first batch
This is the most reliable way I know to learn the routine without overthinking it. The whole process is a cycle of soaking, draining, and rinsing, and the jar should spend more time empty of water than full of it.
- Measure 1 to 2 tablespoons of sprouting seed into a quart jar.
- Cover with cool water, swish, and pour off the first rinse to remove dust.
- Soak small seeds for 6 to 8 hours; soak larger seeds such as mung bean or pea overnight, about 8 to 12 hours.
- Drain well, then invert the jar at an angle so air can move through the seeds.
- Rinse and drain 2 to 4 times a day. I prefer morning and evening at minimum, and a third rinse helps in a warm kitchen.
- Harvest when the sprouts are the length and texture you want, usually after 3 to 6 days.
That sequence sounds almost too simple, but it works because sprouts only need the right balance of water, warmth, and air. If you keep the jar draining cleanly, the seeds do the rest.
Keep moisture and temperature in the safe zone
The FDA treats sprouts as a food-safety issue for a reason: the same warm, wet conditions that wake up the seed also favor bacteria if something goes wrong. I keep the jar in a clean spot away from raw meat prep, pet bowls, and heavy kitchen traffic, and I aim for normal room temperature rather than a hot windowsill. In practice, a kitchen around 68 to 72°F is much easier to manage than one that climbs into the upper 70s.
- Drain completely after every rinse.
- Use clean hands, clean water, and a clean jar each time.
- Do not let the seeds sit in standing water.
- Discard the batch if it smells sour, feels slimy, or shows fuzzy growth that keeps spreading.
- Do not confuse root hairs with mold; root hairs are tiny white threads on the roots, while mold usually looks patchy and keeps expanding.
- If a batch seems off, I throw it out. Sprouts are cheap; a foodborne illness is not.
That discipline matters even more in hot weather, because warm rooms shorten the margin for error. Once the batch is healthy and evenly moist, the next question is when to eat it and how to keep it crisp.
Harvest, dry, and store them before they soften
I harvest when the first leaves, called cotyledons, have opened and the flavor tastes balanced, not grassy or bitter. For many seeds, that is the 3- to 6-day window, but the exact moment depends on variety and room temperature. If I want a little more color, I give the jar a few hours of indirect light near the end; too much direct sun makes the sprouts tougher.
Before refrigerating, I give the sprouts a final rinse, spread them on a clean towel for 30 to 60 minutes, and store them in a container lined with a paper towel. The goal is simple: keep them dry without crushing them. I also wash them again right before serving, especially if they have spent more than a day in the fridge, and I try to use them within 3 to 5 days for the best texture.
If someone in the house is pregnant, very young, older, or immunocompromised, I would cook the sprouts thoroughly instead of serving them raw. The CDC is clear that raw sprouts are a higher-risk food, and that is one place where caution beats convenience.
The mistakes that ruin most batches
Most sprouting failures are not mysterious. They come from too much seed, too little drainage, or a jar that stayed wet for too long. I like to diagnose the problem by looking at the smell, the texture, and the room conditions before I blame the seed.
| Problem | What it usually means | What I do next |
|---|---|---|
| Sour smell | Too much standing water or poor sanitation | Rinse more often, drain longer, and restart if the smell persists |
| Fuzzy white growth | Could be root hairs if it is limited to the roots, or mold if it spreads | Improve airflow and drainage; discard the batch if it looks patchy or gets worse |
| Slow germination | Old seed or a room that is too cool | Use fresher seed and keep the jar near normal room temperature |
| Slimy texture | Seeds were overcrowded or not drained well enough | Use fewer seeds next time and let the jar drain more thoroughly |
| Bitter taste | Too much light too soon or sprouts left too long | Shorten the greening period and harvest earlier |
I keep notes on the batches that taste best, because that saves time on the next round. After a week or two, the pattern becomes obvious: a little less seed, a little better drainage, and a cleaner routine usually solve most problems.
Keep a steady supply moving with a two-jar rhythm
Once one jar works, the easiest upgrade is not a bigger gadget; it is a staggered schedule. I start one batch, then begin a second jar 2 or 3 days later, which gives me overlapping harvests instead of a feast-or-famine cycle. A small notebook helps more than people expect, because it shows which seed, soak time, and rinse rhythm gave the best flavor.
- Start with one jar until the routine feels automatic.
- Label each batch with the seed and the start date.
- Keep the first batch small enough to finish in a few meals.
- Repeat the seed that tasted best before experimenting with new ones.
Once you know how to grow sprouts cleanly, the whole process becomes repeatable and low-effort. Keep the seed clean, the jar drained, and the rinsing consistent, and you will have a fresh, crisp harvest on the kitchen counter with very little effort.