Hanging a door is mostly a geometry job with carpentry attached. I treat how to hang a door as a question of fit, plumb, and reveal, because a door that is set correctly will swing cleanly, latch easily, and stay quiet long after the trim is finished. In the sections below, I cover the right door type for the job, how to measure the opening, how to shim and fasten the frame, and how to correct the small alignment issues that usually cause sticking or sagging.
The job is won before the first screw goes in
- Choose a prehung unit if the existing frame is damaged, twisted, or badly out of square.
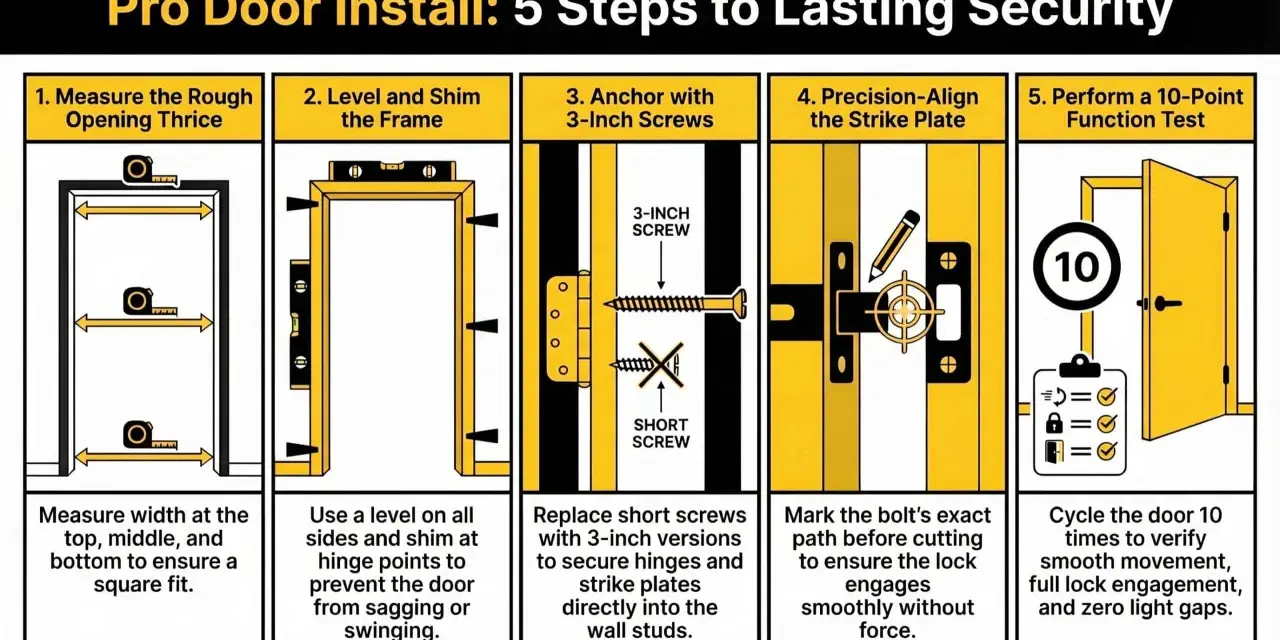
- Measure the rough opening at the top, middle, and bottom, then use the smallest numbers.
- Shims fix small errors; they do not rescue a crooked opening.
- A consistent reveal is the goal, with about 1/8 inch at the top and sides in many interior installs.
- Longer screws in the top hinge help reduce sag and keep the latch edge aligned.
- Test the swing before you fully fasten the jamb, not after the trim is on.
Decide whether you’re hanging a slab or a prehung unit
Before I touch a drill, I decide what kind of door I am actually installing. A prehung door comes already mounted in its frame, so the whole assembly goes into the opening together. A slab door is just the door leaf itself, which means I am reusing the old frame and usually reworking the hinges, latch, and clearances.
| Option | Best for | Tradeoff |
|---|---|---|
| Prehung door | New openings, damaged jambs, or any frame that is out of square | Heavier and more expensive, but easier to get right |
| Slab door | Existing frame is solid, square, and already close to correct | More measuring, mortising, and fine tuning |
Measure the opening before you commit to the door
The rough opening is the framed space in the wall, and it has to be checked in more than one place. I measure the width at the top, middle, and bottom, then I measure the height on the left, center, and right. I always use the smallest numbers, because that is the real constraint.
Then I check three things that matter just as much as the raw dimensions: plumb, square, and level. A door opening can be the right size and still be a pain if one stud leans, the floor slopes, or the head jamb would sit crooked once fastened. If the diagonals are noticeably different, the opening is out of square and needs correction or extra care with shims.
For many U.S. prehung interior doors, the rough opening ends up roughly 2 inches wider and around 2 1/4 inches taller than the nominal door size, but I do not buy on that rule alone. Product sheets vary, especially with jamb thickness, flooring height, and casing details. As a practical example, a nominal 30 x 80 door is often sold with a rough opening around 32 x 82 1/4 inches.
If the fit is tight before the door even goes in, stop and correct the opening first. Shimming can fine-tune a frame; it cannot make up for a bad hole in the wall. Once the opening is honest, the hinge side becomes the foundation of the whole install.
Set the hinge side first and shim for a plumb frame
This is the part where patience pays for itself. I start on the hinge side because that side controls how the door hangs, how it closes, and how the reveal will look on the latch side. A helper is useful here, especially with a solid-core slab or a heavy prehung unit.
- Set the unit loosely in the opening and rest it on small shims so the bottom is off the floor or subfloor.
- Place shims at the top hinge, bottom hinge, and center hinge area on the jamb side that will carry the load.
- Use a long level to make the hinge jamb perfectly plumb.
- Fasten through the jamb and shims into the framing, but do not fully lock everything in place yet.
- Check the head jamb for level and verify that the frame has not twisted as you fastened it.
- Keep the unit loose enough that you can still make small corrections before the final fasteners go in.
I want the frame to move as one unit, not bow when I tighten a screw. That is why I use shims at the hinge locations first instead of scattering them randomly. A shim pack near a hinge gives you leverage where the door actually carries weight. The common mistake is to over-shim the latch side early and create a frame that looks centered but still binds when the door closes.
For interior installs, I like a reveal of about 1/8 inch at the top and along the latch side, unless the manufacturer says otherwise. The bottom gap depends on flooring, carpet, and room use, so I treat that as a separate decision rather than a fixed rule. If the door starts to rub while you are still setting the frame, do not ignore it; fix the plumb first and the reveal usually follows.
Hang the slab and tune the reveal
If I am working with a slab instead of a prehung unit, the hinges have to be mortised correctly. A mortise is the shallow recess that lets the hinge leaf sit flush with the wood instead of standing proud. If that cut is too deep, the door sits loose; if it is too shallow, the door binds or sits wrong in the frame.
Once the hinge leaves match the jamb and slab, I set the door on shims if needed, insert the hinge pins, and test the swing before I touch the latch hardware. The door should move smoothly, stay where I leave it, and keep an even gap around the top and latch side. If it drifts open or shut on its own, the frame is still out of plumb or the floor is influencing the set.
| Symptom | What I check first | Typical fix |
|---|---|---|
| Top latch corner rubs | Top hinge alignment and screw length | Reset the top hinge and use a longer screw into framing |
| Door swings open or closed by itself | Plumb of the hinge jamb | Re-shim the jamb until the frame is truly vertical |
| Gap is even but the door still sticks | Twist in the frame or door slab | Check the plane of the jamb and plane the edge only if needed |
| Bottom edge drags | Floor level and undercut clearance | Increase clearance or trim the bottom edge carefully |
What I avoid here is forcing the latch side to fix a hinge-side problem. That almost always creates a new problem somewhere else. If the swing feels wrong, I go back to the hinge side first, because that is where the door is truly being controlled.
Install hardware, then test the door like it will be used
Once the swing is right, I install the latchset, strike plate, stop molding, and any other hardware that belongs on the unit. The strike plate should meet the latch without a fight, and the latch should click in cleanly instead of pushing the door out of alignment at the last inch. If the strike is off, I adjust the frame before I start filing the metal.
I also test the door like a real person will use it: open, close, pause, close softly, then repeat a few times. If the latch edge bumps or the corner squeaks, I treat that as a sign that something in the set is still slightly off. A door should not need to be muscled shut to seem “finished.”
For a prehung interior unit, I like to replace the center screw in the top two hinges with a 2 1/2-inch screw driven into framing. That small move makes a noticeable difference on sag resistance, especially on heavier doors. It is one of those details that looks minor on paper and saves a lot of annoyance later.
If this is an exterior door, I would add one caution: follow the manufacturer’s flashing, sealant, and weatherproofing steps exactly. The alignment logic is the same, but water management becomes part of the job, and that is not something I improvise.
The details that keep a hung door from going bad later
The last 10 percent of the job is what protects the first 90 percent. I keep a few habits that make a door stay correct instead of slowly drifting out of line.
- Use shims at every hinge location and trim the exposed ends only after the frame is secured.
- Do not overdrive fasteners; a crushed jamb can pull the frame out of alignment.
- Seal or paint all six sides of a wood slab, including the top and bottom edges, so it absorbs moisture evenly.
- Leave enough clearance for flooring changes, seasonal movement, and normal house settling.
- If the opening is badly out of square, fix the framing instead of trying to hide the problem with trim.
That is the part most people miss: a door is not just hung once, it is asked to keep working through humidity swings, traffic, and slight movement in the house. If I leave the job with a clean reveal, firm hinge-side fastening, and properly set hardware, the door usually stays quiet for years. A small investment of time at the start is what keeps the repair from turning into a repeat project later.