The main things that decide whether the job goes smoothly
- Inside mount looks cleaner, but it needs enough depth and a fairly square opening.
- Outside mount is better for shallow, uneven, or obstacle-heavy windows and usually blocks more light.
- Measure every window separately and record width, height, and depth before you drill anything.
- A level, drill, pencil, tape measure, pilot bit, and the correct anchors are the tools that save the most time.
- Cordless blinds are the safer default in homes with children; CPSC says cordless coverings are the only way to eliminate the strangulation hazard.
- Most single-window installs are beginner-friendly and usually take less than an afternoon when the fit is planned correctly.
Choose the mount that fits the window
Before I touch a drill, I decide whether the blind should sit inside the frame or cover it from the outside. That choice affects the look, the light control, and whether the hardware will actually fit without fighting the window.
| Mount type | Best for | What you gain | Tradeoff |
|---|---|---|---|
| Inside mount | Deep, square openings with little or no obstruction | Clean built-in look, exposed trim, room for curtains | Less forgiveness if the frame is uneven; edge light can leak through |
| Outside mount | Shallow frames, warped openings, handles, cranks, or trim that gets in the way | Better light coverage, more privacy, visually larger windows | Hardware is more visible and the blind can feel heavier on the wall |
If the window is not square, I usually stop pretending an inside mount will hide the problem. An outside mount is often the cleaner repair because it gives you room to level the blind against the wall instead of the frame. Once that choice is clear, measuring becomes much more straightforward.
Measure before you drill
I measure each window separately, even when they look identical from across the room. For width, I check the top, middle, and bottom. For height, I check the left, middle, and right sides. A metal tape measure is worth using here because fabric tapes flex just enough to throw off a small opening.
- Record measurements to the nearest 1/8 inch. That small increment matters more than people think on a tight inside mount.
- Use the narrowest width for an inside mount. That gives the blind room to move without rubbing the frame.
- Check depth before buying or drilling. The headrail needs clearance from glass, cranks, locks, and decorative trim.
- Compare diagonals if you suspect the frame is off square. If the diagonals differ too much, an inside mount usually looks forced.
For custom or cut-to-fit blinds, I follow the order sheet instead of guessing at clearance. Some products want the exact opening size, while others build in their own adjustment. That is why I prefer to have the blind in front of me before I decide anything about cutting or trimming.
Gather the right tools and hardware
The install goes faster when everything is laid out before the first hole is drilled. I keep a drill, a screwdriver, a pencil, a level, a metal tape measure, a step ladder, a small pilot bit, and the blind’s screw package within reach. If the window is drywall rather than wood, I also keep anchors nearby, because standard screws alone are not reliable in drywall.
- Level keeps the brackets aligned so the blind does not drift or bind.
- Pilot bit makes the screws bite cleanly and helps prevent splitting or stripping.
- Anchors are for drywall or other hollow surfaces where a screw needs extra grip.
- Shims or spacer blocks help when trim projects forward and the blind needs clearance.
- Cordless hardware is the safer choice in homes with children because it removes accessible cords from the setup.
I also unpack the blind itself before I climb the ladder. Brackets, screws, valance clips, the wand, and end caps should all be present. A missing clip is annoying at the table; it is a real time sink once you are balanced on a step ladder. With the parts sorted, the actual mounting work is mostly careful repetition.

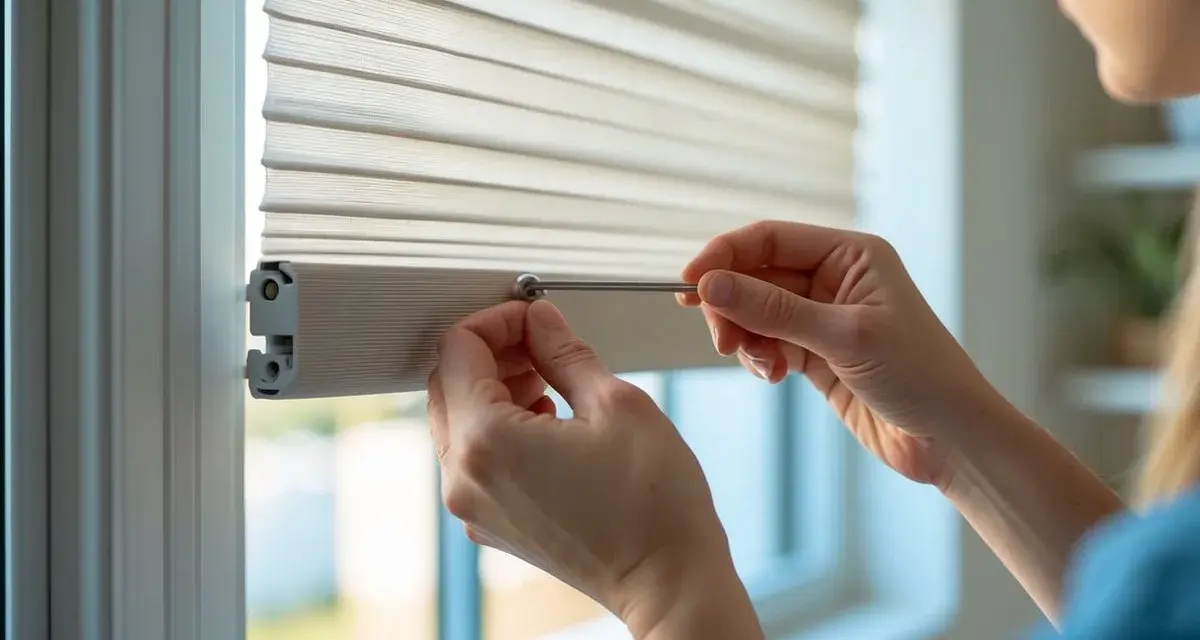
Install the brackets and seat the headrail
Once the measurements are right, the install is mostly a matter of marking accurately and keeping the brackets level. I do not rush this part, because the blind will only move as well as the brackets let it.
- Hold the end brackets in place where the instructions call for them, usually tight to the upper corners for an inside mount or above the opening for an outside mount.
- Mark the screw holes lightly with a pencil, then remove the brackets and drill shallow pilot holes.
- Fasten the end brackets loosely at first so you still have room to correct alignment.
- If the blind includes a center support, mark and install it before hanging the headrail. Wide blinds often need that extra support.
- Set the headrail into the brackets and lock or snap the clips closed.
- Attach the wand, then add the valance clips and valance if the kit includes them.
- Lower and raise the blind a few times to confirm smooth movement before you step down.
If I am drilling into drywall, I use anchors and stop if the screw never firms up. If the bracket lands on wood trim, a stud, or the window frame itself, screws alone are usually fine. When trim sticks out far enough to keep the bracket from sitting flat, I use the supplied spacer hardware or shims rather than forcing the blind into a bad angle.
Handle wide windows, doors, and awkward trim
Not every window behaves like a textbook rectangle. Wide blinds often need a center bracket, and door-mounted blinds usually need hold-down brackets so the bottom rail does not swing every time the door moves. Those two details make a big difference in how stable the finished install feels.
| Situation | What I do | Why it helps |
|---|---|---|
| Wide opening | Add the center support the kit calls for | Prevents the headrail from sagging in the middle |
| Trim that sticks out | Use shims or spacer blocks, or switch to outside mount | Keeps the blind clear of molding and lets the rail sit flat |
| Doors and sliders | Install hold-down brackets at the bottom rail | Stops swaying and keeps the blind from banging around |
| Oversized or trim-to-fit kit | Trim only if the manufacturer allows it | Prevents damage to slats, cords, or the bottom rail |
That last point matters more than most DIY guides admit. Some mini-blind and faux-wood kits are designed to be shortened, but others are not forgiving at all. I only cut a blind when the instructions make it clear that the product is trim-friendly, because improvising usually turns a usable blind into waste. Once the special cases are handled, the next step is checking for problems that show up only after the hardware is loaded.
Fix the problems before you leave the ladder
Most post-install issues are not mysterious. They come from one of four things: a bracket that is off level, a frame that is not square, a mounting surface that is too weak, or a blind that needs more clearance than the opening gives it.
| What you notice | Likely cause | What I do |
|---|---|---|
| The blind looks crooked | One bracket sits lower or farther forward than the other | Reset the brackets and check level again before tightening |
| The headrail will not lock | The brackets are not fully seated or a screw head is in the way | Back out the problem screw, reseat the rail, then re-tighten |
| The slats rub the trim | The blind is too close to the frame or the opening is out of square | Add clearance with shims or move to an outside mount |
| Light leaks heavily at the sides | The outside mount does not extend far enough beyond the opening | Reposition the brackets for wider coverage |
| The blind sags in the middle | A center support is missing on a wide blind | Install the center bracket the kit calls for |
If the blind still binds after those checks, I stop forcing it. A brittle plaster wall, a badly warped frame, or a deep obstruction behind the trim can turn a simple project into the wrong kind of repair. In those cases, the better answer is usually a different mount style, not more pressure on the same hardware.
The last checks that keep the installation looking clean
Before I put the drill away, I run the blind through a full open-and-close cycle and look at it from across the room. That is the fastest way to see whether the installation reads as intentional or slightly off.
- Make sure every screw is snug, but do not overtighten into soft trim or drywall.
- Confirm the valance is centered and does not sit at a slight angle.
- Check that cords are short, tidy, and kept away from cribs, beds, and furniture.
- Wipe the slats and headrail now, before dust and fingerprints are harder to remove.
- Keep the spare screws and clips in a labeled bag in case a bracket ever loosens later.
If the opening is shallow, uneven, or crowded by molding, I usually switch to an outside mount rather than keep fighting for an inside fit. That one decision often saves more time than any amount of bracket rework, and it usually leaves the blind looking better for years instead of just looking acceptable on day one.