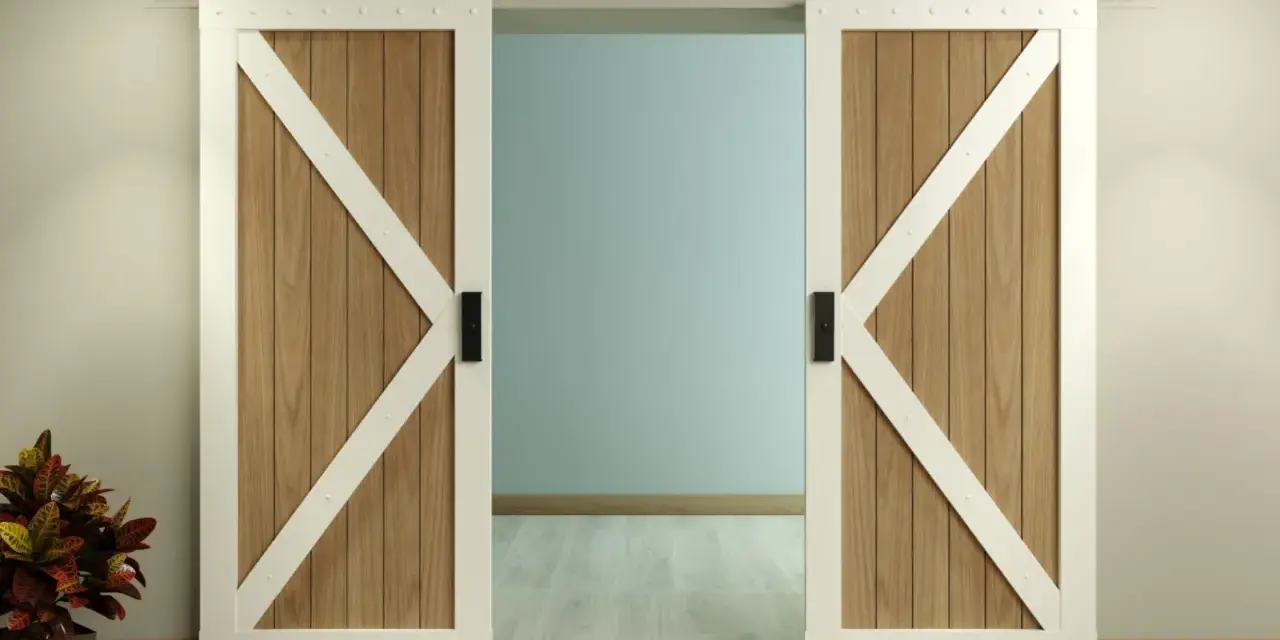
Installing a barn door is mostly a question of support and alignment, not just style. This guide breaks down how to install barn door hardware in a way that feels solid, slides cleanly, and leaves enough overlap for real privacy where it matters. I’m focusing on the parts that make or break the job in an actual home: measuring the opening, finding structure, setting the track height, and tuning the door so it does not wobble or scrape.
Key points to keep the install clean and secure
- Choose a track that is at least twice the door width so the panel can slide fully clear of the opening.
- Fasten the rail into studs or a solid header board; drywall alone is not a safe mounting surface.
- A common target is track center at door height plus 1 3/4 inches, which usually leaves a 3/8 to 1/2 inch floor gap.
- Plan for about 2 inches of overlap on each side if you want better coverage and fewer light gaps.
- Use the anti-jump pieces, door stops, and floor guide that come with the kit; they are stability parts, not extras.
What a barn door can and cannot solve
I like barn doors for closets, pantries, laundry rooms, and offices because they save swing space and look deliberate when the hardware is sized correctly. They are less convincing in rooms that need a tight seal, because even a well-installed sliding door will leave small gaps for light, sound, and air. If you need real privacy in a bedroom or bath, I treat that as a design choice, not a surprise, and I plan for a latch or I recommend a different door type altogether.
| Situation | My take | Better choice if... |
|---|---|---|
| Closet, pantry, laundry room | Usually a strong fit | You want to save floor space and the door only needs basic privacy |
| Bathroom or bedroom | Possible, but more compromise | You need a tight acoustic or light seal |
| Heavy solid wood slab | Good if the hardware rating and wall structure match | Your wall cannot support the load without reinforcement |
| Very narrow wall beside the opening | Often a poor fit | You do not have parking space for the open door |
Once I know the door is the right solution, I move straight to measuring, because the next section is where most bad installs are won or lost.
Measure the opening before you buy the kit
Before I touch a drill, I measure the clear opening, the wall space beside it, and the trim projection. The door needs enough width to cover the opening, and the track needs enough length for the panel to park fully open. A simple rule works well here: the track should be at least twice the door width, and the door itself usually needs about 2 inches of overlap on each side for good coverage.
| Measurement | Typical target | Why it matters |
|---|---|---|
| Track length | At least 2x the door width | Lets the door slide completely clear of the opening |
| Door overlap | About 2 inches per side | Improves privacy and reduces visible gaps |
| Track height | Door height plus 1 3/4 inches to the track center | Usually creates a 3/8 to 1/2 inch gap under the door |
| Parking space | At least one full door width beside the opening | The door has to slide somewhere when it is open |
| Weight rating | Higher than the actual door weight | Prevents sag, wobble, and premature wear |
I also check the trim. If the casing sticks out far enough to catch the door, I either plan a deeper spacer setup or I modify the trim so the panel clears it cleanly. That clearance check sounds small, but it is exactly what keeps the finished install from feeling improvised.
With the measurements in hand, the next step is choosing the right hardware and support pieces instead of buying the first kit that looks close enough.
Choose the tools and hardware that make the job easier
I keep the shopping list practical. For most interior installs, you need the door slab, the track kit, hangers, standoffs or spacers, lag screws, door stops, a floor guide, anti-jump blocks or discs, a handle or pull, a level, a stud finder, a drill, and the correct drill bits. Many common single-door kits are built for 1 3/8-inch to 1 3/4-inch thick slabs, so I always check the kit spec before I drill any hanger holes.
- Door slab - Solid-core is my preference when the budget allows because the hardware loads are concentrated at the hanger points.
- Track kit - The rail, rollers, stops, spacers, and guide should all be rated for the door weight.
- Header board or ledger - Useful when studs do not line up where the rail needs to land.
- Stud finder and level - These are not optional on a barn door job.
- Floor guide - Keeps the slab from swinging at the bottom and helps the door track true.
If the wall does not give me solid fastening points where I need them, I stop and add a header board anchored into studs. That choice is cheaper and cleaner than fighting loose hardware later, which leads straight into the mounting step.
Mount the track on structure, not on guesswork
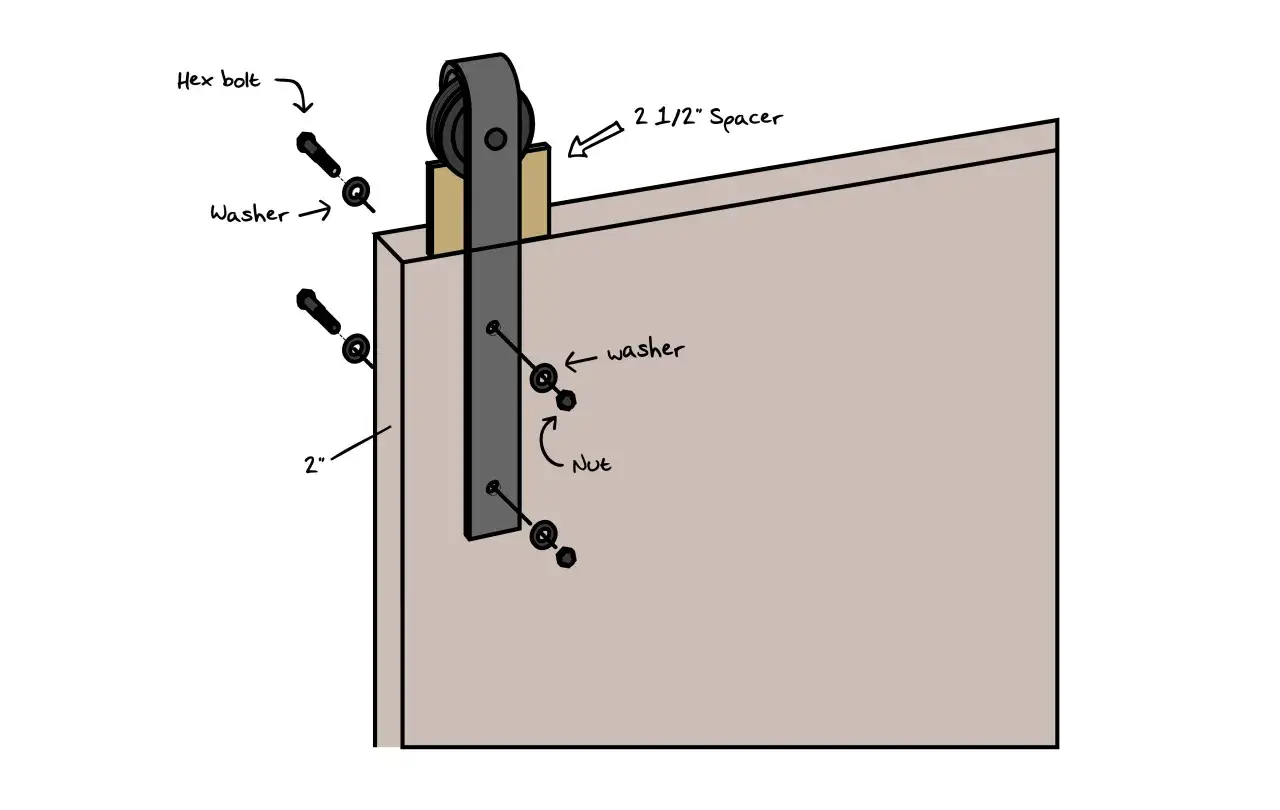
This is the part where precision matters most. I locate the studs, mark the rail centerline, and set the height so the door will clear the floor by roughly 3/8 to 1/2 inch. A common rule is to place the center of the track at door height plus 1 3/4 inches, but I still verify that against the specific kit, because hardware profiles vary a little.
- Find every stud or the solid header board that will carry the track.
- Mark the track centerline level across the opening.
- Dry-fit the rail and confirm the end clearance beside the opening.
- Pre-drill the mounting points so the lag screws bite cleanly.
- Fasten the rail and spacers evenly, tightening each point without twisting the track.
- Install the stops before you call the rail finished, because they define the travel limits.
I do not trust drywall alone here. The track, rollers, and door all create leverage, and leverage is what makes a marginal install fail. If the wall is framed oddly or the studs miss the ideal spots, a header board gives you a much better result than trying to improvise with anchors.
Once the rail is secure and level, hanging the slab becomes straightforward instead of stressful.
Hang the door and set the guide, stops, and handles
I like to hang the door with a helper, because one person can hold the slab while the other checks alignment and keeps the rollers on the rail. After the hangers are attached to the door, I lift the slab onto the track, then I test the travel before tightening the small adjustments. If the door drifts, rubs, or feels heavy in one spot, I look at the level of the rail first and the guide position second.
The floor guide is doing more work than people realize. A surface-mounted guide works fine when the door does not have a bottom groove, while a centered guide is cleaner if the slab was milled for one. Either way, the guide should keep the door from swinging in and out at the bottom without creating drag.
- Anti-jump hardware keeps the rollers from lifting off the rail if someone yanks the door too hard.
- Door stops define the open and closed limits so the panel does not slam into trim or slide off-center.
- Handle placement should give you a comfortable grip without interfering with the opening edge or nearby wall.
- Latches are worth adding if the room needs real privacy, because a sliding door does not lock the way a hinged door does.
When the door rolls cleanly by hand, I test it a few more times from both directions. That is usually when hidden issues show up, and that is exactly what the next section is about.
Fix the problems that show up on the first test slide
Most post-install problems are simple, but they need a calm diagnosis. If the door scrapes the floor, the track is too low or the guide is off. If it hits the casing, the rail is too close to the wall or the spacers are too shallow. If it feels unstable, the hangers may be loose or the rail may not be tied into enough structure.
| Symptom | Likely cause | What I would do |
|---|---|---|
| Door rubs trim | Not enough standoff depth or the rail is too low | Recheck spacers and rail height, then retest clearance |
| Door sways at the bottom | Floor guide is missing or out of alignment | Center the guide and confirm the bottom channel or edge path |
| Track flexes or feels loose | Fastened to drywall instead of studs or header board | Rebuild the support and refasten properly |
| Door does not stay closed | Stops are mis-set or there is no latch | Reset the stop positions and add the right latch style |
| Door is hard to slide | Rail is not level or the rollers are overloaded | Check level, confirm weight rating, and retighten hardware |
I also watch for a mistake I see often on DIY jobs: people trust the look of the installation before they trust the hardware. If the rail is even slightly off level, the door will tell on you every time it moves. Once those corrections are made, the only thing left is the finishing work that keeps the door feeling solid over time.
The finishing checks that keep the door working well
After the install, I always do a short maintenance pass. I tighten the fasteners again after a few days of use, vacuum the track so dust does not make the rollers noisy, and confirm the guide is still centered if the home settles or the door gets seasonal movement. That is usually enough to keep a good hardware kit feeling smooth for years, not just the first week.
If I am being honest, the biggest difference between an average barn door and a good one is not the finish on the slab. It is the support behind the rail, the clearance around the trim, and the way the final adjustments were handled. Get those three parts right, and the door will feel intentional every time you slide it shut.