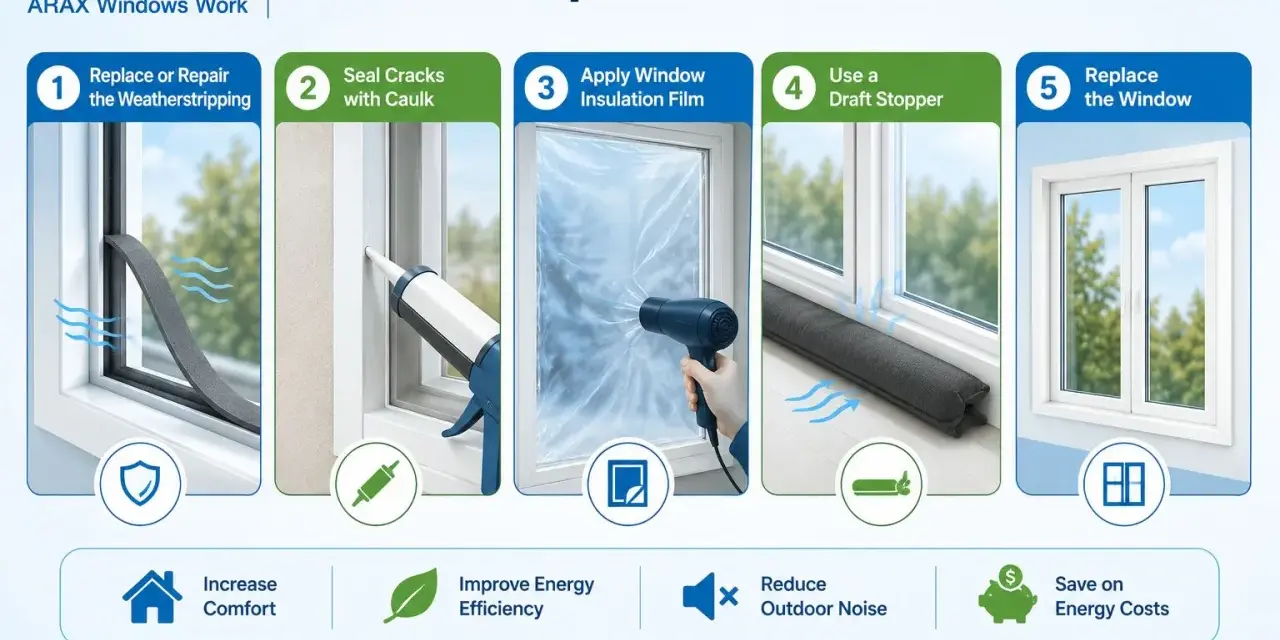
What matters most before you start sealing window gaps
- Use weatherstripping on moving parts and caulk on fixed cracks.
- Pick the seal by window type, not just by the size of the draft.
- Clean, dry surfaces matter more than most people expect.
- A good seal should compress lightly when the window closes, not jam the sash.
- If you still feel a strong draft after sealing, the leak may be behind the trim or in the window itself.
Why a small draft can become a big comfort problem
I treat a drafty window as two separate issues: air leakage and poor fit. Air leakage wastes heated or cooled air, but the comfort problem is often what gets people moving first. A cold stream of air near a sofa, bed, or desk makes a room feel unfinished even when the thermostat says the temperature is fine.
The Department of Energy draws a useful line here: use weatherstripping on movable parts like operable windows, and use caulk on stationary cracks. That matters because many homeowners try to solve every gap with the same product, then wonder why the repair fails or the sash starts sticking.
Before I touch a roll of tape or a strip of vinyl, I look for three clues: visible daylight around the frame, a sash that rattles when I tap it, and a spot where a strip of paper slides through too easily. Once I know where the air is moving, the repair becomes much more specific. That is what keeps the next step from turning into guesswork.
Which weatherstripping actually fits your window
The best material depends on how the window moves, how much friction it sees, and whether you want a fast fix or a longer-lasting one. I do not choose by price alone. I choose by the way the window behaves when it closes.
| Material | Best for | Why I use it | Tradeoffs |
|---|---|---|---|
| Foam tape | Quick fixes, irregular gaps, short-term repairs | Easy to cut, easy to apply, cheap, and forgiving on uneven surfaces | Wears faster, can compress too much, and is usually the least durable choice |
| V-strip | Double-hung and sliding windows | Makes a clean tension seal along the sash and frame | Corners have to be neat, or the seal opens up |
| Felt | Low-friction areas and older windows with light use | Inexpensive and simple to install | Least durable and not great where moisture or abrasion are present |
| Tubular vinyl or rubber | Windows that need a stronger compression seal | Seals well when the sash closes firmly against it | Can be fiddly to align and may be visible |
| Fin seal or pile weatherstrip | Aluminum sliders and sliding glass doors | Durable and designed for sliding action | Installation can be more precise than most DIY tapes |
| Magnetic or interlocking metal | High-performance or specialty windows | Excellent seal when the parts line up correctly | Usually more technical and often better handled by a pro |
My rule of thumb is simple: if the window still moves well and just needs a better seal, I lean toward a compression-style strip. If the surface is rough, the window is older, or I need a fast improvement, foam tape can make sense. For aluminum sliders, I usually look first at fin seal rather than trying to force a softer product to do a job it was never meant to do.
Once the material matches the window, the install itself is much easier to get right.
How I install a seal without making the sash stick
The Department of Energy recommends applying weatherstripping to clean, dry surfaces and doing the work in temperatures above 20°F (-7°C). I follow that advice because adhesive-backed products fail quickly when dust, moisture, or cold gets in the way. I also measure twice and leave a little extra material so I can trim for a tight fit instead of hoping the first cut is perfect.
- Open and close the window fully so I can see where it binds and where the gap is largest.
- Clean the contact surfaces with a mild cleaner and let them dry completely.
- Remove loose paint, old adhesive, and grit from the tracks and stop surfaces.
- Measure the perimeter carefully and add 5% to 10% extra to account for cuts and waste.
- Cut the strip slightly long, test the fit, then trim the final edge once I know the alignment is right.
- Press the seal in place firmly, paying attention to corners and end points where peeling often starts.
- Close the window and check for gentle compression, not hard resistance.
I am careful not to overbuild the seal. If a window takes real force to latch after the strip goes on, the profile is too thick or the placement is wrong. That is a common mistake, and it usually shows up before winter is even over.
If the repair is done well, the next thing to check is whether the window actually passes a real draft test.
How to tell whether the repair really worked
ENERGY STAR suggests two simple tests that I use often: a paper test and an incense test. The paper test is straightforward. Close the window on a strip of paper and see how easily it moves. If it slides without much resistance, the seal is probably too loose. If it tears or the sash feels overcompressed, the strip is too aggressive.
The incense test is useful when the draft is subtle. I hold the smoke near the sash, the lock side, and the corners, then watch whether it bends or gets pulled toward a gap. That gives me a more precise picture than just standing near the window and guessing.
I also check for daylight, rattling, and cold spots around the frame. A window can feel sealed in one place and still leak at the meeting rail or bottom corner. That is why I prefer to test after each major piece of strip goes on rather than waiting until the whole room is finished. The earlier I catch a bad fit, the less material I waste.
When weatherstripping is the wrong fix
Some window problems are not weatherstripping problems at all. If the leak is in a fixed crack around the frame, caulk is usually the better tool. For stationary openings under about 1/4 inch, caulk is the cleaner answer because it seals the gap without interfering with movement.
If the gap is behind the trim, the repair moves into a different category. That often means the air is leaking through the rough opening or around the framing, and the solution may involve removing casing, sealing the cavity, and then reassembling the trim. That is not a bad repair, but it is no longer a simple strip-and-stick job.
I stop and rethink the plan when I see rotten wood, warped sashes, broken balances, or windows that refuse to close squarely. In those cases, weatherstripping can buy time, but it will not solve the underlying problem. On older homes, especially those built before 1978, any trim removal should be handled with lead-safe caution.
The practical takeaway is easy: if the sash is sound and the leak is at the moving joint, weatherstripping makes sense. If the opening itself is failing, I fix the structure first and the seal second.
How I keep a good seal from failing early
A decent seal can fail for boring reasons: dust, paint buildup, seasonal movement, and corners that were never quite snug enough. I check my windows at the start of the heating season and again after a heavy cleaning or paint job. That is usually enough to catch peeling adhesive, crushed foam, or a strip that has gone flat.
I also vacuum the tracks and wipe down the contact points before I blame the material. Dirt changes how the sash closes, and a tiny layer of grime can make a good seal look bad. If I want a repair to last, I treat the window like moving hardware, not just a hole in the wall.
- Inspect the strips once in fall and once in spring.
- Replace any section that has lifted at the corners or lost its spring.
- Keep tracks clean so the sash closes on the seal instead of on grit.
- Recheck the fit after paint, major temperature swings, or a storm season.
That kind of maintenance is dull, but it is the reason a simple repair keeps working long after the first cold front has passed.
The three moves I would make first on a real drafty window
If I were standing in front of one stubborn window on a weekend repair, I would start with the moving joint, not the whole frame. I would choose a material that fits the window type, not just the gap size. And I would stop immediately if the sash began to bind, because a window that closes poorly is telling you the seal is too heavy or the frame needs a different fix.
That is the cleanest way to think about window air sealing: seal the motion with the right strip, seal stationary cracks with caulk, and do not force a product to solve structural damage. That approach usually gives the best mix of comfort, durability, and sanity for a home repair that is supposed to be simple.