Micrometers give you a much tighter answer than a ruler or tape measure when a part is small enough for hundredths to matter. This guide breaks down the reading process in plain English, shows how inch and metric models differ, and points out the mistakes that usually distort the number. I’m also keeping it grounded in home-repair work, where a micrometer is useful for shafts, spacers, shims, small hardware, and other parts that need an exact match.
These are the points that matter most
- A micrometer reading always comes from two places: the sleeve gives the base value, and the thimble adds the fine increment.
- Many mechanical models read to 0.001 in or 0.01 mm; vernier models extend that to 0.0001 in or 0.001 mm.
- Use the ratchet or friction thimble for consistent pressure instead of tightening by feel.
- Read straight on, not at an angle, or parallax will throw off the result.
- Dirty faces, burrs, heat, and soft materials can create a measurement that looks precise but is still wrong.
Know what each part contributes to the number
When I’m checking a replacement shaft or a spacer, I start by identifying the parts of the tool before I worry about the final value. That keeps the reading process simple: the frame holds everything steady, the anvil is the fixed contact point, the spindle moves in tiny steps, and the sleeve and thimble are the two scales that tell you how far the spindle has traveled.
| Part | What it does | Why it matters |
|---|---|---|
| Anvil | Fixed measuring face | It gives you a stable reference point |
| Spindle | Movable measuring face | It closes onto the part and creates the reading |
| Sleeve | Main scale | It shows the base size in larger increments |
| Thimble | Rotating drum scale | It adds the fine part of the measurement |
| Ratchet or friction thimble | Controls measuring force | It helps you apply the same pressure every time |
| Lock | Holds the spindle position | It lets you read without changing the contact point |
Most outside micrometers used around the garage or workshop cover a standard 0 to 1 in or 0 to 25 mm range. Larger models work the same way, but they are less forgiving if the zero point drifts, so a quick check matters more. Once the parts make sense, the next step is the actual reading.
Read the sleeve, then the thimble
The cleanest way to read a micrometer is to treat the sleeve as the coarse scale and the thimble as the fine scale. I like to read them in that order because it prevents the common mistake of adding the wrong decimal to the wrong base.
- Find the last full mark or number visible on the sleeve.
- Add any extra half-step that is fully exposed.
- Read the thimble line that matches the sleeve reference line.
- Add the thimble value to the sleeve value.
- If your tool has a vernier scale, add that last digit only after the main reading is complete.
Inch micrometers
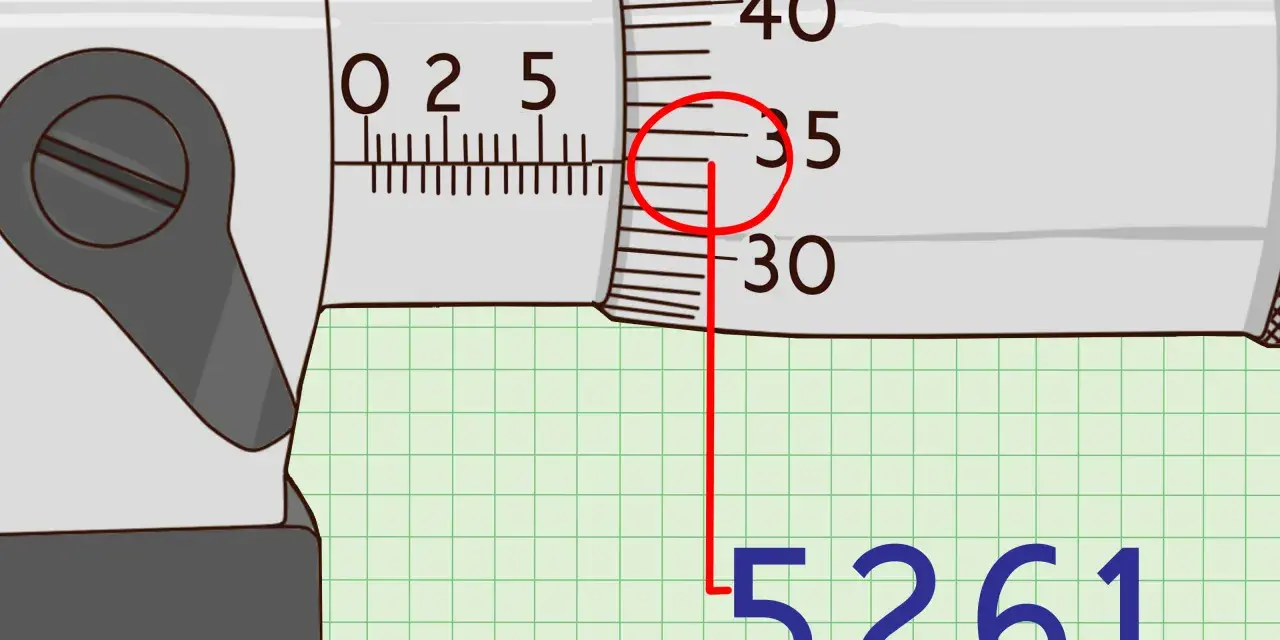
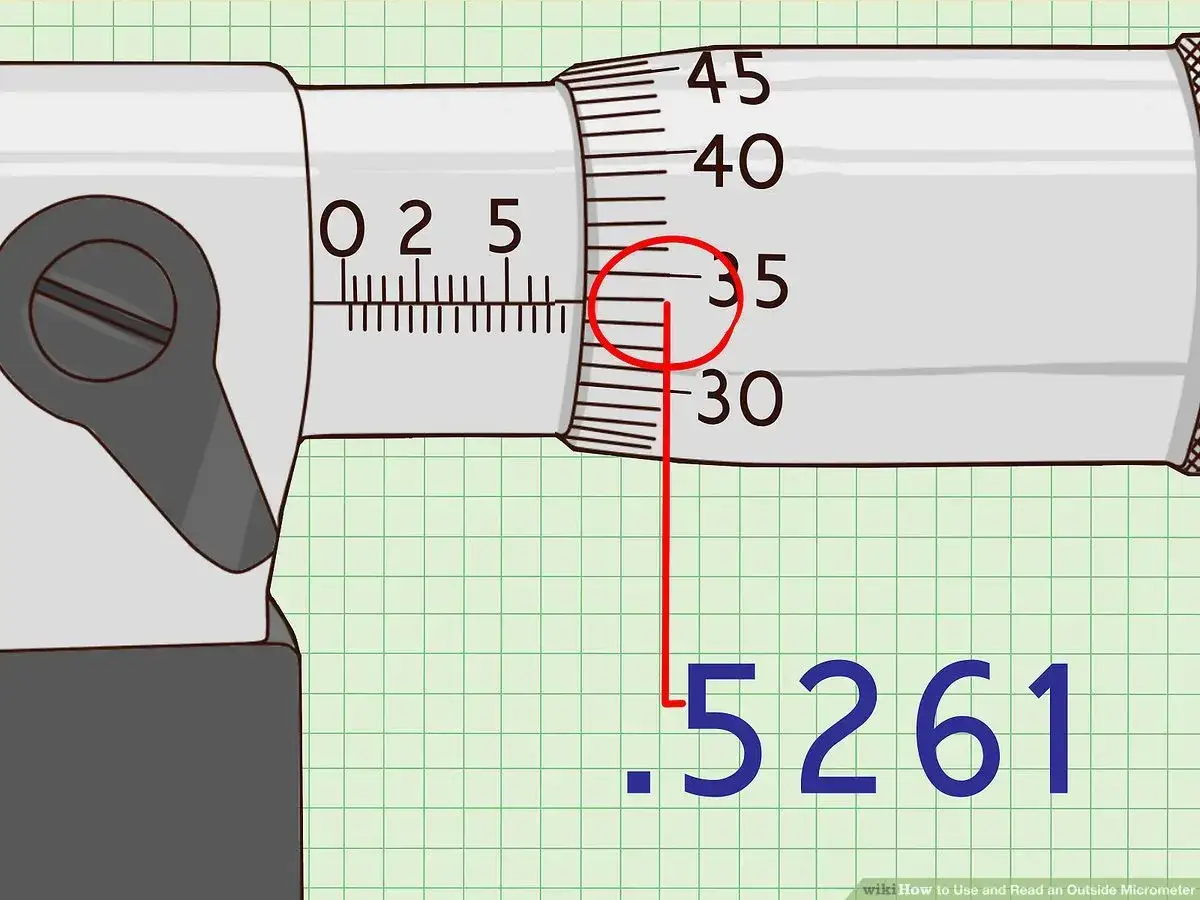
On a standard inch micrometer, each full turn moves the spindle 0.025 in. The sleeve shows those 0.025-inch steps, while the thimble usually divides one turn into 25 parts, so each line equals 0.001 in.
A practical example looks like this:
- Sleeve reading: 0.600 in
- Additional sleeve line: 0.025 in
- Thimble reading: 0.005 in
- Total: 0.630 in
That is the size I would trust for a small shaft or a machined spacer, assuming the faces are clean and the part is not hot. If the part is warm from use, let it settle first, because expansion can move the number enough to matter on close-fit work.
Read Also: Table Saw Safety - Master Cuts & Avoid Kickback
Metric micrometers
Metric models usually work on a 0.5 mm spindle pitch, with the thimble divided into 50 parts, so each division equals 0.01 mm. The sleeve shows whole millimeters and the half-millimeter mark; the thimble adds the hundredths.
Example:
- Sleeve reading: 12.5 mm
- Thimble reading: 0.34 mm
- Total: 12.84 mm
That structure is why micrometers are so useful for small repairs: the scale is simple once you stop expecting the tool to behave like a ruler. After that, the only extra layer is whether the model has a vernier or a digital display.
Use vernier and digital models without guessing
A vernier scale is a secondary scale that lets you read one more digit when a line lines up cleanly. A digital micrometer does the same job on a screen, but the principle behind the measurement is unchanged: the tool still depends on clean faces, steady pressure, and a correct zero.
| Type | How to read it | Common mistake |
|---|---|---|
| Standard mechanical | Add the sleeve reading and the thimble reading | Trying to invent extra precision that is not actually there |
| Vernier micrometer | Read the sleeve and thimble first, then add the vernier line that matches | Counting more than one vernier line as a match |
| Digital micrometer | Zero it on a clean closed face, then read the display in the correct units | Trusting the display even when the part was measured with uneven pressure |
Digital tools are easier to read, but they are not magic. If the faces are dirty, the part is tilted, or the pressure changes from one measurement to the next, the display will still give you a misleading number. For that reason, I treat the display as the end of the process, not the beginning of trust.
Avoid the errors that quietly ruin a good measurement
Most bad micrometer readings do not come from bad scales. They come from handling problems, and those are easy to overlook because the number still looks neat.
| Problem | What it does | What to do instead |
|---|---|---|
| Reading from an angle | Creates parallax error and can shift the line you think you see | Look straight at the sleeve and thimble |
| Too much force | Compresses the part or changes the contact point | Use the ratchet or friction thimble until it slips consistently |
| Dirty measuring faces | Adds false thickness | Wipe the faces before every accurate measurement |
| Burrs or raised edges | Makes the part seem larger than it really is | Deburr or choose a clean spot on the part |
| Heat from the part or room | Expands metal just enough to change a close fit | Let the part and tool reach room temperature first |
| Soft or flexible material | Can compress under the spindle | Use the right measuring method and minimal force |
| Out-of-round parts | Give different values at different points | Measure in several spots and compare the numbers |
The temperature point matters more than many DIYers expect. For precise work, the reference temperature is 68°F (20°C), and even a small shift away from that can affect a tight tolerance. In home repairs, that usually shows up when a part was sitting in the sun, near a heater, or freshly machined before you measured it. With those errors under control, you can decide when a micrometer is actually the right tool.
Use the micrometer where it actually adds value
I reach for a micrometer when the part must match another part, not when I just need a rough size. That distinction matters in home repairs because a lot of jobs only need an estimate, but a few need a real measurement.
| Task | Micrometer? | Best note |
|---|---|---|
| Measuring a small steel shaft or axle | Yes | Good use case when the fit must be exact |
| Checking a shim, spacer, or washer thickness | Yes | Especially useful when the part needs to sit flush |
| Verifying a bearing outer diameter | Yes | Measure carefully and avoid side pressure |
| Measuring lumber, drywall, or pipe length | No | A tape measure or ruler is the better tool |
| Checking large pipe diameter | Usually not | A caliper is usually faster and more practical |
| Finding thread pitch | No | Use a thread gauge for the pitch, then measure diameter if needed |
| Measuring soft rubber parts | Sometimes | Compression can distort the result, so be cautious |
For home-repair work, the micrometer shines when you need to confirm that a replacement part is truly the same size as the original, especially on small motors, appliances, faucet stems, spacers, or hardware that must fit without play. It is less useful for general-purpose measuring, and that is fine. A precise tool should only do the jobs where precision pays off.
Keep the reading honest on the next job
The last step is not the reading itself but protecting the tool so the next one starts from a known point. I always check zero on a clean closure, store the micrometer slightly open, and keep it away from moisture, dust, and impact. A dropped micrometer can still look perfect at a glance and be wrong enough to waste time on the next repair.
If I am making a tight-fit decision, I measure the same part more than once, from the same direction, with the same pressure. That habit catches most of the small problems people blame on the tool. In practice, the best way to read a micrometer is to combine a clean scale, steady hands, and a healthy suspicion of any number that seems too easy.