A backsplash does more than protect the wall behind a counter. It also sets the visual line for the whole kitchen, which is why a rushed install stands out immediately. This guide walks through how to install a backsplash in the kitchen the practical way: choosing the right material, preparing the wall, laying out the first course, setting the tiles, and finishing the joints so the result holds up to daily cooking.
The job goes smoothly when the wall, layout, and finish are handled in that order
- Ceramic or porcelain tile is still the most forgiving DIY option for most kitchens.
- Leave a 1/8-inch expansion gap around the perimeter where tile meets cabinets, counters, and other fixed surfaces.
- Use thin-set mortar for most tile installs, then wait about 24 hours before grouting unless the product label says otherwise.
- Use silicone caulk at corners and countertop joints, not grout, because those seams need movement.
- Plan outlet cuts and edge finishes before you spread adhesive, or the layout will start to drift.
- Seal natural stone and other porous materials after grout cures; glazed ceramic and porcelain usually do not need a sealer.
Choose the backsplash material before you buy the mortar
When I plan a backsplash, I start with the material rather than the pattern. In 2026, seamless slab looks are getting more attention, but tile still gives most homeowners the best mix of control, cost, and repairability. If you want a result that feels durable without turning the project into fabrication work, that decision matters more than the color of the grout.
| Material | Best for | DIY difficulty | Main advantage | Main trade-off |
|---|---|---|---|---|
| Ceramic or porcelain tile | Most kitchens and first-time installers | Medium | Flexible layout, familiar tools, easy to replace a damaged tile | Grout lines need cleaning and careful finishing |
| Glass tile | Bright, reflective kitchens | Medium to high | Fresh look and strong light reflection | Shows uneven adhesive and sloppy cuts quickly |
| Peel-and-stick tile | Fast refreshes and rental-friendly updates | Low | No mortar or grout, quick installation | Less forgiving near heat, steam, and frequent splashes |
| Slab panel | Seamless, high-end kitchens | High to professional | Minimal grout, clean visual line | Heavy, exacting, and usually not a casual DIY job |
For a first project, I still favor glazed ceramic subway tile or a straightforward porcelain tile. It gives you room to correct small mistakes, and that matters more than people admit. Once you pick the material, the wall prep becomes the real foundation of the project.
Prepare the wall and map the layout with a level line
The wall does more damage to a backsplash than most people expect. Grease, glossy paint, and out-of-level cabinets can all ruin a clean layout before the first tile is set. I treat prep as part of the installation, not a preliminary chore to rush through.
- Turn off the breaker for any outlets in the work area, then remove switch plates and outlet covers.
- Cover the countertop, sink, and nearby appliances with rosin paper or a heavy drop cloth.
- Clean the wall with a degreaser so thin-set or adhesive can bond properly.
- Check the wall for flatness with a long straightedge. If you find dips or bumps of more than about 1/8 inch over a few feet, correct them before tiling.
- Measure the backsplash area and add 10% extra tile for a simple grid layout. For diagonal patterns, herringbone, or walls with lots of cuts, I usually plan for 15% to 20% extra.
- Mark a level horizontal reference line, even if the countertop is slightly out of level. A backsplash should look level to the eye, not obedient to a crooked counter.
- Plan your edge treatment now. Bullnose tile, a slim metal edge profile, or a clean caulked termination all work, but they need to be built into the layout from the start.
A standard backsplash run between a countertop and upper cabinets is often around 18 inches high, but I always measure the actual wall. Range areas, open shelving, windows, and under-cabinet lighting can change the whole geometry. Once those measurements are locked in, the install itself becomes much more manageable.
Set the tile row by row without drifting off course
For the actual installation, I work slowly enough to keep the first few rows perfect. That matters because once the tile starts climbing the wall, small errors become obvious. The goal is not just to attach tile; the goal is to keep the lines consistent from one side of the kitchen to the other.
-
Dry-fit the first course. Lay a row of tile on the counter or floor and see where the cuts will land. If one side ends in a tiny sliver, shift the centerline before you start.
-
Mix the adhesive correctly. For most ceramic and porcelain tile, I use a modified thin-set mortar unless the tile manufacturer specifies something different. Mix it to a smooth, peanut-butter-like consistency and let it slake if the label calls for it.
-
Spread only a workable section. Apply mortar with a notched trowel over an area you can tile in about 10 to 15 minutes. If the mortar skins over, the bond gets weaker.
-
Set the first tiles on the level line. Press each tile into place with a slight twist, then use spacers to keep the joints even. I check the line constantly, because the first row sets the rhythm for everything above it.
-
Keep checking level and pattern alignment. Every few rows, step back and look at the wall from normal standing distance. The eye catches drifting lines faster than the tape measure does.
-
Cut around outlets and obstacles carefully. Use a wet saw or tile cutter suited to your tile type. If the tile and adhesive leave the electrical box recessed, add a code-approved box extender before reinstalling the plate.
-
Leave movement gaps open. Do not pack mortar or grout into the perimeter gap. That space is there so the installation can move a little without cracking.
-
Let the tile cure before moving on. Overnight is the minimum I like for standard tile work, and 24 hours is the safer baseline before grouting unless the product instructions say otherwise.
If you are using peel-and-stick tile instead of mortar, the layout logic is the same, but the sequence changes. You still dry-fit, center the pattern, and protect the openings; you simply skip the thin-set and grout stages. That makes it faster, but it also makes the finish less forgiving if the wall is uneven.
Grout, caulk, and seal the finish the right way
The last stage decides whether the backsplash feels finished or merely installed. Grout fills the field joints between tiles, but the moving joints at the counter and corners need flexible sealant instead. That distinction is small, but it is the difference between a clean finish and a cracked line six months later.
- Grout the field joints after the mortar has set. For narrow joints around 1/8 inch, unsanded grout is usually the cleaner choice; wider joints often take sanded grout better.
- Clean grout haze promptly with a damp sponge, not a soaking wet one. Too much water can pull pigment out of the joints and weaken the finish.
- Use silicone caulk where tile meets the countertop, inside corners, and other change-of-plane joints. Those spots move, so grout is the wrong material there.
- Match the sealant to the grout if you want a finished look. A color-matched kitchen-and-bath silicone is usually the neatest option.
- Seal porous tile or natural stone after the grout has fully cured, which is often 48 to 72 hours but should always follow the product label. Glazed ceramic and porcelain usually do not need a penetrating sealer.
I am strict about the perimeter seams because that is where many DIY backsplashes fail first. If the backsplash touches the countertop, the sink area, or an inside corner, I want a flexible bead there. It looks better, lasts longer, and handles normal kitchen movement without stress cracks.
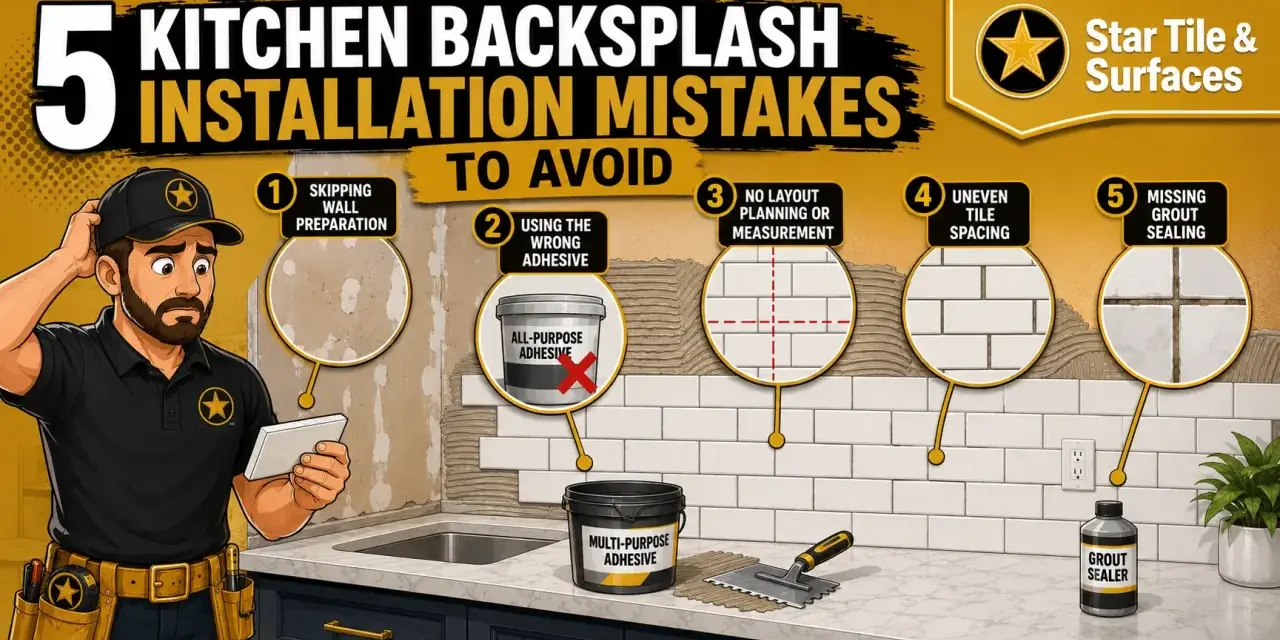
Watch for the mistakes that turn a weekend project into a repair
Most backsplash problems are not dramatic. They are small errors that stack up until the wall looks slightly off, and then the eye cannot unsee them. If I were coaching a homeowner through their first install, these are the issues I would flag immediately.
- Following the countertop instead of a level line. A backsplash that mirrors a crooked counter looks crooked even when the measurements are technically consistent.
- Skipping the dry fit. Without it, you may discover too late that one corner ends with a sliver cut.
- Using grout where movement is expected. Countertop lines and corners need silicone, not rigid grout.
- Forgetting outlet depth. If plates sit recessed after tile goes up, the install looks unfinished and can become unsafe.
- Rushing the cure. Setting tile and grouting too quickly can move pieces out of alignment or weaken the bond.
- Choosing a high-maintenance surface for a busy cooking area. Deep texture, narrow mosaics, and very light grout look good in photos but can be tiring to clean in real life.
There is also a point where a DIY project stops being the sensible choice. If the wall is badly out of plane, the layout needs intricate diagonal cuts, or you want slab panels that have to be templated precisely, I would bring in a pro or at least outsource the fabrication. That is not a failure; it is matching the job to the right level of skill.
The finishing details that make the backsplash feel built in
What separates a decent backsplash from a good one is usually not the tile itself. It is the edges, the lines around the outlets, the way the caulk meets the counter, and the cleanup after the grout haze is gone. Those details are quiet, but they are what make the installation feel like part of the kitchen instead of an add-on.
I also think the backsplash should work with the way the kitchen is actually used. If the cooktop sees a lot of splatter, a simpler tile shape and a medium-tone grout will be easier to live with than a highly decorative pattern. If the goal is a cleaner, more seamless look, full-height slab materials are attractive, but they usually belong in a more precise budget and a more fabrication-heavy plan.
If you keep the wall flat, the first row level, and the perimeter joints flexible, the backsplash will do its job without demanding attention. That is the result I aim for every time: a finished surface that looks intentional on day one and still feels solid after a year of real cooking.