Here is the practical way to get a garage door opener paired correctly
- Most modern openers use a learn, smart, or program button on the motor unit.
- A handheld remote usually pairs in seconds, but the exact window is often only 20 to 30 seconds.
- Car systems like HomeLink often need a two-step process: train the car to the remote, then train the opener to the car.
- Holding the learn button too long can erase every stored remote, so press and release unless you want a reset.
- If your opener uses dip switches or has no learn button, the programming method is different and may require a compatible replacement remote.
- Most failed attempts come down to weak batteries, timing, or using the wrong sequence for a rolling-code system.
Which system you are actually programming
I usually start by asking a simple question: what exactly are you trying to make work? The answer changes the process. A handheld remote, an outside keypad, and a vehicle’s built-in transmitter all behave differently, even if they ultimately open the same door.
| System | What it does | What you usually need | Common catch |
|---|---|---|---|
| Handheld remote | Opens the door from the driveway, garage, or house | Access to the opener’s learn button and a fresh remote battery | Many units clear memory if the learn button is held too long |
| Wireless keypad | Lets you enter a PIN from outside the garage | The opener’s learn button and a 4-digit PIN | Some models need the keypad reset before pairing |
| Vehicle HomeLink | Lets the car open the door without a separate remote | The original handheld remote plus access to the opener | Rolling-code systems need a second step at the opener |
| Older dip-switch opener | Uses a fixed code set by switch positions | A compatible transmitter or the exact switch pattern | Some very old units are simply not worth retrofitting |
That distinction matters because a fixed-code unit can work after a simple signal copy, while a rolling-code opener needs the opener itself to approve the new device. Once you know the category, the rest becomes much more predictable.
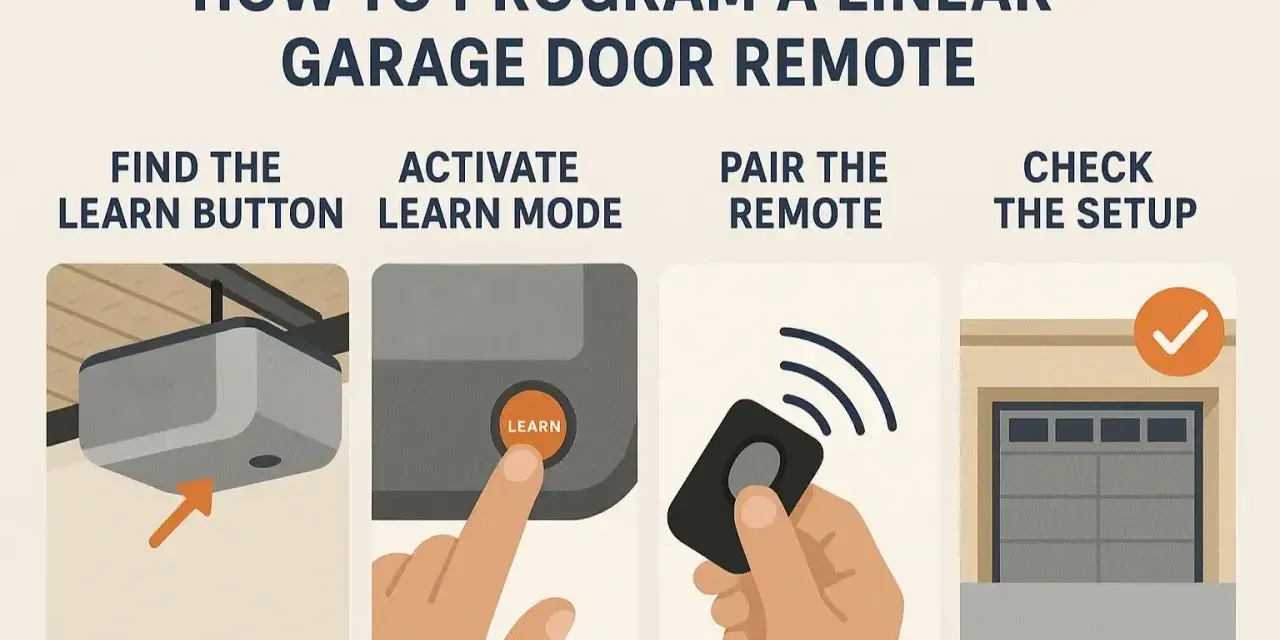
The step-by-step process that works for most modern openers
For most current residential systems, I follow the same basic sequence. The wording changes slightly by brand, but the rhythm is the same: prepare the opener, put it in pairing mode, then send the signal from the remote.
- Clear the area around the door. No one should be standing under it, and the path should be open before you start.
- Find the learn, smart, or program button on the opener motor. It is often near the antenna wire or under the light cover.
- Press and release the button. Do not hold it down unless the manual tells you to, because a long press can erase stored remotes on many units.
- Watch for the indicator light. It may blink or stay on solid, depending on the brand.
- Within the programming window, usually 20 to 30 seconds, press the button on the remote you want to use.
- If the door moves or the opener light flashes, test the remote again from the normal approach distance.
If the first attempt fails, I do not immediately assume the remote is bad. I try it once more with a fresh battery and a clean timing window, because those two details solve a surprising number of cases. The process is simple, but it is time-sensitive, which is why people often miss it on the first pass.
Programming a keypad or a car’s HomeLink system
Outside access and in-car access are both convenient, but they are not programmed exactly like a standard remote. The goal is the same, yet the sequence usually adds one extra step or a short reset.
Wireless keypads
A typical wireless keypad setup starts with the learn button on the opener, followed by a PIN on the keypad. On many current units, that PIN is four digits. I like to choose a number that is easy to remember but not obvious from the street, especially if the keypad is mounted near a front entry or side gate.
- Reset or wake the keypad if the manual calls for it.
- Press the opener’s learn button.
- Enter the PIN and press Enter or the confirm key.
- Test the code twice, once with the door closed and once from a normal outside approach.
Some keypad models behave differently if they already have an older code stored, so if the first code does not work, I clear the keypad and start over rather than stacking one failed attempt on top of another.
Read Also: How to Shingle a Roof - Prevent Leaks & Do It Right
Vehicle systems like HomeLink
In a car, the first part usually trains the vehicle to recognize the handheld remote. I hold the remote close to the HomeLink buttons, typically about 1 to 3 inches away, and keep pressing until the indicator changes from a slow flash to a faster blink or a solid light. That usually means the car has learned the remote’s signal pattern.
If the opener uses rolling code, there is a second step. I then go to the opener in the garage, press the learn button, and return to the vehicle within the short time window to press the trained HomeLink button again. Sometimes it takes two or three presses before the door responds. That extra step is normal, not a sign that the setup failed.
I also avoid standing on the vehicle to reach the opener. A sturdy ladder is the right tool here, because the timing window is short and the work needs stable footing. That sounds obvious, but it is exactly where people get careless.
Older openers and dip-switch remotes need a different approach
If your opener has no learn button, you are probably dealing with an older fixed-code system. Those units often use dip switches, which are tiny switch blocks set in a specific pattern inside the remote and sometimes inside the motor head as well.
In that case, the job is not “pairing” in the modern sense. It is matching the switch pattern exactly or using a transmitter built for that code style. If you are trying to connect a car system to an older opener, a compatibility bridge or a newer compatible remote may be required.
One important boundary: if the opener is very old and lacks modern stop-and-reverse safety features, I would not treat programming as the main solution. In the US, garage door openers manufactured before April 1, 1982 are outside the current safety standard, so replacement is often the more sensible path than trying to keep an obsolete unit alive.
That is the point where the conversation shifts from setup to safety and reliability, which is exactly where the next troubleshooting section belongs.
Why programming fails and how I troubleshoot it
When a garage door opener refuses to pair, the cause is usually boring, not mysterious. I start with the same few checks because they account for most of the failures I see in the field.
- Weak remote battery - The remote may still click, but its training signal is too weak to complete pairing. Put in a fresh battery first.
- Missed timing window - If you wait too long after pressing learn, the opener exits programming mode. Start the sequence again from the opener.
- Learn button held too long - A long press can erase all stored remotes, which creates a bigger problem than the one you started with.
- Interference - Certain LED bulbs can reduce range or make the signal inconsistent. If the opener suddenly got worse after a bulb change, I would test that connection.
- Antenna issue - A hanging antenna wire that is bent, tucked up, or damaged can shorten the range dramatically.
- Wrong sequence for rolling code - If the first training phase worked but the door still will not move, you probably skipped the second step at the opener.
If several remotes stopped working at once, I assume the opener memory was cleared and reprogram everything from scratch. If only one device fails, I focus on that device first. That distinction saves a lot of unnecessary reset work.
The small checks that keep the setup reliable
Once the code works, I treat the job as finished only after a few quick checks. These are simple habits, but they make the system easier to live with and harder to break later.
- Test the door from the usual approach distance, not just right next to the opener.
- Try the remote with the garage door fully closed and the path clear.
- Replace remote batteries before they are completely dead, not after the opener starts acting erratic.
- If you use an outside keypad, mount it where rain and direct spray are limited and where you can reach it comfortably in bad weather.
- Erase lost remotes from memory instead of leaving old codes active.
- Check the door’s safety reversal feature regularly so access stays safe, not just convenient.
If I had to reduce the whole process to one rule, it would be this: identify the system first, press the learn button briefly, and respect the time window. That is the cleanest way to handle a modern opener, a keypad, or a car-based system without turning a five-minute task into a reset job.