Basement moisture is rarely just a cosmetic nuisance; left alone, it can feed mold, damage finishes, corrode metal, and turn storage space into a damp, musty room no one wants to use. This article breaks down how to get rid of moisture in basement spaces by tracing the source, lowering humidity, fixing exterior drainage, and deciding when crack repair or a sump system is worth the cost. I’m focusing on practical repairs that make sense for U.S. homes, not quick cover-ups that fail after the next storm.
The fastest wins come from stopping water at the source
- Measure humidity first. A basement should generally stay between 30% and 50% RH, with 40% to 50% being a practical target for most homes.
- Use a dehumidifier to control symptoms, but treat it as a support tool, not the permanent fix.
- Fix roof runoff, grading, and downspouts before spending money on interior coatings or cosmetic repairs.
- If water returns after storms, look for cracks, window wells, or a failed drainage system.
- Do not insulate, carpet, or finish a basement until the walls and slab are truly dry.
Figure out what kind of moisture you're dealing with
I always start here, because the pattern tells you whether you have condensation, seepage, or a real leak. Those three problems can look similar at first, but they do not respond to the same fix. A basement that feels clammy on hot days is often dealing with humid air condensing on cool concrete, while a damp ring at the base of a wall after rain points more toward groundwater or runoff.
| What you notice | Most likely cause | First thing I would check |
|---|---|---|
| Water drops on windows, pipes, or cold walls in summer | Warm, humid outdoor air meeting a cool basement surface | Close basement windows, check RH, and run a dehumidifier |
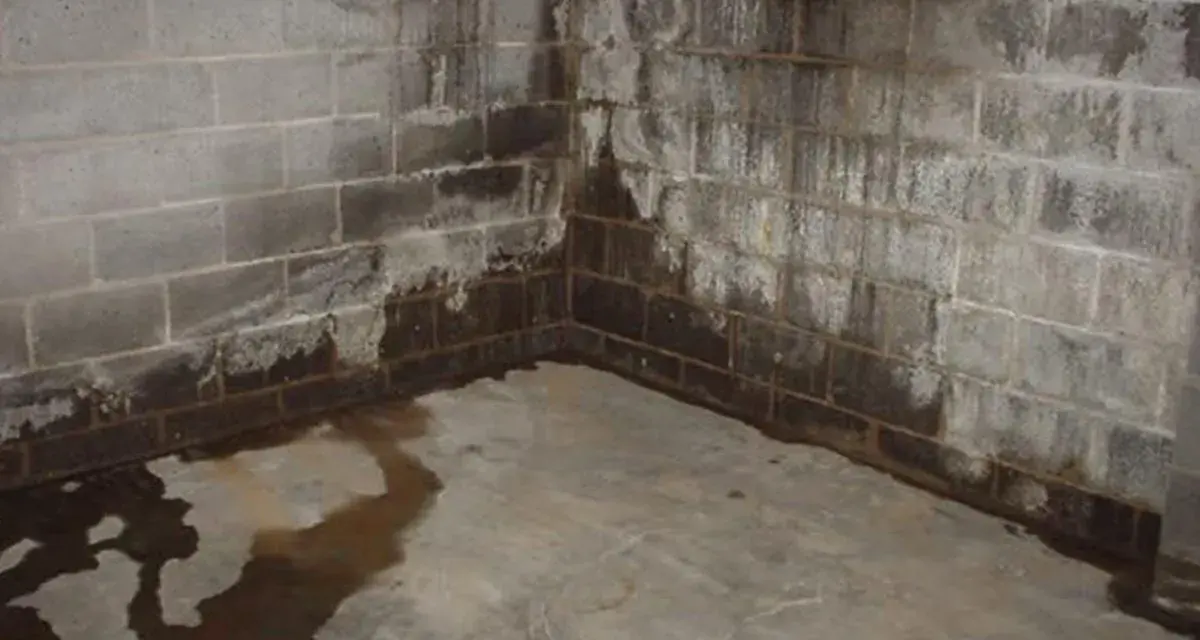
| White powder on masonry, peeling paint, or a damp band near the floor | Moisture moving through concrete or block by capillary action | Look at grading, gutters, downspouts, and wall cracks |
| Wet spots after heavy rain | Roof runoff, surface drainage, window wells, or groundwater pressure | Inspect downspouts, yard slope, and sump performance |
| Musty smell without visible standing water | High humidity or hidden damp materials | Measure RH and inspect carpet, cardboard, and stored items |
Efflorescence is the chalky white residue that appears when water moves through masonry and leaves minerals behind. I pay attention to it because it usually means the wall is not just dirty; it is actively moving moisture. Once you know the pattern, the next step is to dry the air without pretending that drying the air solves everything.
Lower the indoor humidity and stop feeding the problem
This is the first line of defense I use because it is cheap, measurable, and usually worth doing immediately. The EPA recommends keeping indoor humidity between 30% and 50%, and for basements I usually aim for the middle of that range. If the basement is stubbornly damp, a hygrometer is worth the money; guessing by feel is unreliable.
My practical setup looks like this:
- Set the dehumidifier around 45% to 50% RH and adjust from there.
- Use a hose drain to a floor drain or sump if you do not want to empty the bucket constantly.
- Keep doors and windows closed while the unit is running.
- Run bath and laundry exhaust fans to the outside, not into the attic or basement.
- Vent the clothes dryer outdoors and do not let it dump moisture into the basement.
- If the basement stays below about 65°F, choose a model rated for lower temperatures or with auto-defrost.
| Basement condition | Portable dehumidifier size | What that usually means |
|---|---|---|
| Slightly to moderately damp, small to medium space | 20 to 30 pints per day | The space feels humid, but you are not seeing regular seepage |
| Very damp, small to medium space | 25 to 40 pints per day | Walls or floors stay damp and odors linger |
| Wet conditions, small to medium space | 30 to 50 pints per day | There is sweating, seepage, or recurring moisture after storms |
| Larger basement spaces | 30+, 40+, or 50+ pints per day | Capacity needs rise quickly with size and moisture load |
For cost planning, a portable basement dehumidifier often lands around $250 to $450, while a whole-house or permanently installed system is commonly $1,100 to $3,500 or more, depending on ducting and labor. I treat a dehumidifier as symptom control: it can make the basement livable, but it does not stop water from entering the structure. Once the air is under control, the real test is whether outside drainage is pulling water away from the house.
Fix the outside water path before you seal a single crack
If I had to pick one section where homeowners get the biggest return for the least money, this is it. Roof runoff and bad grading are responsible for a surprising number of damp basements, and they are often the easiest problems to improve. The goal is simple: move water away from the foundation before it has a chance to collect against the wall or soak into the soil beside it.
Start with these repairs in order:
- Clean gutters so they do not overflow during storms.
- Make sure the soil slopes away from the foundation at about 1 inch per foot for at least 6 feet.
- Use downspout extensions so roof water discharges at least 4 feet beyond the wall.
- Check that you have enough downspouts for the roof line, not just one lonely outlet dumping water in the wrong place.
- Inspect window wells and make sure they are not acting like shallow ponds next to the basement wall.
| Exterior fix | Typical U.S. cost | Why it matters |
|---|---|---|
| Gutter cleaning | $119 to $234 on average | Prevents overflow that dumps water beside the foundation |
| Downspout extension | $30 to $75 per downspout, or roughly $2 to $4 per linear foot | Moves roof water away from the wall for a relatively small cost |
| Regrading around the foundation | $1,000 to $3,000 | Corrects a slope that sends water back toward the house |
If a window well collects water, I do not ignore it. I want drainage at the base of the well and coarse aggregate that lets water fall away from the window instead of pressing against it. This kind of work is not glamorous, but it often reduces basement humidity enough that you can delay or avoid heavier waterproofing. If the outside path is already right and the wall still leaks, the problem has likely moved deeper into the structure.
Repair cracks and groundwater entry without guessing
At this stage, I look for the places where water is actually entering, not just where it is showing up. Hairline foundation cracks, cold joints where the wall meets the slab, open sump pits, and block walls with hollow cores all create pathways for moisture. A sump pit should have an airtight cover, because an open pit can pull humid basement air in and make the whole room feel wetter than it should.
Here is how I think about the main repair options:
| Repair | Typical cost range | Best for | Limitation |
|---|---|---|---|
| Crack injection | $250 to $800+ per crack | Minor vertical or hairline wall cracks | Does not solve a bowed wall, settlement, or widespread groundwater pressure |
| Interior drainage with sump | Often $3,000 to $8,000+ | Repeated seepage along the wall-floor joint or block-wall moisture | Controls water inside the basement, but does not stop all moisture at the source |
| Exterior excavation and waterproofing | Commonly $8,000 to $15,000+ | Persistent water intrusion or failed outside drainage | Most effective, but also the most disruptive and expensive |
I would not trust an interior coating or waterproof paint to carry the whole job. It may make the wall look better for a while, but it usually does not solve the water pathway behind the surface. The Minnesota Extension guidance is blunt about this: dehumidification helps with symptoms, but it is not a permanent fix, and coating the inside without drainage usually does not hold up long term. If you are seeing repeating leaks, the repair needs to match the source, not just the visible stain. That decision gets easier once you separate quick fixes from structural fixes.
Match the repair to the severity of the problem
Not every damp basement needs excavation, and not every leak can be solved with a bucket and a fan. I use a simple rule: if the problem is only humidity, start with air control; if water shows up after storms, fix drainage; if the wall itself is leaking, repair the entry point; and if the basement is taking on water on a regular basis, step up to a drainage system or exterior waterproofing.
- Damp air only - Use a hygrometer, dehumidifier, and source control first.
- Moisture after rain - Focus on gutters, grading, window wells, and downspouts.
- One or two cracks - Crack injection is often the most cost-effective repair.
- Water at the wall-floor joint - Interior drainage and a sump may be the right next step.
- Bowed wall, repeated flooding, or major structural movement - Bring in a foundation specialist before finishing the space.
I also tell people not to rush into finishes just because the basement smells better. Carpet, drywall, and insulation will fail if the slab or walls are still holding moisture. If you want to use the basement as living space, the order matters: dry the structure, verify that humidity stays in range, and only then start building on top of it. That keeps you from paying twice for the same room.
What I would keep doing after the basement looks dry
Once the basement is dry, I still keep watching it for a few weeks. Moisture problems are sneaky, and they often return during the first heavy rain or the first stretch of humid weather. I like to leave a hygrometer in the basement and check it after storms, because a stable reading tells you more than a single dry day ever will.
My maintenance list is short but effective: keep gutters clear, confirm that downspout extensions still point away from the house, test the sump pump before storm season, and store boxes on shelving instead of directly on the slab. I also prefer plastic bins over cardboard, because cardboard becomes a sponge the moment humidity creeps back up. If the musty smell returns, or if new stains appear, that is the basement telling you the source was reduced, not eliminated. When that happens, I go back to the wall, the grade, and the drainage before I blame the air again.
For a finished basement, the final check is simple: walls should be dry, the slab should not sweat, and the relative humidity should stay in the 30% to 50% range without the dehumidifier running nonstop. If those conditions are not met, I would hold off on finishing work and solve the moisture issue first.