Worn door weather stripping is one of those repairs that looks minor until the drafts, dust, and moisture start showing up in daily life. If you want to replace weather stripping on a door correctly, the real work is in choosing the right profile, removing the old material cleanly, and setting the new seal so the door still closes without fighting you. I’ll walk through the signs of failure, the best replacement options, the install steps, and the small adjustments that make the repair last.
The essentials before you start
- Start by checking for daylight, loose corners, cracked material, and air leaks at the bottom of the door.
- Match the replacement to the gap: foam, vinyl, rubber, bronze, or a door sweep each solve different problems.
- Tighten hinges and clean the jamb before installing anything; weather stripping cannot fix a sagging door by itself.
- For a standard 36-by-80-inch exterior door, expect about 16 to 18 linear feet around the sides and top, plus a bottom seal.
- Most DIY material costs land around $10 to $60 per door, with specialty systems costing more.
- The finished door should close with light resistance, not a hard shove.
How to tell the old seal has failed
I usually tell people to inspect the door before buying anything. That saves money and keeps you from replacing the wrong part. According to the U.S. Department of Energy, visible daylight and loose-fitting doors are clear signs of air leakage, and that matches what I see in real homes.
| What you notice | What it usually means | What I check first |
|---|---|---|
| Daylight around the edges | The side or top seal is flattened, missing, or too short | Look closely at the hinge side, latch side, and top corners |
| Draft at ankle level | The bottom sweep or threshold seal is worn out | Check the gap under the door and along the threshold |
| Door closes with a thud or refuses to latch cleanly | The new or existing seal may be too thick, or the door may be sagging | Test the hinges and strike plate before changing the seal |
| Cracked foam, sticky rubber, or peeling adhesive | The material has aged out | Plan a full replacement instead of patching one corner |
If the gap changes from top to bottom, that is usually a door-alignment problem, not just a weatherstripping problem. I fix the movement first, then seal the opening. That leads straight into choosing the right replacement material.
Choose the right replacement for your door
Not every seal is built for the same job. A cheap peel-and-stick strip can work fine on a low-traffic interior door, but an exterior entry door usually needs something tougher. For a standard door, I think in three zones: the sides and top, the bottom edge, and the threshold area.
| Type | Best use | Main advantage | Main limitation |
|---|---|---|---|
| Foam tape | Fast, low-cost fixes and low-traffic doors | Easy to cut and install | Wears out faster than harder materials |
| Vinyl V-strip | Sides and top on fairly straight jambs | Low profile and durable enough for regular use | Needs cleaner cuts and better alignment |
| Rubber or silicone bulb seal | Exterior doors that need a tighter, longer-lasting seal | Good compression and better moisture resistance | Costs more and can be harder to fit |
| Spring bronze or metal | Older wood doors and long-life repairs | Very durable when installed correctly | Less forgiving and more skill-dependent |
| Door sweep or door shoe | The bottom gap under an exterior door | Blocks drafts, dust, and pests | Must match the threshold and door style |
| Magnetic seal | Metal doors only | Strong, even contact | Limited compatibility |
For a typical 36-by-80-inch exterior door, I usually buy enough material for about 16 to 18 feet around the perimeter and add 10 percent extra for cuts and mistakes. In practice, that often means a 30-foot roll is plenty, but only if the frame is standard and you are not dealing with a heavily warped door. The U.S. Department of Energy treats weatherstripping as a quick-return air-sealing upgrade, and this is exactly why: the right material matters more than the price tag.
The rule I follow is simple. If the door is square and the gap is even, a straightforward strip or bulb seal usually works. If the door is older, uneven, or exposed to weather, I lean toward more durable rubber, silicone, bronze, or a better bottom sweep.
Once the material matches the job, the installation becomes much easier.
Remove the old stripping and prep the opening
This is the part most people rush, and it is the part that determines whether the new seal stays put. Adhesive-backed products need a clean, dry surface. Nail-on and screw-on products need a frame that is sound, smooth, and not already fighting the door alignment.
- Open the door and inspect the jamb, stop, threshold, and corners for rot, loose paint, or damage.
- Remove old weather stripping with a utility knife, putty knife, or scraper, depending on how it was installed.
- Pull off old adhesive and clean the surface with a mild cleaner so the new strip can bond properly.
- Sand rough spots and stubborn residue lightly so the new material sits flat.
- Tighten loose hinge screws and check the strike plate before you measure anything else.
I also look at the door swing itself. If the top corner scrapes or the latch side sits too far away from the jamb, I fix that first. A new seal can mask a small alignment issue, but it will not solve a sagging door. If the frame is damaged or the wood is soft, repair that before you install the new strip.
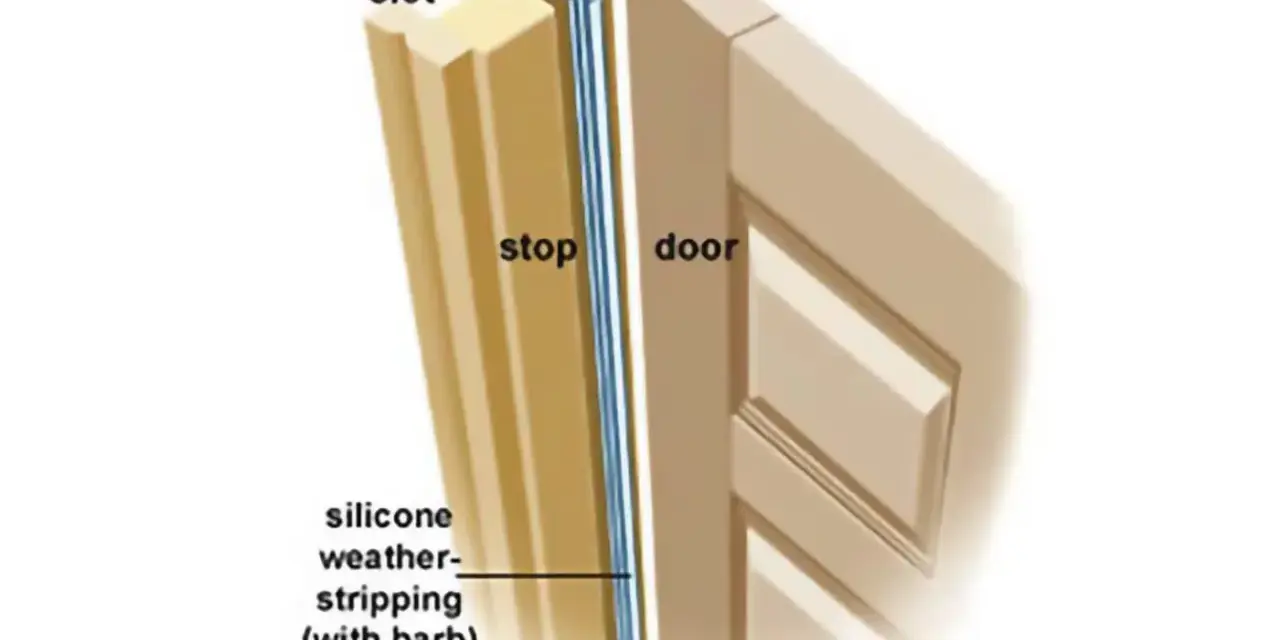
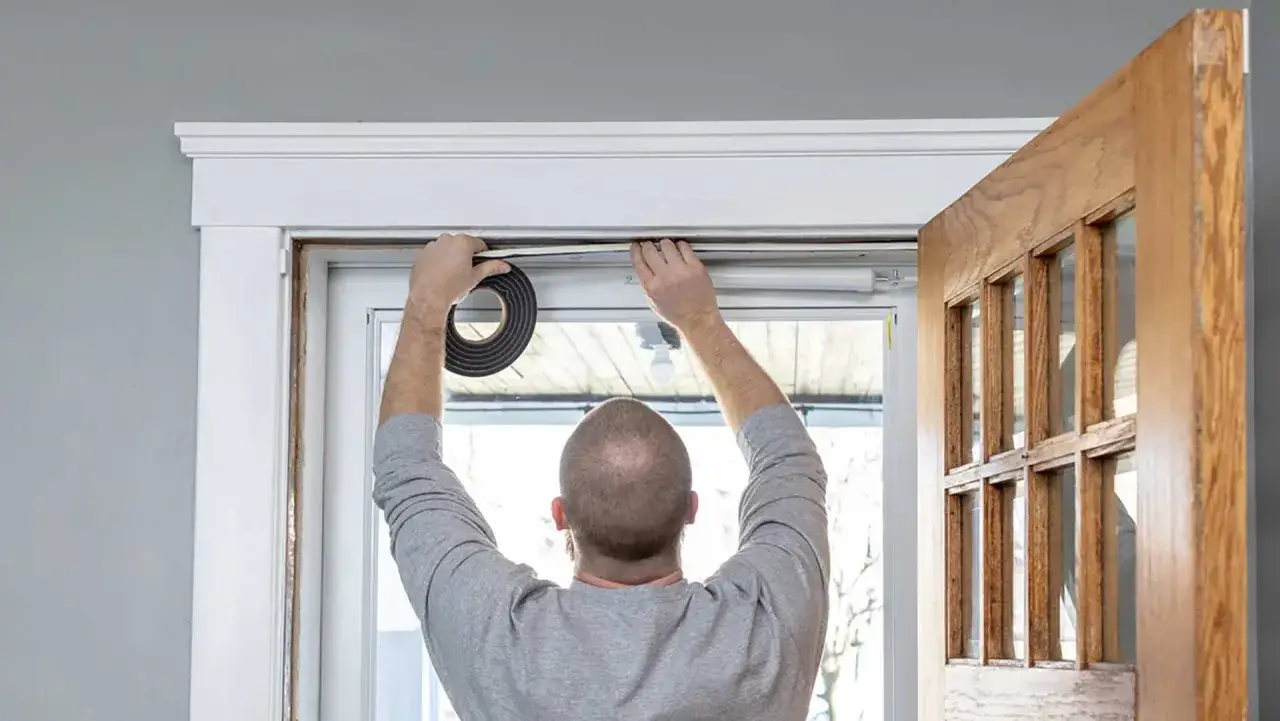
Install the new side and top seals cleanly
For most doors, I start with the top piece, then cut the two side pieces to match. That keeps the corners neat and makes the final fit easier to control. The goal is not to pack the gap as tightly as possible; the goal is to create even compression all the way around.
- Measure the top and each side separately, because old frames are rarely perfectly equal.
- Cut the top piece first, then dry-fit it before peeling any backing or driving any fasteners.
- Set the seal against the doorstop or jamb so the door will compress it lightly when closed.
- Work from the center outward so the strip stays straight and does not buckle at the corners.
- If the product calls for nails or screws, space them evenly and avoid overtightening.
- Trim the ends cleanly and follow the kit’s corner instructions if it calls for a notch or miter.
When I install adhesive-backed strips, I press them in gradually instead of laying the whole length down at once. That gives you a chance to correct a small alignment error before it becomes permanent. The door should close with a soft, consistent resistance. If you have to force it, the strip is too thick or the frame still needs adjustment.
That same idea matters even more at the bottom, where most of the remaining draft usually slips through.
Fit the bottom seal so the door still swings freely
The bottom edge is where many repairs fail, because the threshold is often uneven and the door sweep has to do more than one job at once. It needs to block air, keep out dust and pests, and still let the door open without dragging. On exterior doors, I mount the sweep on the outside face so it sheds water and debris instead of trapping them underneath.
- Use a standard door sweep when the threshold is reasonably even and the gap is modest.
- Use a brush-style sweep when the floor or threshold is uneven and a rigid seal would leave gaps.
- Use a door shoe or automatic bottom when you want a more durable retrofit on a solid door.
- Replace the threshold itself if it is cracked, loose, or worn down enough that no sweep can bridge the gap properly.
As a practical benchmark, a bottom gap under about 1/4 inch is usually manageable with the right sweep. Once the gap gets larger or the threshold varies from side to side, the real fix may be door alignment or threshold repair, not just a thicker strip. I set the sweep so it barely touches the threshold, because that is enough to stop airflow without creating friction every time the door opens.
With the perimeter in place, the last step is testing. That is where small adjustments turn a decent installation into a good one.
Test the fit and correct the small problems
I always test the door more than once. A seal can look perfect and still leak at a corner or bind near the latch. The easiest check is the paper test: close the door on a strip of paper and see whether it pulls out easily. If it slides free with no resistance, the seal is too loose there.
Here is the order I use when something feels off:
- Check for daylight around the perimeter with the lights off.
- Run the paper test at the top, hinge side, latch side, and bottom.
- Listen for scraping or stiffness as the latch engages.
- Adjust the strike plate if the latch is fighting the seal.
- Tighten hinge screws again if the latch side is uneven.
- Trim or reposition any section that is bunching up at the corners.
Once the fit is right, the last job is keeping it that way through the season.
Keep the repair working through the next season
The best weatherstripping does not need much attention, but it does need an occasional check. I like to inspect exterior doors twice a year, usually in spring and again before heating season starts. That is enough to catch a loose hinge screw, a flattened sweep, or a corner that has started to peel.
A few habits make the seal last longer:
- Wipe the threshold and sweep clean so grit does not grind down the contact edge.
- Check hinge screws after seasonal humidity changes, especially on wood doors.
- Replace cheap foam sooner rather than later; it is the least durable option.
- Upgrade to silicone, bronze, or a better sweep if you replace the same strip every year.
- Do not ignore a door that suddenly needs extra force to close, because that usually means the alignment changed.
If you take nothing else from this, keep it simple: match the material to the gap, prep the frame properly, and tune the bottom seal before you call the job done. That is the practical way to replace weather stripping on a door without ending up with a sticky latch, a crooked sweep, or the same draft you started with. A careful hour or two here usually pays back quickly in comfort, cleaner air, and a door that feels solid again.