Knowing how to measure a window correctly saves time when you are replacing a unit, ordering a custom fit, or checking whether an opening has shifted over time. I focus on the opening that actually matters, measure in the right places, and record the figures in a way that leaves no room for guesswork. That is the difference between a clean fit and a return trip to the store.
These are the measurements that keep a replacement fit honest
- Measure width and height in inches, and take each dimension in three places.
- Use the smallest width and height reading when the opening is slightly uneven.
- Check both diagonals; if they differ by more than about 1/4 inch, the opening is probably out of square.
- For replacement windows, measure the frame or rough opening, not the glass alone.
- Write the final size as width first and height second, such as 35 3/4 x 59 1/2.
Start by identifying the opening you actually need
I always begin by asking what the measurement will be used for, because that changes the method. An insert replacement window uses the existing frame, while a full-frame replacement means the entire unit comes out and the rough opening behind the trim becomes the reference point. If you are only buying blinds or shades, you measure the visible inside space differently and usually ignore the rough opening entirely.
That distinction matters in U.S. home repair work because the wrong measuring target can make a perfectly good product unusable. If you are unsure which type of project you have, assume the seller will want the opening dimension, not the glass size. Once that is clear, the rest of the process becomes much more predictable.
What I keep on hand before I measure
I do not need much, but I do need the right basics: a metal tape measure, a pencil, something to write on, and a step stool for taller openings. A rigid tape is better than a soft cloth tape because it stays true across the span. If the room is dim or the trim is dark, a flashlight makes it easier to see the jambs, sill, and any hidden damage.
- Metal tape measure
- Pencil or phone notes
- Step stool or ladder for tall windows
- Flashlight for trim and sill inspection
- Helper for wide or heavy openings
The goal is not to collect gear; it is to make sure the tape can sit flat and the numbers get written down immediately. From there, the measuring itself is straightforward.
Measure width, height, and diagonals the right way
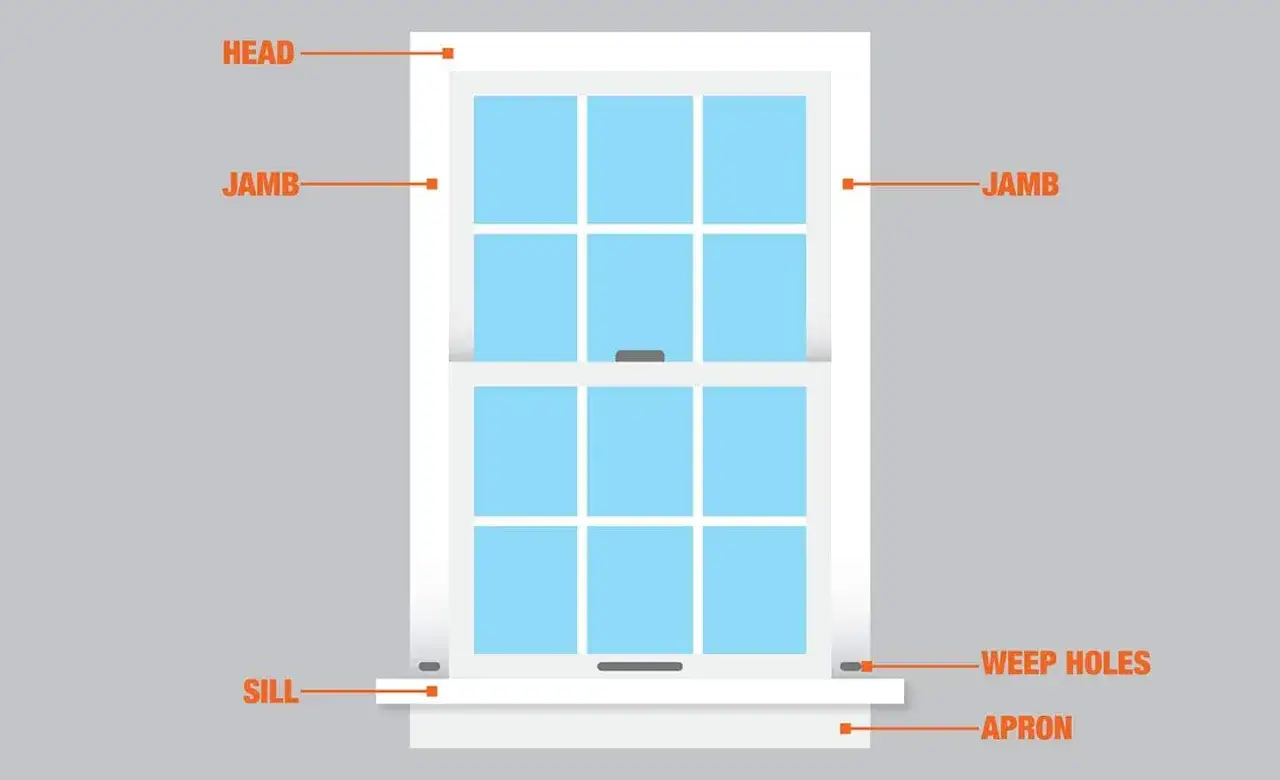
Use a metal tape measure and keep it flat, not bent or twisted. For width, measure from jamb to jamb, meaning the vertical side members of the frame, at the top, middle, and bottom of the opening. If there is no trim, measure from drywall return to drywall return at the opening edge. For height, measure from the head, the top inside edge, to the sill, the bottom ledge, at the left, center, and right sides. Then check both diagonals corner to corner to see whether the opening is square.
| What to measure | Where to place the tape | What I record |
|---|---|---|
| Width | Inside the jamb at top, middle, and bottom | Three readings in inches |
| Height | From head to sill at left, center, and right | Three readings in inches |
| Diagonal 1 | Top right corner to lower left corner | One corner-to-corner reading |
| Diagonal 2 | Top left corner to lower right corner | One corner-to-corner reading |
For most standard openings, the two diagonal readings should be close. If they are off by more than about 1/4 inch, I treat that as a warning sign that the frame may be skewed, bowed, or settled out of square. That does not automatically ruin the project, but it does affect how carefully the replacement needs to be ordered.
Once the measurements are on paper, the next step is deciding which number becomes the final size.
Choose the smallest reading and round it the practical way
When an opening is uneven, I use the smallest width and the smallest height. That is the safest way to avoid ordering a unit that is too large to fit. In older homes, I almost expect a slight taper, so the smallest number is usually the one that protects you from a mistake.
In the U.S., measurements are normally written to the nearest 1/8 inch or 1/16 inch, depending on the seller. If your tape gives you 35 13/16 inches but the order form only accepts 1/8-inch increments, round down, not up. A recorded size of 35 3/4 x 59 1/2 is easier to work with than a number that looks precise but leaves no installation room.
Write it down as width first and height second, and keep the note simple enough that you can repeat it later without second-guessing yourself. That habit matters even more when the opening is not perfectly square.
Account for openings that are out of square
Even a good measurement can hide a bad shape. A frame may be wide enough and tall enough, but still lean enough to create trouble during installation. That is why I check diagonals, inspect the sill for slope, and look for rot, swelling, or old caulk that hides the true edge of the opening.
If the opening is noticeably out of square, I do not try to force the product to behave like a perfect rectangle. Instead, I make a note of the condition and expect the install to need more shimming, trim work, or a full-frame repair. For arched windows, skylights, and other specialty shapes, standard width-and-height math is often not enough, and a template or product-specific guide is the safer route.
That check usually tells me whether the project is routine or whether I need to slow down and look harder at the frame itself.
Avoid the mistakes that cause bad fits
- Measuring the glass instead of the frame opening. Glass size is not the same as the size you order.
- Taking only one width and one height reading. A frame that is off by even a small amount can still matter.
- Reading the outside trim instead of the inside jamb. Trim can add misleading width and height.
- Writing the numbers in the wrong order. Width comes first, height second.
- Rounding up when the opening is already tight. That is how a job turns into a return.
- Ignoring sagging sills, soft wood, or bowed jambs. A tape measure cannot fix damaged framing.
I have found that most measurement problems come from rushing, not from complicated math. A calm 10-minute check usually prevents an expensive correction later. With those mistakes out of the way, the last step is turning the numbers into the right order for the supplier.
Use the numbers the way suppliers expect them
Most window sellers in the United States want the final size written as width by height, not height by width. They may also ask whether the dimension is for an insert replacement, a full-frame replacement, or a rough opening. If you skip that detail, the numbers can be technically correct and still useless for the order.
For full-frame work, the opening usually needs a little clearance so the unit can be shimmed and fastened properly. In practice, installers often expect the replacement to be about 1/2 inch to 3/4 inch smaller than the rough opening, but I would still follow the product’s installation instructions rather than guess. That small gap is what gives you room for leveling, insulation, and a clean finish.
If you are comparing standard sizes, keep in mind that manufacturers may use shorthand size labels that do not match the exact tape measurement in a simple one-to-one way. That is another reason I never order from memory; I order from the written measurements and the project type.
Once those numbers are formatted correctly, the final check is less about math and more about discipline.
The last check I make before a window order goes in
Before I buy, I verify five things: the width, the height, the diagonals, the opening type, and the unit type. If any one of those is missing, I treat the order as unfinished. That habit is boring, but it saves time, money, and a lot of frustration on install day. If the opening is damaged or heavily out of square, I repair the frame first instead of hoping caulk will make up the difference.
- Width recorded in inches
- Height recorded in inches
- Both diagonals checked
- Replacement type confirmed
- Any damage, slope, or out-of-square condition noted
If the frame is sound, the numbers are consistent, and the product type matches the opening, the project is usually straightforward. If not, I slow down and verify the framing before anything is ordered, because that is where most avoidable window problems start.