A vapor barrier for crawl space moisture is one of the simplest repairs that can change how a house feels underfoot and in the air above it. When the soil below a home keeps feeding humidity into the framing, you get musty odors, tired insulation, and a crawl space that slowly turns into a maintenance problem. This article explains what the barrier actually does, which materials make sense, how installation should be done, and when drainage or full encapsulation is the better move.
What matters most before you cover the ground
- The barrier should stop ground moisture, not hide a water problem that still needs drainage or repair.
- For most homes, thicker reinforced polyethylene lasts longer than thin builder-grade plastic.
- Seams, wall terminations, and pipe penetrations matter as much as the sheet itself.
- A crawl space liner works best when the crawl space is kept dry and humidity is controlled.
- If there is standing water, active mold, or recurring condensation, the barrier is only part of the fix.
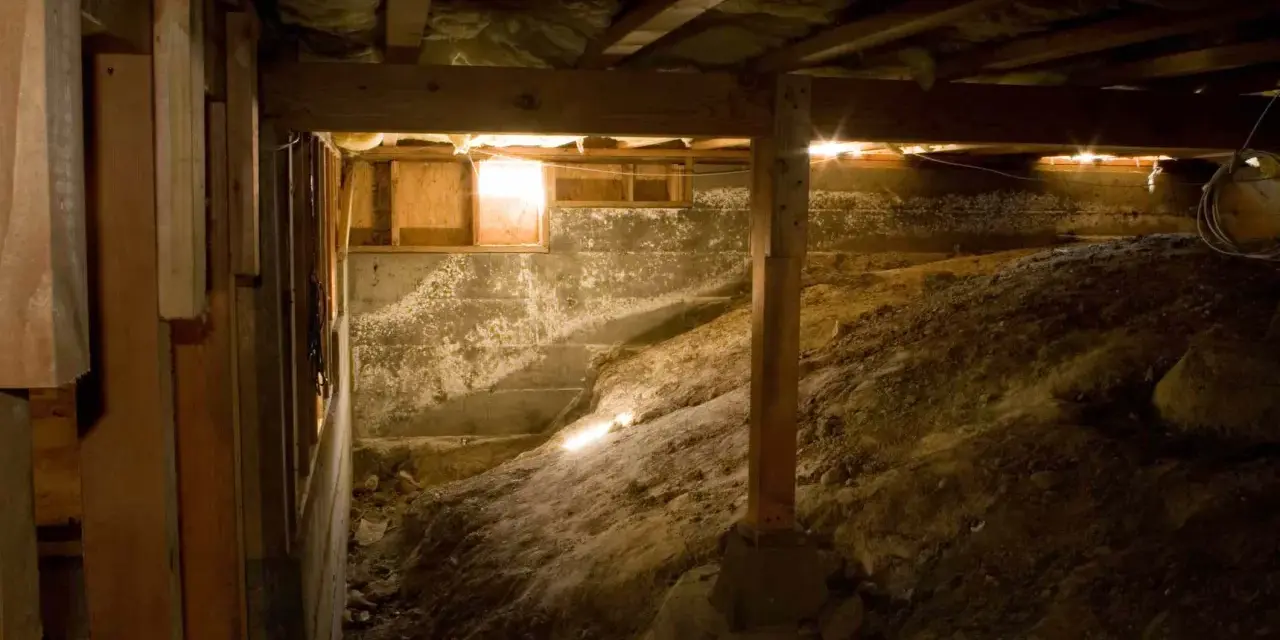
Why moisture under the house matters
I treat crawl space moisture as a house-wide issue, not a problem isolated to one dark corner. Soil under a home constantly releases water vapor, and that vapor rises into insulation, floor framing, and often the air you breathe upstairs. The result is often subtle at first: a little odor, a little softness in the air, and then wood movement, sagging insulation, or mold growth on joists and subflooring.
The U.S. Environmental Protection Agency is direct about this: moisture control is the foundation of mold prevention. In practice, that means you do not start with plastic alone if you already have leaks, groundwater intrusion, or rotten wood. You start by finding the source of the wetness, because a liner cannot compensate for a failing gutter, a broken drain line, or a crawl space that floods after every hard rain.
This is also where many homeowners misread the problem. A crawl space can look dry on the surface and still push enough vapor into the home to create humidity, odor, and energy loss. Once you understand that, the next step is choosing a liner that can actually hold up long enough to matter.
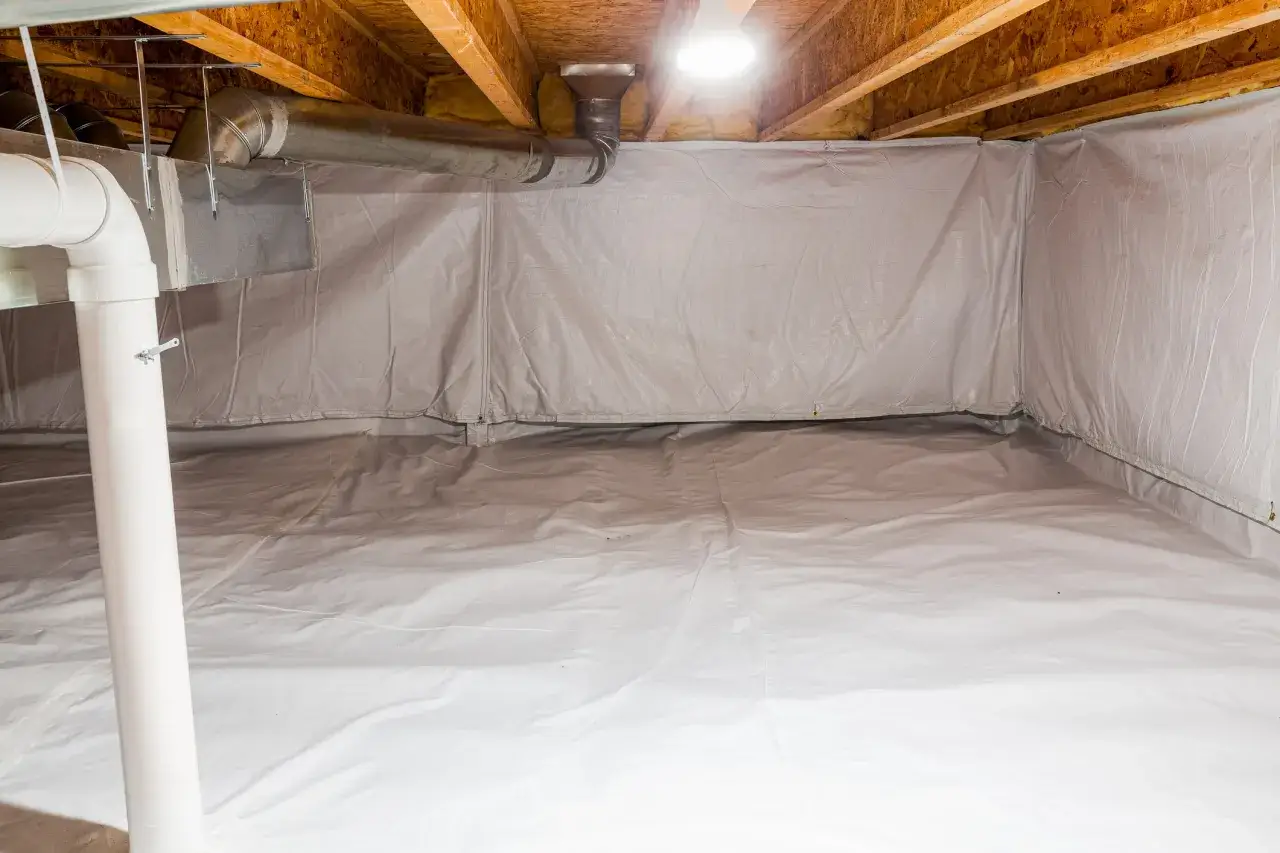
Which liner material actually holds up
The term vapor barrier is still common, but the technical term is vapor diffusion retarder because the material slows moisture movement rather than making it disappear. In crawl spaces, that usually means polyethylene sheeting installed on the ground and carried up the walls, piers, and columns. The U.S. Department of Energy recommends a minimum 6-mil ground retarder with a perm rating of 0.1 or less, plus 12-inch seam overlaps and at least 6 inches of vertical extension on walls and supports.
| Material | Typical thickness | Best use | What to watch |
|---|---|---|---|
| Basic polyethylene sheet | 6 mil | Low-budget coverage where traffic is rare | Easy to tear, easier to punch holes in during service work |
| Heavier reinforced poly | 10 to 12 mil | Most homes that need a durable ground cover | Costs more, but usually gives a better service life |
| Heavy-duty reinforced liner | 15 to 20 mil | Rough soil, frequent access, or long-term encapsulation | More expensive and heavier to handle, but resists damage better |
| Specialty crawl space systems | Varies | Projects that need wall sealing, drainage integration, or high durability | Usually best installed as part of a full moisture-control plan |
My own rule is simple: 6-mil is the baseline, 10- to 12-mil is the sweet spot for many homes, and 20-mil starts making sense when the crawl space gets regular foot traffic or you want a tougher long-term system. Thickness is not the only metric, though. A flimsy sheet with perfect seams is still flimsy; a better liner with sloppy installation can fail just as fast.
That is why material choice and installation have to be discussed together. The right sheet helps, but it is the way it is laid, sealed, and protected that determines whether it performs for years or tears apart in one season.
How to install the barrier without trapping problems
If I were doing the job from scratch, I would follow the same order every time: fix water entry first, clean and dry the crawl space, lay the liner, seal the overlaps, then inspect every transition point. Rushing the process is what creates callbacks and mold problems later. A crawl space should be dry before the ground cover goes in, not wet and “hopefully sealed” afterward.
- Remove debris, old insulation that has failed, and anything that prevents full ground coverage.
- Check for standing water, active leaks, or poor grading outside the home and correct those first.
- Roll out the liner so it covers the entire soil surface, not just the obvious open areas.
- Overlap seams by at least 12 inches and tape or seal them so the laps do not peel apart over time.
- Run the material at least 6 inches up foundation walls, piers, and columns, then fasten it securely.
- Seal around pipes, wiring, ducts, and other penetrations so air and vapor do not slip through gaps.
- Protect the liner in high-traffic zones if people or trades will keep entering the space.
The detail that gets skipped most often is the vertical turn-up at the walls and supports. Flat plastic on the dirt helps, but the moisture path is not only through the soil surface. It also comes through edges, seams, and penetrations. I also like to see mechanical fastening where needed, because adhesive alone does not always hold up in a damp, dusty crawl space.
If the crawl space has a low ceiling or awkward supports, take a little extra time on the layout. A neat installation looks better, but more importantly, it reduces the places where humidity can leak back in and undo the work.
Barrier-only protection vs full encapsulation
Not every crawl space needs the same solution. A barrier-only job is usually the right fit when the space is mostly dry, access is simple, and you mainly want to stop soil moisture from evaporating into the home. Full encapsulation goes further: the ground is sealed, vents are closed or managed, the walls may be insulated, and humidity is controlled with conditioning or a dehumidifier.
| Approach | Good fit for | Limitations |
|---|---|---|
| Barrier only | Homes with modest moisture and no active water entry | Does not solve drainage failures or high outside humidity on its own |
| Full encapsulation | Humid climates, chronic odor, HVAC in the crawl space, or recurring condensation | Higher cost and more components to maintain |
In much of the U.S., especially humid and mixed-humid regions, I am cautious about relying on vented crawl spaces to “dry themselves out.” Outdoor air can carry more moisture than the crawl space can handle, and when it hits cooler framing or ductwork, condensation starts. That is why the right answer is often not more outside air, but better moisture control and, in some homes, a sealed crawl space strategy.
If you are deciding between a simple liner and a fully conditioned crawl space, the real question is how much moisture pressure the house is dealing with. Once that is clear, the tradeoff becomes much easier to judge.
Mistakes that make the job fail early
Most failed crawl space jobs do not fail because the idea was wrong. They fail because a few important details were ignored. These are the mistakes I see most often:
- Installing thin plastic over a wet crawl space and assuming it will solve the problem.
- Leaving gaps at seams, corners, or around pipes so vapor can still move upward.
- Stopping the liner at the floor line instead of turning it up the walls and supports.
- Using tape or adhesive on dirty, damp surfaces that will not hold long-term.
- Ignoring damaged insulation, mold, or rotted wood that should be repaired before sealing anything.
- Covering soil while drainage, gutters, or downspouts are still dumping water near the foundation.
- Assuming the liner alone will solve radon, pests, or structural problems.
The last point matters more than people expect. A crawl space liner can be part of a radon strategy, but it is not a test result and it is not a substitute for proper mitigation where radon levels are high. The same goes for termites and other pests. Moisture control helps, but it does not replace pest management or structural repair.
When a crawl space fails after a barrier installation, the cause is usually one of those basic misses, not a mysterious product defect. That is why the final cost and the maintenance plan matter just as much as the material itself.
Cost, lifespan, and maintenance
For budgeting, I like to separate the project into three levels. A basic DIY ground cover can stay relatively inexpensive, especially in a small crawl space. Heavier reinforced liners cost more, but they usually last longer and hold up better during later inspections. Full encapsulation becomes a much bigger investment because it can add drainage, insulation, sealed vents, and a dehumidifier.
| Project level | Typical budget range | What drives the cost |
|---|---|---|
| Basic DIY liner | About $150 to $600 for many small to medium crawl spaces | Material thickness, access, and how much cutting and seam work is needed |
| Heavier DIY liner | About $400 to $1,200 | Reinforced material and extra sealing supplies |
| Professional barrier-only install | About $1,500 to $4,000 | Labor, cleanup, crawl space size, and detailing around piers and penetrations |
| Full encapsulation | About $4,000 to $15,000+ | Drainage, dehumidification, insulation, and vent or air-sealing work |
As for lifespan, I would think in decades only when the liner is thick, well-sealed, and protected from abuse. A 6-mil sheet can work, but it is the most vulnerable to tears. A 10- to 12-mil reinforced liner often gives a better balance of cost and durability. A 20-mil liner is the one I would lean toward when the crawl space is rough, busy, or expected to stay sealed for the long haul.
Maintenance is simple but non-negotiable: inspect the space at least twice a year, and again after major storms. Look for tears, loose seams, standing water, condensation on ducts, pest activity, and any new musty smell. If you add a dehumidifier, I want to see humidity held under roughly 60 percent, with no long stretches above that level.
Once the price and upkeep are realistic, the job becomes easier to judge on its merits instead of on the cheapest quote.
What I check before I call the crawl space finished
When a crawl space is truly under control, it looks boring. That is the goal. I want dry soil under the liner, sealed seams, no active water entry, and no damp odor drifting into the house. If the space still smells musty, if condensation is building on framing, or if the liner keeps shifting, something upstream is still wrong.
- Check gutters, downspouts, and grading before blaming the liner.
- Confirm that the seam tape or fasteners are still bonded after a few weeks.
- Look at the floor above the crawl space for cold spots, bounce, or insulation issues.
- Reinspect after heavy rain, because that is when weak points usually show themselves.
- Make sure maintenance access is still possible without ripping the liner every time.
That is the real value of a crawl space moisture project: not just a sheet of plastic, but a stable under-house environment that protects the framing, the air in the home, and the repairs you have already paid for. If you keep the drainage sound, the liner intact, and the humidity in check, the crawl space stops being a problem and starts doing its quiet job properly.