
Wood siding repair is one of those exterior jobs where the wrong shortcut looks fine for a month and then unravels. The goal is not just to make a board look better; it is to stop moisture, restore strength, and keep the wall system sound through rain, sun, and winter movement.
This guide shows how I decide between patching and replacing, how I handle damaged sections step by step, which materials actually hold up outdoors, what the repair may cost in the U.S., and how to keep the fix from failing early.
What matters before you start
- Cracks in solid wood are often patchable, but soft, swollen, or crumbling boards usually need more than filler.
- The real fix starts with the moisture source, not the visible damage.
- For shallow surface issues, exterior filler can work; for rot, you usually need to cut back to sound wood.
- Use exterior-grade caulk only where you created a new seam, then prime and paint the repair.
- Small jobs stay affordable, but rot that reaches sheathing, trim, or framing can push the scope into much bigger territory.
- Annual inspection, gentle cleaning, and fresh paint on schedule do more for durability than most patch products.
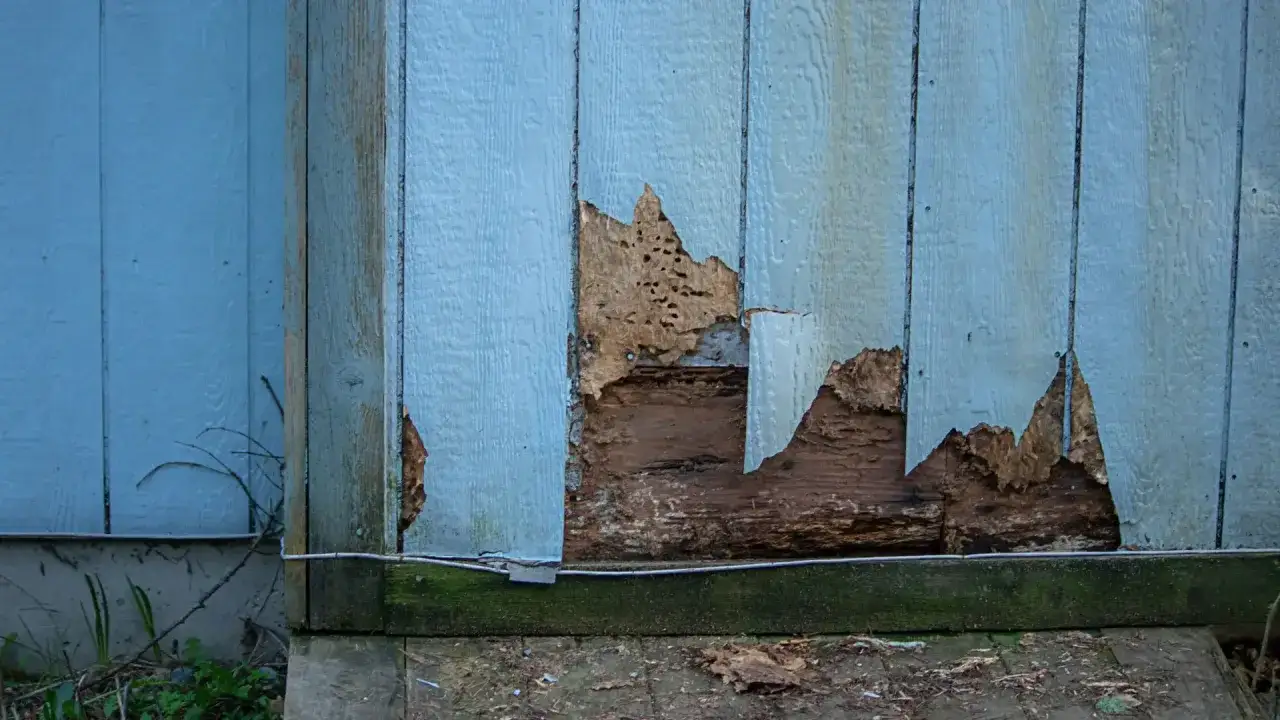
How to tell a patchable board from one that needs replacement
I start by testing the board, not the paint. If the surface is cracked but the wood underneath is still firm, a patch may be enough. If a screwdriver sinks easily, the board feels spongy, or the damage keeps coming back in the same place, I assume the problem is deeper than the finish.
| Condition | What it usually means | Best move |
|---|---|---|
| Hairline crack, dry edges, solid wood | Minor movement or age-related checking | Clean, fill, sand, prime, and paint |
| Localized soft spot with firm borders | Early rot or water entry at one point | Cut out the bad area and patch or splice in new wood |
| Board is swollen, warped, or cupped | Moisture has changed the shape of the lumber | Replace the board and check for the source of water |
| Multiple boards fail in the same zone | Persistent leak, bad flashing, or poor drainage | Repair the wall system, not just the surface |
| Rot near windows, doors, or roof-to-wall transitions | Water is likely entering from flashing or seal failure | Inspect flashing and substrate before cosmetic repair |
My rule is simple: if the wood is structurally sound, patching can work; if the wood is soft or the damage is spreading, replacement is the smarter fix. Once that call is made, the repair itself becomes much more straightforward.
How I would repair a damaged section step by step
A durable exterior repair is usually a sequence, not a single product. I want to remove decay, fit new material cleanly, seal the repair correctly, and finish it so the patch can survive weather instead of just hiding under paint.
- Find the moisture source first. Check gutters, downspouts, nearby sprinklers, failed caulk, and any flashing at windows, doors, or roof lines. If water is still getting in, the repair will fail again.
- Mark the full extent of the damage. Tap and probe the board until you reach sound wood on all sides. Cut slightly beyond the visible decay so you do not leave hidden rot behind.
- Remove the compromised material carefully. A pry bar, chisel, or saw can lift out the bad section without tearing up surrounding boards. Keep the good siding intact whenever possible.
- Repair the substrate if it is exposed. If the damage reaches sheathing, do not cover it and hope for the best. Patch the wall layer, then protect it again quickly so weather does not create a second problem.
- Fit the replacement piece. Use the removed board as a template when you can. Match the thickness, profile, and exposure so the new work blends with the existing siding.
- Fasten with corrosion-resistant nails. Stainless steel is a smart choice near salt air; galvanized fasteners are usually fine inland. Corrosion is a small detail that can shorten the life of an otherwise good repair.
- Seal the new joints, not the drainage path. Caulk the seams you created at the patch edges, but do not smear sealant across joints that are meant to shed water.
- Prime and paint all cut surfaces. Bare end grain drinks moisture fast. Prime first, then topcoat with exterior paint that matches the rest of the wall.
For shallow cracks, exterior wood filler can be enough. For rot, I prefer wood hardener or epoxy filler only after the area is completely dry and every loose, decayed fiber is gone. That distinction matters more than most homeowners expect.
The tools, materials, and cost range that make sense
You do not need a truck full of specialty gear, but you do need the right basics. The wrong filler or fastener can turn a clean repair into a repeated maintenance problem.
| Item | Why it matters |
|---|---|
| Pry bar, circular saw, chisel, utility knife | Lets you remove bad wood without destroying adjacent boards |
| Exterior wood filler or epoxy filler | Best for shallow damage and small voids |
| Wood hardener | Stabilizes small areas of weakened wood before patching |
| Exterior-grade caulk | Seals the edges of the repair against water intrusion |
| Stainless or galvanized nails | Resist rust and staining over time |
| Primer and exterior paint | Protects cut ends and blends the repair visually |
For costs, HomeAdvisor’s data puts damaged wood siding board replacement at roughly $6.25 to $18.75 per square foot, with minor fixes often landing around $100 to $200. In practice, a small DIY repair may stay inexpensive in materials, but the bill climbs when you need matching lumber, extra trim work, or access equipment for upper stories.
That cost gap is one reason I look closely at the wall itself, not just the face of the siding. Once decay moves beyond the board, the job stops being cosmetic and starts becoming structural.
When the damage is deeper than the siding
Some repairs should make you pause and look harder. If the board failure is near a window head, a deck ledger, a roof intersection, or the bottom edge where splashback is common, the visible damage may be only the symptom.
- Sheathing feels soft behind the siding. At that point, the wall layers need repair, not just the exterior face.
- Rot keeps returning in the same spot. That usually means water is still entering from above or behind.
- Multiple courses are warped or cupped. A local patch will not correct a broader moisture problem.
- The house is older and painted layers are failing repeatedly. On pre-1978 homes in the U.S., I treat sanding and scraping as a lead-paint issue until proven otherwise.
- The repair requires staging or major ladder work. Safety and access can matter more than the actual woodworking.
If you uncover damaged sheathing, protect the wall the same day with proper weather barrier or temporary cover. That is the part many people miss: once the siding is open, time matters. A quick cosmetic patch means little if the wall stays exposed overnight.
When the decay is broad, hidden, or tied to a flashing failure, I bring the repair back to the whole wall system instead of forcing a board-level fix. That mindset is what keeps a small problem from becoming a full elevation replacement.
The habits that keep the next repair from failing early
Good exterior maintenance is boring, and that is exactly why it works. Southern Living’s maintenance guidance lines up with what I see in the field: inspect regularly, clean gently, avoid aggressive pressure washing on wood, and repaint wood siding every five to ten years depending on climate and exposure.
- Clean the siding at least once a year so you can spot failed joints, peeling paint, and mildew early.
- Keep gutters and downspouts clear so water does not dump onto the wall.
- Trim shrubs, vines, and mulch back from the siding so moisture does not linger against the boards.
- Check caulk around the repair after hard rain, especially at corners and trim transitions.
- Watch the lower edges of boards, since that is where splashback and wicking often start the next failure.
- Recoat bare cuts and fresh patches promptly so end grain does not absorb water.
If I had to reduce the whole process to one rule, it would be this: remove every compromised section, solve the source of the moisture, and finish the wall like it still has to face real weather. That is what separates a quick patch from a repair that actually lasts.