Building an exterior access ramp is mostly a problem of slope, support, and weather management. This guide explains how to build a wheelchair ramp for a U.S. home, from measuring the rise and choosing the layout to framing, drainage, handrails, and the details that keep the ramp safe after rain or snow. I focus on the decisions that matter most outdoors: the right pitch, solid footing, slip resistance, and when a switchback works better than a straight run.
The essentials you need before starting
- Use 1:12 as the practical maximum slope and keep the ramp as gentle as the site allows.
- Plan 1 foot of run for every 1 inch of rise, then add landings at the top and bottom.
- Keep the clear width at least 36 inches and make the walking surface firm, stable, and slip-resistant.
- Provide handrails on both sides when the rise is more than 6 inches, with heights between 34 and 38 inches.
- Design for water first; outdoor ramps fail faster from pooling, ice, and settlement than from heavy use.
- For public or commercial entrances, ADA rules apply; for a private home, I still use those dimensions as the safest baseline.
What a safe outdoor ramp has to do
An exterior ramp has one job: it must make a height change feel predictable, not like an obstacle course. According to the U.S. Access Board, the core benchmark is a running slope no steeper than 1:12, a clear width of at least 36 inches, landings at the top and bottom, and no more than 30 inches of rise on one ramp run. Cross slope should stay at 1:48 or flatter so wheels do not drift sideways.
I treat those numbers as the floor, not the finish line. If I can make the ramp a little gentler than minimum, it usually feels better in daily use, especially for manual wheelchair users, older adults, and anyone pushing a stroller or cart. Outdoors, that margin matters because rain, snow, and grit make every small flaw feel bigger.
The other thing I watch closely is the route around the ramp, not just the ramp itself. A good design connects naturally to the door, porch, driveway, or garden path, because a technically correct ramp can still feel awkward if people have to make sharp turns or cross a slick landing to reach it. Once the performance target is clear, the next job is measuring the site so the ramp actually fits.
Plan the slope and footprint before you buy anything
I start by measuring the vertical rise from finished grade to the finished threshold, not from the visible step. That difference matters more than people expect, especially if the entry has been regraded, resurfaced, or fitted with a new porch surface. Then I calculate the ramp run using the simple 1:12 rule, which means 1 inch of rise needs at least 12 inches of ramp.
| Vertical rise | Minimum ramp run | Approximate footprint with 5-foot top and bottom landings |
|---|---|---|
| 6 inches | 6 feet | 16 feet |
| 12 inches | 12 feet | 22 feet |
| 18 inches | 18 feet | 28 feet |
| 24 inches | 24 feet | 34 feet |
| 30 inches | 30 feet | 40 feet |
That table assumes a straight ramp with 60-inch landings at both ends, which is the minimum I like to plan around for a permanent outdoor build. If the ramp has to turn, add a 60-by-60-inch landing where the direction changes. If the rise exceeds 30 inches, you need another run and another landing rather than one long steep stretch.
Before I commit to a layout, I mark the footprint on the yard with stakes and string. I also check door swing, porch posts, hose bibs, downspouts, tree roots, and the route for rainwater. If the straight run would swallow the whole yard, I stop and rethink the shape instead of forcing a bad solution into a tight space. That is usually the moment a switchback, landing platform, or modular system starts to make more sense.
I also check local permit rules and call for utility locates before I dig anything. That is not the glamorous part of the project, but it is a lot easier than rebuilding a ramp because a footing landed where it should not have. Once the footprint is fixed, the material choice becomes much easier.
Choose materials that survive weather instead of chasing the cheapest board
For outdoor ramps, I want materials that hold their shape, shed water, and keep a predictable walking surface when temperatures swing. The right choice depends on budget, how permanent the ramp needs to be, and how much maintenance you are willing to do over time.
| Material | Best for | Strengths | Tradeoffs |
|---|---|---|---|
| Pressure-treated wood | Budget-conscious DIY builds and custom layouts | Easy to cut, widely available, straightforward to modify | Needs sealing, inspection, and careful detailing around fasteners and ends |
| Composite decking on a treated frame | Homeowners who want lower maintenance | Weather resistant, comfortable underfoot, consistent appearance | Higher material cost and still depends on a solid frame below it |
| Modular aluminum | Fast installs or ramps that may need future reconfiguration | Lightweight, predictable parts, often quick to assemble | Upfront cost can be higher and the look is more utilitarian |
| Poured concrete | Permanent ramps with fixed site conditions | Very durable and low maintenance once installed correctly | Hard to modify later and expensive if the site is not prepared properly |
For most homeowners, pressure-treated wood or modular aluminum is the practical sweet spot. In 2026, Angi’s cost data puts a typical wheelchair-ramp installation around $2,292, with a common range of $1,122 to $3,594, and the total climbs quickly as the run gets longer or the site gets more complicated. That is why I always match the material to the footprint instead of deciding on price alone.
Whatever material you choose, use exterior-rated fasteners, galvanized or stainless connectors, and a walking surface that still has grip when it is wet. I also prefer supports that keep the structure out of standing water, because a ramp only feels solid when the frame stays dry and square. With the material selected, the actual build process becomes much more manageable.
Build the frame and deck in the right order
I build exterior ramps from the ground up, not from the doorway down. That keeps the slope honest and makes it easier to fix problems before the deck goes on.
- Set out the footprint with stakes, string, and a laser or long level. Mark the run, the landings, and any turn before digging.
- Build footings or piers below the local frost depth, then square and plumb the posts. In colder parts of the U.S., shallow supports are a common cause of heaving and seasonal movement.
- Install beams and rim members, then set the joists so the ramp maintains one consistent slope. Avoid improvised shims that create dips, humps, or twist in the walking surface.
- Attach the deck boards or ramp surface with exterior fasteners, keeping the surface even, dry-draining, and free of raised screw heads.
- Flash any connection to the house properly. If the ramp is attached to the structure, I want the water managed at the ledger, not trapped behind siding.
- Test the frame before adding handrails. A solid ramp should feel rigid, quiet, and predictable under load.
If you use a prefabricated modular system, follow the manufacturer’s span tables and support spacing exactly. That is one place where improvising rarely saves time, and it often costs more in the end. Once the structure is sound, the details that make the ramp usable day after day become much easier to get right.
Add handrails, curbs, and landings that make the ramp feel finished
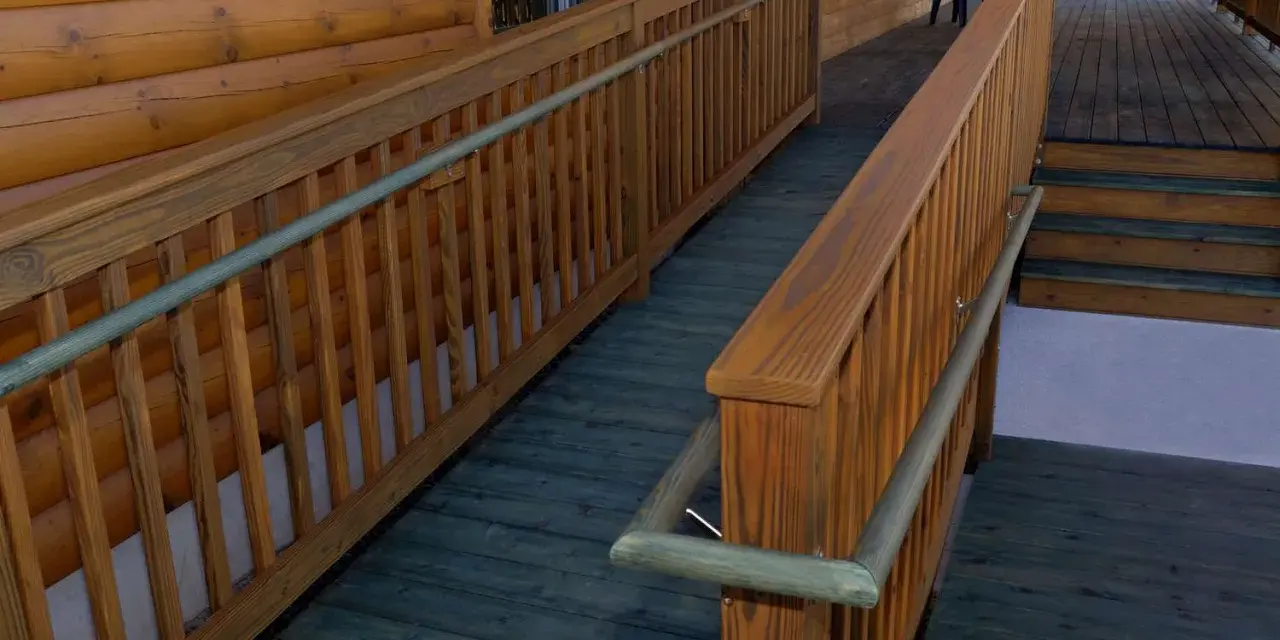
Handrails are not decorative on a wheelchair ramp. They give users a second point of contact, help with balance in poor weather, and make the route feel more defined. I install handrails on both sides when the rise is more than 6 inches, and I keep the gripping surface between 34 and 38 inches above the ramp surface. When possible, I also give the rails a 12-inch extension at the top and bottom so the handhold does not disappear exactly where someone needs it most.
Landings matter just as much. A ramp needs level landings at the top and bottom of each run, and when the direction changes, I want at least a 60-by-60-inch landing so the chair can turn without scraping a wheel against the edge. At a door, I check the swing carefully because a door that opens across the landing can make a technically compliant ramp feel awkward and cramped.
For edge protection, I prefer a curb, barrier, or extended surface along any open side where a wheel could drift off the edge. If I use a curb, I make it at least 4 inches high. That small detail prevents a front caster from slipping over the side and makes the ramp feel much less exposed, especially on narrow side yards or raised porches. Once those safety details are in place, the last big task is keeping the ramp usable through weather and wear.
Keep the ramp usable after the first storm
An exterior ramp can meet every dimension on day one and still become unpleasant if water pools on the landing or algae grows on the walking surface. Outdoors, maintenance is part of the design, not an afterthought.
- Check for pooling water after the first hard rain and again after the first freeze-thaw cycle.
- Sweep leaves, mud, and grit before they pack down into a slippery film.
- Watch shaded areas for moss or algae, because they can make wood or composite feel slick very quickly.
- Inspect fasteners, rail brackets, and footing alignment at least once a season.
- Recoat or reseal wood on schedule so the surface does not absorb water and swell unevenly.
In snowy climates, I also keep the clearing routine simple. A plastic shovel, a broom, and a deicer that is compatible with the surface are usually safer than aggressive chipping. The goal is to preserve the slope and the traction, not just to remove visible snow. After that, the remaining question is usually whether the project belongs in DIY territory at all.
What the project may cost and when I would hire a pro
For a simple exterior ramp, the price can stay surprisingly reasonable, but the total moves fast once the run gets long or the layout needs turns, rails, or custom footings. A straightforward wood build may be a manageable DIY project if the site is simple, yet a long or elevated ramp can become a structural job rather than a carpentry job.
I would bring in a contractor if the ramp needs to attach to a porch or foundation wall, if the footprint is tight enough to require switchbacks, if the site sits on a steep grade, or if the project needs permit drawings and inspections. I would also hire out a ramp that will serve a public or commercial entrance, because accessibility work is one area where a small mistake can become a real safety problem.
Modular aluminum ramps are often worth pricing when you need a fast install, a reversible layout, or a system you may reconfigure later. They are not always the cheapest path on paper, but they can save time and reduce guesswork when the site is awkward. For a private home, I usually choose the path that gives the most reliable slope with the least ongoing maintenance, not the one with the lowest day-one cost.
The final checks I would make before the first use
- Walk the ramp wet, not just dry, and feel for any slick spots or sudden shifts in slope.
- Test the top and bottom transitions to make sure there is no lip that catches a wheel.
- Confirm that the handrails feel solid and that the grip is comfortable from the first step onto the ramp.
- Look for standing water after a hose test, because drainage problems usually show up before structural ones do.
- Recheck the fasteners and brackets after the first week of use, especially on a wood ramp that may settle slightly.
A good exterior ramp is boring to use, and that is the goal. When the slope is gentle, the landings are flat, the surface stays dry enough, and the handrails are exactly where hands expect them, the ramp stops feeling like a project and starts functioning like part of the house. If you build it with weather, drainage, and daily use in mind from the start, it will stay useful long after the first season has passed.