A crack in a concrete slab foundation can be harmless shrinkage, or it can be the first visible sign that the soil under your home is moving. I’ll walk through how to read the crack, what usually causes it, which warning signs matter most, and when a simple seal is enough versus when a structural repair is the smarter move.
What matters most when a slab crack appears
- Hairline cracks are often shrinkage-related and may stay cosmetic if they do not widen or offset.
- Wider cracks, cracks that keep growing, or cracks paired with sloping floors and sticky doors point to movement under the slab.
- In U.S. homes, the usual culprits are soil settlement, expansive clay, poor drainage, and plumbing leaks below the slab.
- Small, stable cracks can often be sealed, while settled slabs may need slabjacking and active movement may need piers.
- The best first step is to measure, photograph, and monitor the crack before you patch it, unless water is already entering.
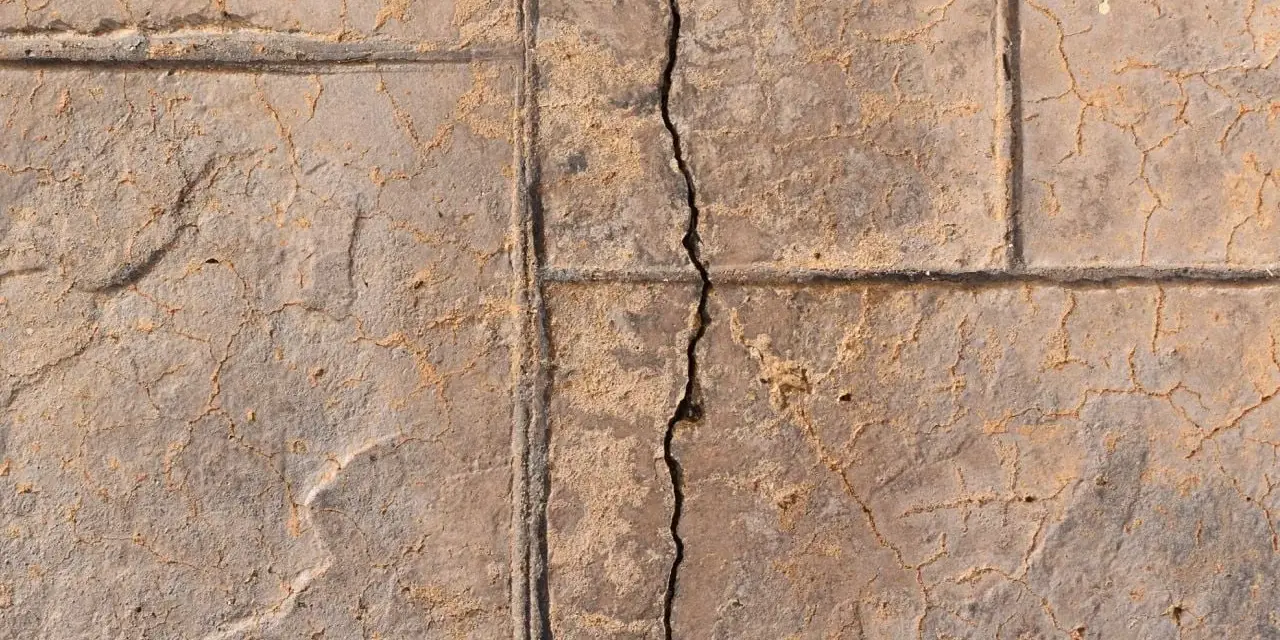
How to read the crack pattern before you panic
I do not judge a slab crack by appearance alone. I look at width, whether the edges are offset, and whether the line has changed since the last rain, drought, or temperature swing. A narrow crack that stays flat is a very different problem from one side of the slab lifting, dropping, or leaking water.
| What you see | What it often means | What I’d do next |
|---|---|---|
| Hairline crack with no height difference | Concrete shrinkage or minor settling | Mark it, photograph it, and monitor it for 30 to 60 days |
| Crack wider than about 1/8 inch | More than normal shrinkage, especially if it is new | Watch closely and get a pro opinion if it keeps changing |
| Crack wider than about 1/4 inch or growing | Active movement is more likely | Schedule an inspection rather than just sealing the surface |
| Crack with one side higher than the other | Differential settlement or heave | Check floors, doors, and nearby walls for related movement |
| Crack that is damp, stained, or musty | Water intrusion or a slab leak may be involved | Look for plumbing issues and drainage problems immediately |
One detail I pay close attention to is whether the crack runs through a control joint or cuts across the slab on its own. A crack that follows a planned joint is usually less worrying than one that ignores it and runs diagonally across the floor. That pattern often tells you the slab is responding to stress, not just drying out.
Once you can read the crack correctly, the real question becomes why the slab moved in the first place.
Why slab foundations crack in the first place
Concrete is rigid, so the slab does not forgive much movement underneath it. In much of the United States, the problem is not the concrete itself but the soil, water, or construction conditions below it. I usually think in terms of four main causes.
- Normal shrinkage - Fresh concrete loses moisture as it cures, and minor cracks can show up even when the slab was poured correctly.
- Settlement - If soil was not compacted well or the ground consolidates unevenly over time, part of the slab can sink.
- Moisture swings - Expansive clay soil swells when wet and shrinks when dry, and freeze-thaw cycles can add stress in colder states.
- Plumbing leaks or poor drainage - Water washing away support under the slab can create soft spots, while a hidden leak can keep one area saturated and unstable.
- Construction flaws - Poor compaction, weak subgrade prep, or bad backfill can set the slab up to move from day one.
There are also less common causes, such as tree roots pulling moisture out of the soil near the house, poor backfill around the perimeter, or a design mistake during construction. Rare material defects can also happen, but they are the exception, not the rule. Once the cause is clearer, the repair choice gets much easier to narrow down.
What I check before deciding on a repair
The first hour matters more than most homeowners think. I like to document the crack before anyone starts filling it, because patching too early can hide a problem that is still active.
- Measure the width at more than one point. A crack that is wider on one end often points to differential settlement.
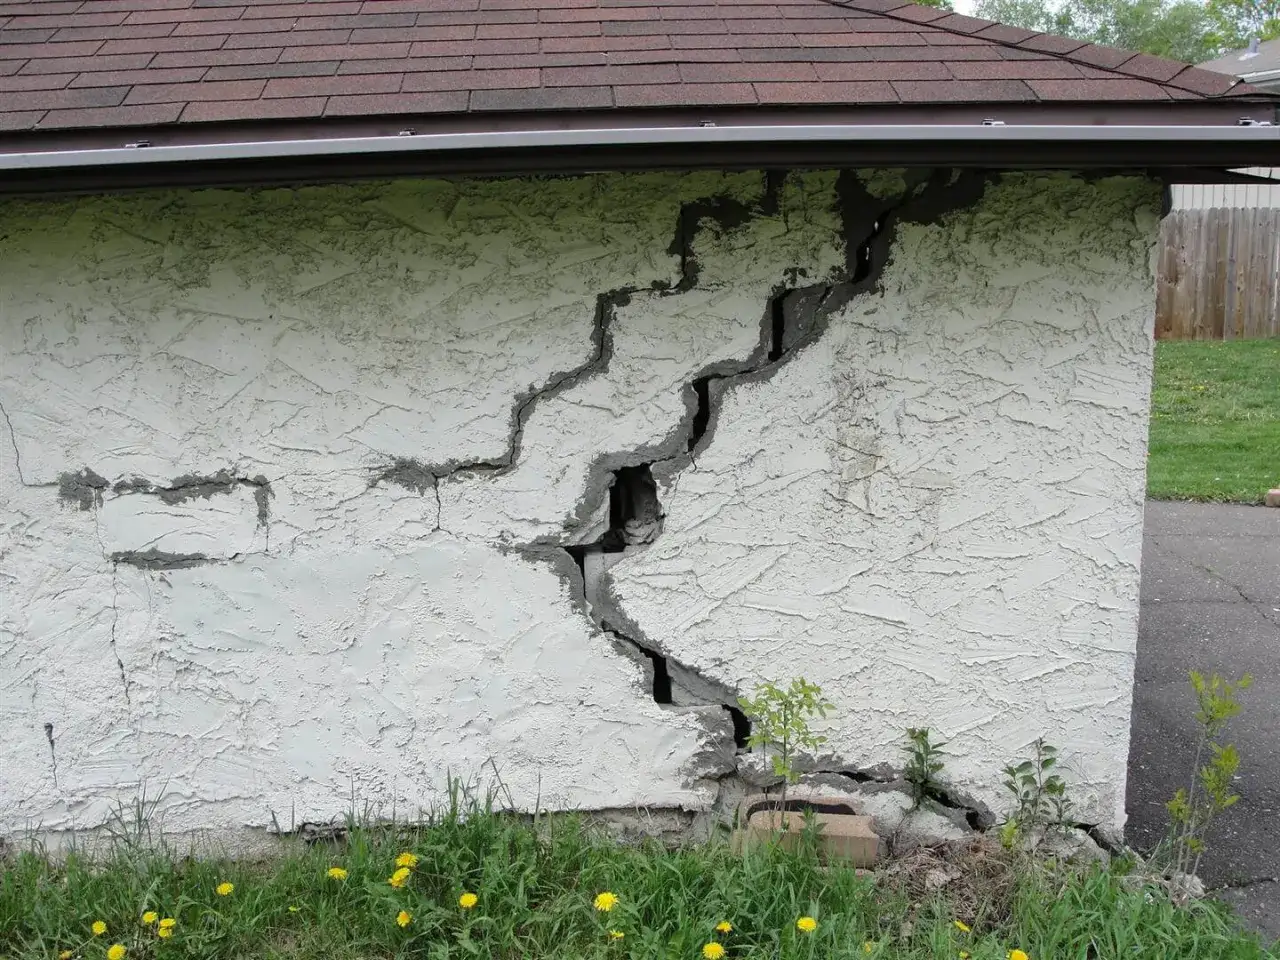
- Check for vertical offset. If one side of the crack sits higher than the other, the slab is no longer behaving as a single plane.
- Photograph the crack with a ruler or coin. Repeat the photo every few weeks so you can tell whether it is stable.
- Look around the house for clues. Sloping floors, sticking doors, cracked drywall, and gaps at trim usually mean the crack is not isolated.
- Rule out plumbing and drainage issues. If the area feels damp, the water bill jumped, or the crack leaks after rain, stop thinking cosmetic and start thinking source control.
- Confirm the slab type before drilling or cutting. On post-tension slabs, which are common in some newer U.S. homes, hitting a cable can turn a repair into a hazard.
If the crack is dry, flat, and unchanged, monitoring may be enough for the moment. If it is moving or wet, I move straight to the repair options that fit the cause.
Repair options that actually fit the problem
The right fix depends on whether you are sealing a stable crack, lifting a settled slab, or stabilizing active movement. The cost difference can be dramatic, so I prefer to match the repair to the symptom instead of buying the most aggressive solution by default.| Repair method | Best use | Typical U.S. cost | Main limitation |
|---|---|---|---|
| Sealant, epoxy, or polyurethane injection | Small, stable cracks and minor water intrusion | Often a few hundred dollars; DIY kits can be around $60 | Does not correct settlement or ongoing movement |
| Slabjacking or mudjacking | Sunken slab sections that are otherwise stable | About $550-$1,300 | Raises the slab, but does not solve the soil problem by itself |
| Piering or underpinning | Active settlement or a corner that keeps dropping | About $1,000-$3,000 per pier | More invasive and usually more expensive |
| Drainage correction or plumbing repair | Cracks driven by water around or under the slab | Varies widely | Must address the source or the crack can return |
| Exterior drainage and waterproofing work | Recurring moisture around the slab | Often around $2,300-$7,300 | Stops water, but not structural settling |
There is also an important material difference that gets overlooked. Epoxy is rigid and works well when strength matters, while polyurethane stays more flexible and is better when the main goal is to stop water. Neither one is a cure for a slab that is still moving. If the repair quote sounds cheap because it only covers the visible line, that is usually the point where I slow down and ask a few more questions.
When I would call a foundation pro immediately
Some slab cracks can wait. Others should not. The line between the two is usually not just width, but change and context.
- The crack is wider than about 1/4 inch or has widened noticeably over a short period.
- One side of the slab is higher or lower than the other.
- Floors are sloping, bouncing, or suddenly feel uneven.
- Doors or windows that used to work fine now stick or will not latch.
- The crack is wet, staining the floor, or accompanied by a musty smell.
- You suspect a slab leak because the water meter moves when every fixture is off.
- New wall or ceiling cracks appear at the same time as the slab crack.
In those cases, I would not spend much time on cosmetic patching. I would want a foundation contractor, structural engineer, or plumber to identify the cause first. A same-day plumber makes sense if the crack seems tied to a leak, while an engineering inspection is smarter when the slab itself looks like it is settling or heaving. That separation saves money because it keeps you from fixing the symptom and ignoring the source.
Once you know whether the issue is structural, moisture-related, or both, prevention becomes much more straightforward.
How to keep a small crack from turning into a bigger repair
The best prevention is boring, but it works. I focus on keeping moisture levels around the slab as consistent as possible and avoiding anything that creates one wet corner and one dry corner.
- Keep gutters clean so water does not overflow near the foundation.
- Make sure downspouts discharge away from the house instead of dumping at the slab edge.
- Fix plumbing leaks quickly, even if they seem minor.
- Keep soil from mounding against the slab so water can drain away.
- Trim back irrigation overspray and avoid soaking the perimeter every day.
- Watch seasonal changes. If the crack opens during dry spells and tightens after rain, the soil is probably doing the talking.
I also tell homeowners not to hide a recurring crack under paint or flooring until they know the movement is stable. A cosmetic cover-up can make the room look better while the problem underneath keeps spreading. Stability is the real target, not camouflage.
The details that make your next inspection more useful
If you end up calling a contractor, the notes you bring can change the quality of the estimate. I would keep a simple record of the crack width, the date each photo was taken, any rain or drought pattern, and whether nearby doors, floors, or trim changed at the same time.
- A close-up photo with a ruler in frame
- A wide photo showing where the crack sits in the room
- The exact date you first noticed it
- Any change after heavy rain, heat, or a dry spell
- Signs of plumbing trouble, moisture, or floor movement
- The home’s age and whether the slab is post-tension or standard
That kind of record keeps the conversation focused on the actual failure pattern, not just the line in the concrete. If the crack stays narrow and unchanged, you may only need monitoring and sealing; if it keeps moving, you will be glad you captured the early evidence before the slab told a bigger story.