Water around a skylight is rarely a single-surface problem. In most homes, the leak starts where the roof, flashing, underlayment, and skylight frame meet, which is why skylight leak repair usually means fixing the weatherproofing system, not just adding more caulk. This guide walks through how I diagnose the source, which repairs last, what they cost in the U.S., and when replacement is the smarter move.
The quickest route to a dry skylight is diagnosis, then the right fix
- Start inside, but do not assume the skylight glass is the leak source.
- Most real leaks involve flashing, underlayment, fasteners, or a failed curb detail.
- Caulk can help with a small edge gap, but it is not a durable substitute for proper flashing.
- If the unit is old, fogged, cracked, or leaking in more than one place, replacement may cost less in the long run.
- Most U.S. repairs land roughly in the mid-hundreds to low thousands, depending on access and how much roof work is needed.
Confirm that water is actually coming from the skylight
I always start with the simplest question: is the skylight leaking, or is something nearby making it look that way? Water can travel along framing, drywall, and insulation before it shows up as a stain, so the wet spot on the ceiling is not always the true entry point. That matters because the wrong diagnosis leads to the wrong repair, and the problem comes back after the next storm.
What points to a roof leak
- Water appears after heavy rain or wind-driven rain, not just in humid weather.
- The stain is strongest near the skylight shaft or the ceiling edge below it.
- Paint bubbles, yellow rings, or soft drywall appear after storms.
- You can see damaged flashing, lifted shingles, or debris packed around the unit from outside.
Read Also: Crystal Clear Pool Water - Your Ultimate Guide
What points to condensation instead
- Moisture appears on cold mornings or in high-humidity rooms such as bathrooms and kitchens.
- Water beads on the interior glass rather than running from the frame or ceiling edge.
- Fog forms between panes on insulated glass, which can signal a failed seal.
- The issue improves when humidity drops or ventilation improves.
If the roof is safe to access and dry, a controlled hose test can help narrow the source. I keep the water flow low and work in short sections, because a hard spray can force water into places a normal rain would never reach. Once you know where the water is entering, the repair becomes much more straightforward.
Why skylights leak in the first place
Most leaks do not begin with the skylight glass itself. They begin with the layers that are supposed to move water around the opening. In practice, I usually find one of a handful of failure points, and each one calls for a different fix.
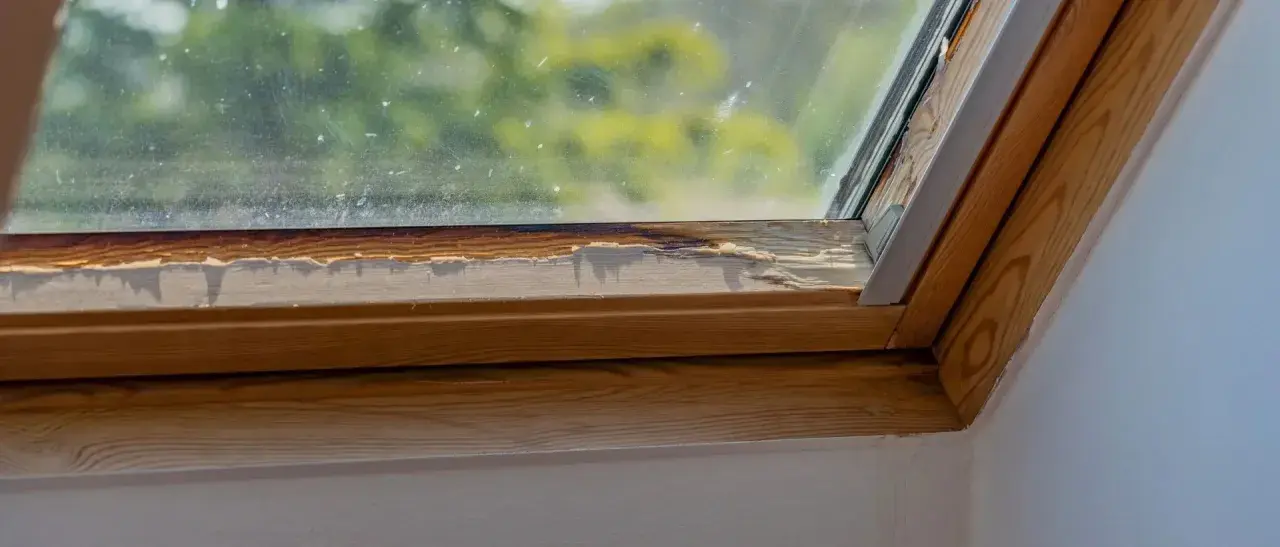
- Failed flashing - The metal flashing around the sides or top has loosened, corroded, or been installed in the wrong order. This is the most common structural problem because flashing is what sheds water away from the opening.
- Dried or cracked sealant - Sealant ages, separates, and loses flexibility under UV exposure. It can slow a leak, but it should not be the only line of defense.
- Clogged drainage paths - Some skylight designs use small drainage routes or weep holes. If debris blocks them, water can back up and enter the frame.
- Rotten curb or framing - On curb-mounted units, the wooden curb can soften or warp over time. Once that wood starts moving, the flashing cannot stay tight.
- Damaged shingles or underlayment nearby - The leak may start in the roof field above the skylight and run down to the opening.
- Ice dams or wind-driven rain - In colder climates, backed-up snowmelt can force water under the roofing layers. Strong wind can do the same on exposed roofs.
That breakdown is useful because it keeps you from treating every leak like a caulk problem. The next step is choosing a repair that matches the actual failure point, not just the visible stain.
How I would repair a typical skylight leak on an asphalt-shingle roof
For a common residential roof, I think in terms of layers. The goal is to restore the water-shedding system from the roof deck outward. A lasting repair usually involves removing enough roofing around the skylight to inspect the curb, underlayment, and flashing sequence, then rebuilding that assembly correctly.
- Stop the interior damage first - Catch active drips, protect floors, and dry out the room. If the drywall is soft or swollen, let it dry fully before patching it.
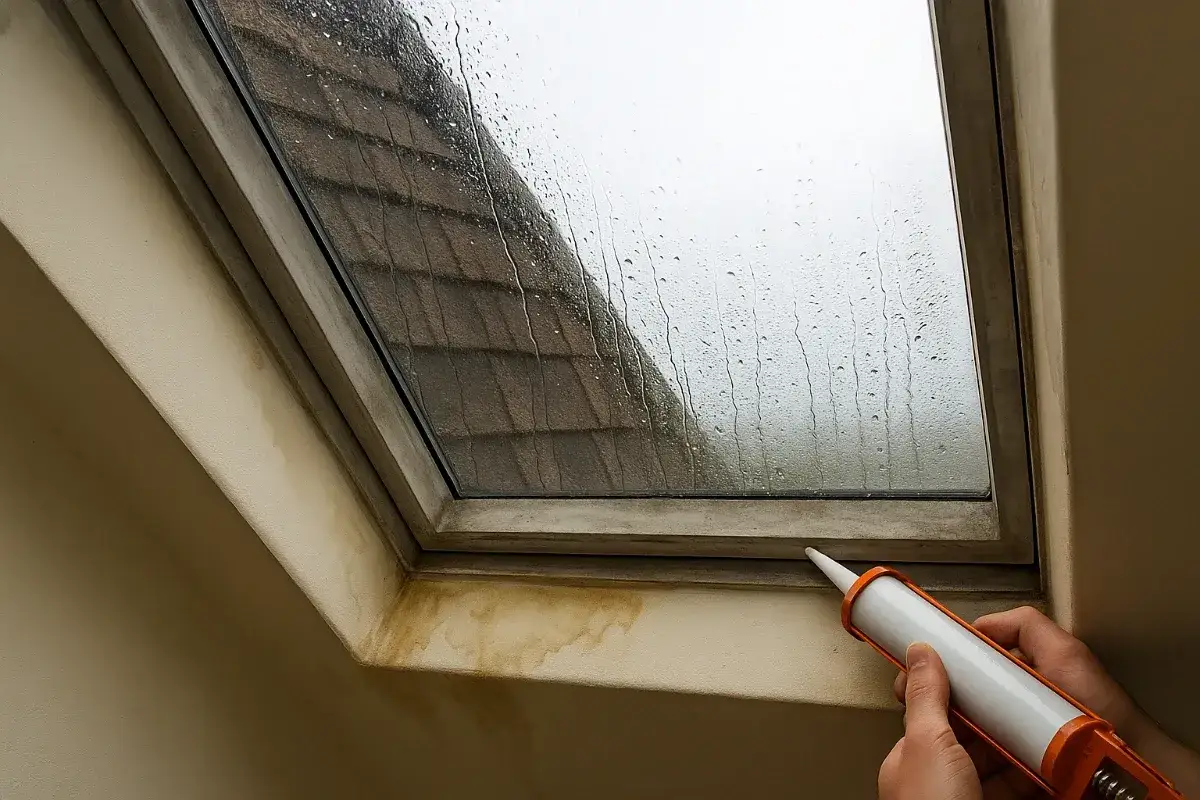
- Expose the problem area on the roof - Remove nearby shingles carefully so the flashing and underlayment can be inspected. Surface sealant alone will not tell you what is happening underneath.
- Check the curb and framing - If the wood is rotten, the repair starts there. New flashing on a damaged curb is wasted effort.
- Replace the waterproof membrane - The underlayment around the opening should be continuous and sound. This layer is what gives the flashing system a backup barrier.
- Install flashing in the right order - The bottom flashing goes first, then the side pieces, then the top piece. Water must always be able to move downward and outward without getting trapped behind metal.
- Reset shingles with clean overlaps - Shingles should cover the flashing without blocking drainage paths. Nails belong where they will not become water channels.
- Test the repair after it cures - I prefer a careful recheck after the next rain, or a low-pressure hose test if conditions allow.
On tile, metal, or low-slope roofs, the details change, but the principle does not: the repair has to guide water around the skylight, not try to hold it back with sealant alone. That leads directly to the bigger decision most homeowners face - patch, reflash, or replace.
Which repair method actually lasts
There is a big difference between a temporary stopgap and a repair that buys you years of dry weather. I look at skylight work in terms of durability, not just immediate appearance.
| Method | Best for | Typical durability | My take |
|---|---|---|---|
| Caulk or sealant touch-up | Small corner gaps, fastener heads, a short-term emergency patch | Weeks to months, sometimes longer if the underlying system is still sound | Useful as a temporary measure, but not a real cure for a failed flashing system |
| Partial flashing repair | Localized damage where the skylight and roof structure are otherwise healthy | Can last years if installed correctly | A solid option when the leak is truly limited to one section |
| Full reflash with new membrane | Most recurring leaks caused by poor water shedding around the opening | Long-term, especially when tied to sound roofing and framing | This is usually the best value when the skylight itself is still in good shape |
| Full skylight replacement | Old units, cracked frames, fogged glass, failed seals, or repeated leaks | Longest-lasting option when matched with a proper flashing kit | More expensive up front, but often cheaper than repeated repairs |
The line I use is simple: if the repair depends on resealing the same weak detail over and over, it is probably not the right repair. A proper flashing rebuild is what makes the difference between a dry ceiling and another stain next season.
When repair stops making sense
Sometimes the cheapest quote is not the cheapest outcome. If the skylight is near the end of its service life, repair can become a holding pattern instead of a solution. In many U.S. homes, I start thinking seriously about replacement when one or more of these are true:
- The skylight is roughly 15 to 25 years old, or older.
- There is fogging or moisture between the panes.
- The curb, frame, or surrounding wood is soft, cracked, or stained.
- The leak returns after heavy rain even after prior sealing work.
- The roof itself is due for replacement, so the skylight flashing would need to be disturbed anyway.
Replacement also makes more sense when the skylight has a history of patched leaks. In that situation, I would rather invest in one clean installation than spend money on repeat service calls and interior drywall fixes.
What homeowners in the U.S. usually pay
Costs vary by roof pitch, skylight size, material, and access, but there are realistic ranges most homeowners can use for planning. Labor often runs about $50 to $100 per hour, and interior patching can add to the total if the leak has already reached the ceiling.
| Work type | Typical U.S. range | What drives the price |
|---|---|---|
| Minor reseal or small leak stop | $250 to $600 | Accessibility, cleanup, and whether the fix is truly minor |
| Flashing repair or reflash | $450 to $1,500 | How much roofing must be removed and rebuilt around the opening |
| Skylight replacement | $1,000 to $3,500+ | Unit type, roof complexity, labor, and interior touch-ups |
| Drywall and paint repair | $100 to $1,000+ | How far the water traveled and whether insulation was damaged |
For a homeowner, the important detail is this: a cheap surface repair can look attractive until you add a second service call, interior patching, and hidden water damage. Once those costs stack up, the better repair is often the one that addresses the roof assembly correctly the first time.
How to keep the leak from coming back
Once the skylight is dry, I want the fix to stay dry. That means maintenance needs to focus on water flow, not just the glass.
- Clear leaves, pine needles, grit, and moss from the skylight perimeter and gutters twice a year.
- Inspect the flashing after hail, high winds, or a hard freeze-thaw cycle.
- Keep bathroom and kitchen humidity under control so condensation does not get mistaken for a roof leak.
- Do not pile on sealant where water should actually be draining.
- When reroofing, replace the skylight flashing at the same time instead of reusing tired materials.
If the inside stain is old but the leak has stopped, I still watch it through at least one or two storms before closing up the drywall. That extra patience is usually cheaper than repairing the same ceiling twice.
When patching stops being the right fix
My rule is simple: if the leak traces to one failed flashing detail and the skylight is otherwise healthy, I repair the assembly correctly and move on. If the unit is old, fogged, cracked, or leaking from multiple points, I stop patching and plan for replacement during the next roof service window. A solid skylight leak repair protects the roof deck, insulation, and drywall, and that is the outcome that actually lasts.